¶ From a Storage Server
Revision date: 30/sep/2024
System version: 2024.08.00
-
In the Navigation menu (left of the screen) click the “INPUT/OUTPUT” module and then on “Files”;

-
In the options list area (lower-left corner) click the “Add”
 button to configure the location;
 -
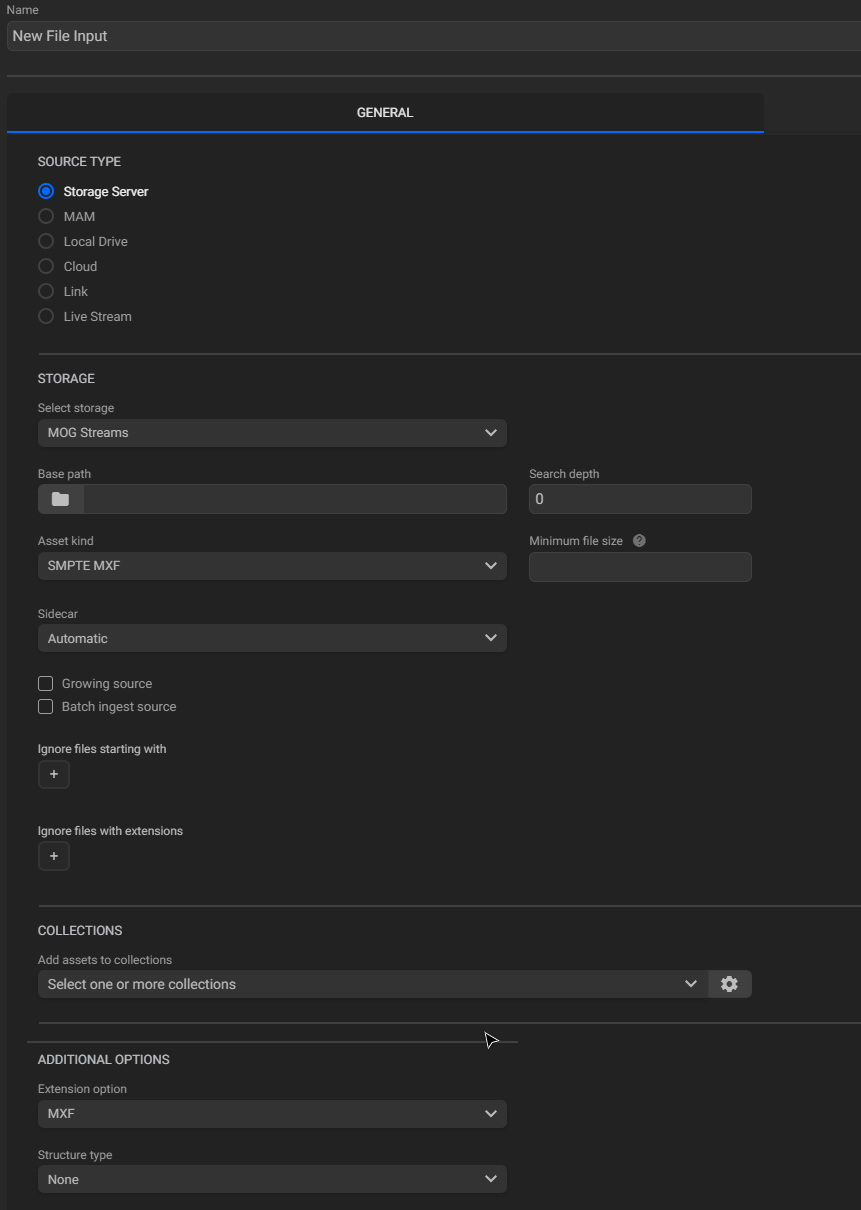
In the “GENERAL” tab fill in the form with the information below:

-
Name: enter the location name;
-
Source type: select the storage type to be used to configure the location;
-
Select Storage: select the storage source, from the available storages (Chapter "Adding Storage");
-
Base path: enter the base path of the target folder, inside the network drive. Leave it blank to have access to the entire drive;
-
Search depth: choose the depth of the file search inside the folder path provided. Inputting “0” means that the search is made, only inside the folder named on the “Base path” field; “1” means that the search is made inside the named folder and in its subfolders, and so on. To search inside the named folder and in all its subfolders a “-1” value should be inputted;
-
Asset kind: select the type of asset to be searched for. Depending on the asset kind, the following options might be:
-
Growing source checkbox: enable this checkbox if the input files are growing-files;
-
Batch ingest source checkbox: enable this option if the input files are from batch ingest source files;
-
Minimum file size: enter the minimum file size in megabytes (MB) for detecting and showing files. Notice that this field isn't available for "Avid Clip" or "Avid Sequence" asset kinds;
-
Sidecar: choose from the existing options the sidecar file format or select "Automatic" to have it automatically identified;
-
EDL kind: choose from the existing options the kind of Edit Decision List (EDL) for the input files;
-
Image formats: (for “Image” asset kind) select from the existing options the input image format;
-
Ignore files starting with: to ignore files that start with an entered string, click on the "Add" button and type in the desired text. To delete any entry, click the "Remove" button;
-
Ignore files with extensions: click on the "Add" button so that the file location ignores assets with the chosen extensions. Click the "Remove" button to delete any input;
-
Extension Option: select from the existing options the type of file extension to be indexed if your directory has more than one file extension;
-
Structure Type: select from the existing options the necessary structure in case your files are in card structure.
-
-
Add assets to collections: select one or more collections to which assets will be sent after being indexed.
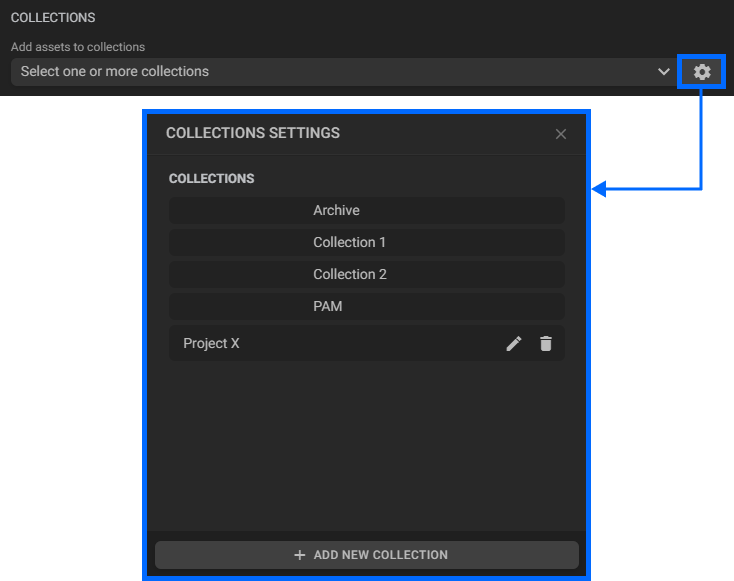
It is possible to edit and delete collections created by the current logged-in user or add new collections directly from the location form. To do this, click on the "Collections Settings" button
 as shown below:

To edit an existing collection, click on the "Edit" button
 . To delete a collection, click on the "Delete" button
  , and to add a new collection, click on the "Add new collection" button at the bottom of the window.
Please refer to page "Managing Collections" to find out more about adding and editing collections.
-
-
In the "Metadata" tab configure the behavior of the metadata of the assets stored in your location:

-
Extraction mode: select how metadata will behave;
- None: will extract only the basics metadata from the video assets;
- Metadata: will extract only the metadata from the video assets;
- Metadata and thumbnail: will extract only metadata and thumbnails from the video assets;
- Metadata, thumbnail and video preview: will extract all metadata from the video assets, including thumbnails and video thumbnails.
-
Video thumbnails duration: enter the desired duration (in seconds) for the video thumbnails;
-
Discard timecode track: check this box to discard the original timecode track.
- Timecode reading mode: when playing an SMPTE MXF asset and the “Discard timecode track” option is enabled, you can choose which timecode track will be read. The possible values are:
- Auto: the default value. With this option, the timecode track will be discarded;
- Material package: read the timecode from the material package track;
- Source package: read the timecode from the source package track.
- Timecode reading mode: when playing an SMPTE MXF asset and the “Discard timecode track” option is enabled, you can choose which timecode track will be read. The possible values are:
-
-
In the action toolbar (bottom right corner) click the “SAVE” button to save the settings.
Note: there is another similar option to preserve the timecode track in the record and ingest workflows. If both are defined, the selection made in the workflow takes precedence.
For instance, if the file input is configured to discard the timecode track, but in the ingest workflow the option to preserve the timecode is selected, the timecode track will be preserved.