¶ Playout Control
Revision date: 21/jan/2025
Software version: 2024.11.00
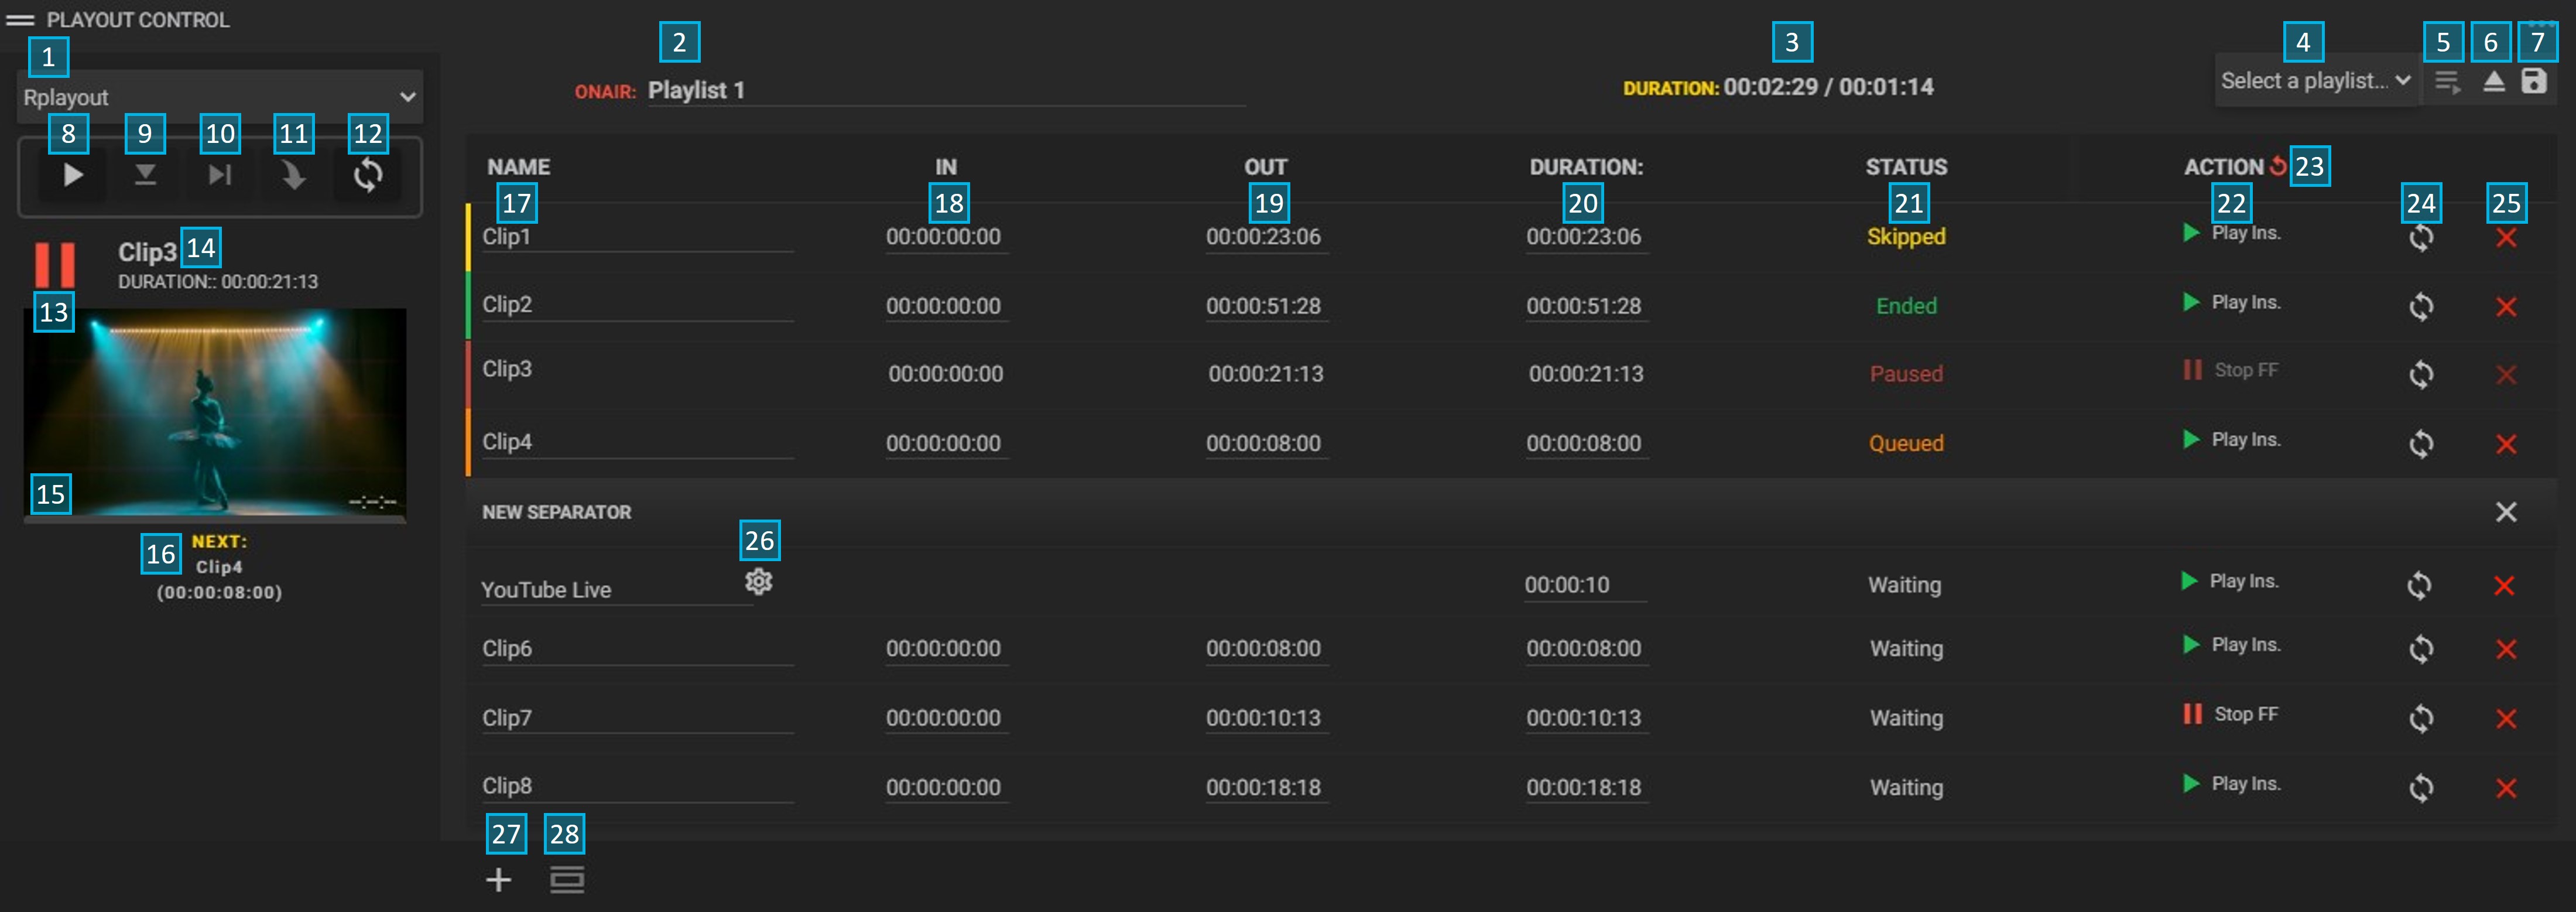
The “Playout Control” widget is responsible for handling the playlists playout. The default state of the playback control widget is an empty playlist. Adding clips can be done by the “Asset Selection” widget or by selecting an existing playlist via the “Select a playlist” field.
To configure the playout control, it is necessary to select the service that will be used. For that, go to the widget configuration (chapter “Widget Settings”).
- Select playout service: click to select service for video playout;
- On air: shows the name of the playlist currently on air. Click the name to change it and then click the “Save” button to update the playlist;
- Duration: shows current clip duration and remaining time;
- Select a playlist: select from the available pre-configured clip lists;
- Load playlist: load the selected playlist;
- Unload playlist: removes the playlist from the “Playout Control” widget;
- Save/Update playlist: click to save updates to the playlist. Updates will also occur in the “Playlist Builder” widget;
Note: when creating the playlist directly from the playout control, remember to enter a name for it in the “On Air” field and click the “Save” button to save the playlist, otherwise it will be lost;
-
Play/Pause event: play or pause the playlist playout;
-
Queue Clip: put the selected clip as the next in the queue;
-
Skip: skips the currently playing clip;
-
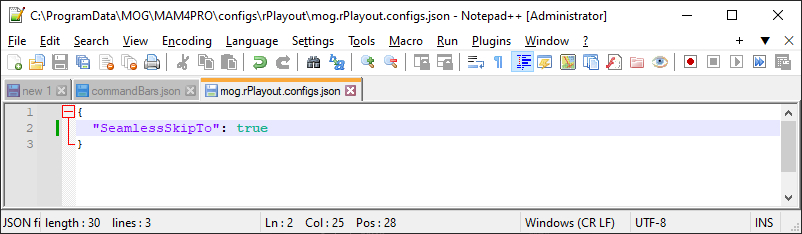
Jump to: click this button to load and play the selected clip. By default, after clicking, there will be a few black frames until the next clip is loaded and starts playing. Alternatively, you can configure the behavior so that after clicking the “Jump to” button, the previous clip continues to play until the selected one is fully loaded and starts playing.
To change the default behavior, edit themog.rPlayout.configs.jsonfile located inC:\ProgramData\MOG\MAM4PRO\configs\rPlayout, and add the following code:{"SeamlessSkipTo": true}:
-
Loop: loops the playlist;
-
Clip Status: shows the status of the current clip;
-
Playing clip information: shows the name and duration of the current clip;
-
Thumbnail: shows the thumbnail and elapsed time of current clip;
-
Next clip info: shows the name and duration of the next clip;
-
Name: clip name. Click to edit this field;
-
In: start timecode. Click to edit this field;
-
Out: end timecode. Click to edit this field;
-
Duration: clip duration. Click to edit this field. When editing this field, the “Mark out” field will be changed to correspond to the chosen time;
-
Status: shows the current status of the clip. They can be “Ended”, “Playing”, “Queued”, “Waiting”, “Paused”, and “Failed”;
-
Action: click to switch between “Play instantly”, “Stop on first frame” and “Stop on last frame” actions. When choosing the “Stop on first/last frame” options, the status will remain as “Paused” until the “Play” button is clicked;
Note: it is not possible to change the action of a clip being played or paused.
- Reset all actions: reset all configured actions to “Play instantly”;
- (Loop): loops the clip;
- Delete or bypass clip: delete or bypass clips. By clicking on this button, a pop-up will be presented to choose between deleting the clip from the playlist, or just bypassing it without removing it, which will allow you to jump to it later. By clicking on this button with the “Bypass” status active, the clip will no longer be ignored;
Note: it is not allowed to delete the last clip from the list if it is already in the queue.
-
Settings: opens the live clip edit form. It is the same form presented in the “Add clip” field, “Live” option;
-
Add clip: click to add a new clip to a playlist. By clicking on this button, two options will be presented, “Clip” and “Live”. By selecting the live option, a form will be presented to configure the entry:
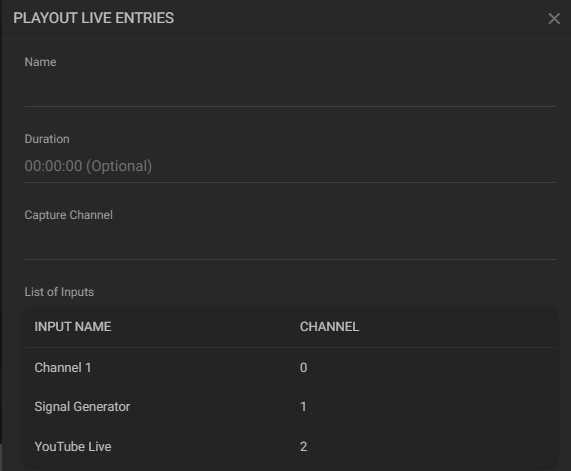
a. Name: enter a name for the clip;
b. Duration: set the clip duration. If there is no duration, it will play until there is some user action;
c. Capture channel: enter the capture channel number where the stream is configured. This number can be found in the “Channel” column of the input list below. -
Add separator: adds a separator to split the playlist. To do this, simply select a clip and click the button. The separator will automatically be created above the selected clip. Click on the name of the separator to edit it.
When selecting a clip, note that on the right side of the “In” and “Out” fields a button will appear, which are identified below:

- Jump mark in3: jumps to the mark in of the selected clip. It is necessary to configure a player with the rPlayerWeb service enabled. In it, the asset will be reproduced for checking and editing the start marking;
- Jump mark out3: jumps to the mark out of the selected clip. It is necessary to configure a player with the rPlayerWeb service enabled. In it, the asset will be reproduced for verification and editing of the end mark;
Tips:
You can easily change the order of the clips by dragging and dropping them;
It is possible to add an asset to the “Playout Control” widget by dragging and dropping it from the “Asset selection” widget;
To edit the start and end mark of a clip, click on the “Jump mark in” or “Jump mark out” button and the asset will be played from the start or end point, respectively. In another player on the same dashboard, which must be configured with the “Web Editor” command bar, click on the “Mark in” and “Mark out” buttons to make editing effective.
Adding live as a clip will only work for mDECK models.
¶ Widget Settings
There is also an extra “Settings” window, to access it, in the upper right corner of the widget, click on the Options menu and then on Settings.
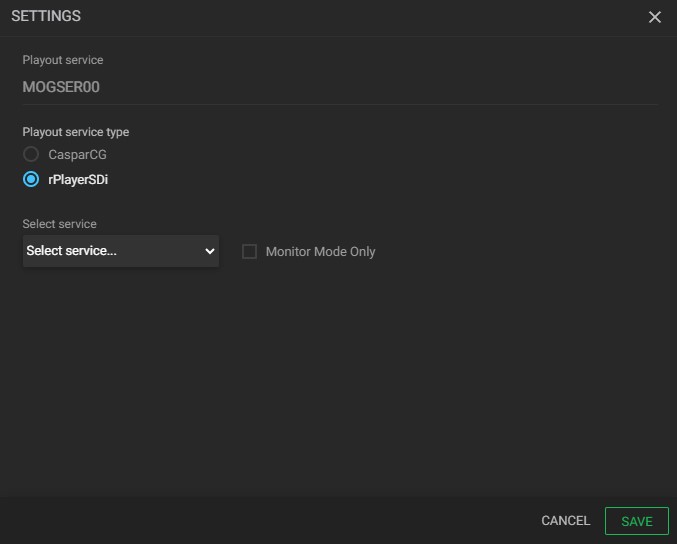
- Playout service type: choose the kind of playout service;
- Select service: click to select service for video playout (for rPlayerSDI Playout service type);
- Monitor mode only: by checking this option, you can load playlists and add new clips to the ongoing playout directly from the Asset Selection widget (for rPlayerSDI Playout service type);
- Hostname: click to select the Caspar hostname (for CasparCG Playout service type).