¶ Digitizing VTR Archives
Revision date: 18/sep/2024
Software version: 2024.08.00_ed07c3a1_dev
With the MAM4PRO’s batch capture feature, capturing lists or batches of clips from videotape is an easy task.
The batch capture feature works when using a VTR and enables users to create clip lists, configuring the system to automatically capture them. Even if the system isn’t connected with a VTR, it is possible to proceed with offline batch captures. It is also possible to configure a series of parameters that define when the recording will start, skip to the next clip, and stop.
There are 3 ways to do batch capture. They are:
-
Online: based on the in and out timecode of the clip list, the system automatically controls the VTR and captures the clips;
-
Offline: you can still create your clip list and afterward, when MAM4PRO detects the VTR connection, the capture will automatically take place;
-
Automatic: the system will start recording whenever it detects a pre-defined number of uninterrupted frames. The system will then continue to record until it finds a timecode jump. If the timecode jump is longer than a pre-determined number of frames, the capture stops, and a new clip will be recorded as soon as some consecutive frames are detected, restarting the cycle. The batch capture cycle is only interrupted after the system detects invalid or repeated (e.g., if the tape comes to an end) timecodes for longer than a predetermined number of frames (all these features are configurable through the workflow).
Here’s how to try them out!
-
First, add a recording workflow in the “Workflows > Workflow Profiles” menu:

-
In case of using batch capture in automatic mode, determine the parameters in the “Advanced > Record” tab:

The values to be set here are (in frames):
- Start: the number of consecutive frames required to start recording a new clip;
- Tolerance: the gap between timecodes to consider two non-consecutive frames;
- Stop: the number of frames, after detecting a non-consecutive timecode, required to stop recording (repeated or invalid timecodes are also considered non-consecutive frames). The capture will only be stopped if, after the given frames number, the gap between the expected (assumed continuous) timecode and the current timecode is still larger than the tolerance setting;
- Capture timeout: the number of consecutive invalid or repeated timecodes required to stop recording and end the current batch capture operation.
-
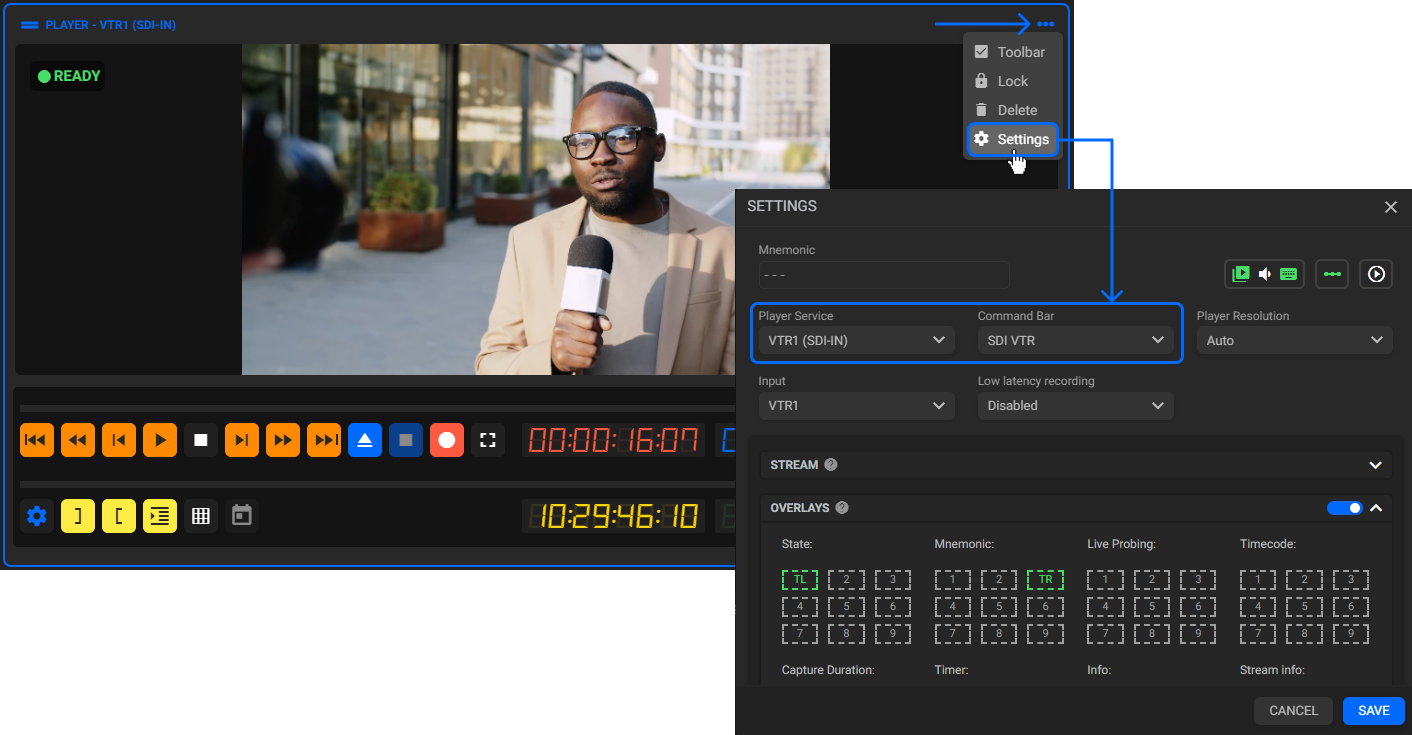
After the workflow, configure the “Player” widget to receive the signal from the VTR and, for online and offline modes, choose the command bar “SDI VTR” to create the clip list:

-
To create the clip list, through the “Player” widget, click “Mark In” and “Mark Out” button at the start and end points of the clip and click “Add to playlist builder” to build the clip list in the “Playlist Builder” widget:

-
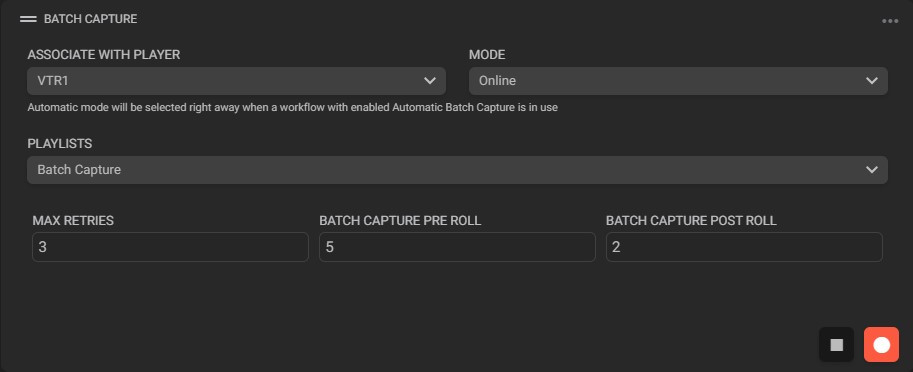
Having created the list and the workflow, it’s time to start recording. To do this, just configure the “Batch Capture” widget.
In the “Associate with player” field, select the player that is receiving the signal from the VTR, and in the “Mode” field select how the batch capture will be executed.
Depending on the chosen mode, new fields will be presented to fill in:

The fields could be:
- Max retries: it is the number of times the batch capture will try to position correctly. This function is very important when using a device with unstable connectivity;
- Batch capture pre roll: define the number of seconds before the initial timecode, where the batch capture will begin to record;
- Batch capture post roll: define the number of seconds after the end timecode, where the batch capture will stop to record.
After configuring the “Batch Capture” widget, click “Start Batch Capture” to start recording.
Note: when capturing, you will not be able to edit the clip list. From this point, the only possible user interaction will be clicking the “Stop" button. This option will effectively stop all current and pending clip captures.

