¶ Player
Revision date: 19/nov/2024
Software version: 2024.09.00
The player widget is used to recording operations and to preview the signals and files. This widget is highly customizable. To find out how to do it, see the next sub-chapter.
¶ Widget Settings
With the “Settings” option, you can easily configure the Player according to your needs. To access it, in the top right-hand corner of the widget, click on the “Options” button ![]() and then on the “Settings” option.
and then on the “Settings” option.
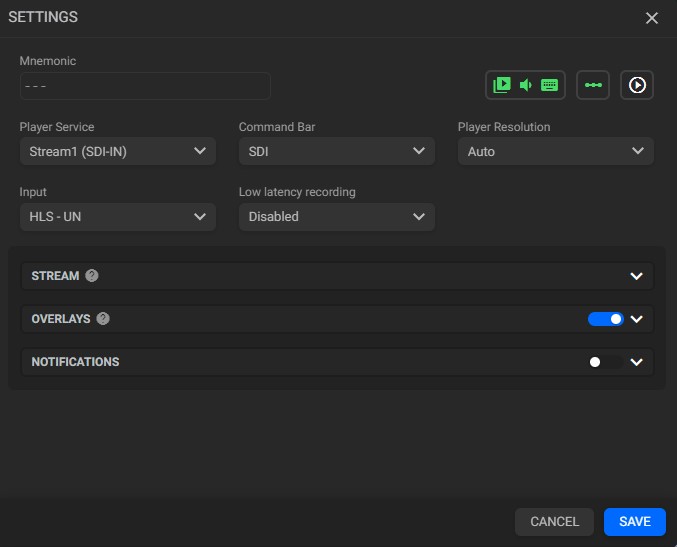
To better understand the “Player” widget settings let’s divide it into three areas as show in the image above:
 |
¶ Main Settings |
- Mnemonic: useful to enter a player’s unique name;
- Player service: select which of the available capture, playout, or file-based web monitoring services will be used for input, output, or media preview;
- Command bar: click to enable / disable the player command bar;
- Input (Only if a capture instance is selected): click to select a video input related to the player service chosen;
- Low latency recording: enable or disable the use of time references in stream captures when starting and stopping a recording.
 |
¶ General Settings |
- Player resolution: use it to select a fixed or automatic player resolution;
- Cue mode: when this option is selected, the asset loads at the first frame and remains paused until the “Play” button is pressed;
- Place marker after timecode update (for preview and playout services): when this option is activated and you navigate through the player’s timecode editing, a marker will automatically be placed on the video’s timeline at the exact timecode you entered;
- Clear asset data (for preview and playout services): enabling this option will remove all asset data from the EDL and Markers widgets when the asset is ejected from the Player widget;
- Auto eject (only for playout services): clicking this option the asset will be automatically ejected when swicthing dashboard or logout;
- Playout player (only for playout services): click to change the player’s look to the default playout settings;
- Hide overlays: click to enable / disable player overlays;
- Video: click to enable / disable video preview;
- Audio: click to enable / disable embedded audio VU Meter preview;
Note: when the audio VU meter preview is disabled the mnemonic will appear in the command bar.
- Command bar: click to select from the available command bars the one that best suits the operation you want to perform. All types are described in the sub-chapters “Types of Players”;
- Timeline: click to enable / disable embedded timeline;
 |
¶ Overlays Settings |
This area has its settings divided into tabs that are:
¶ General
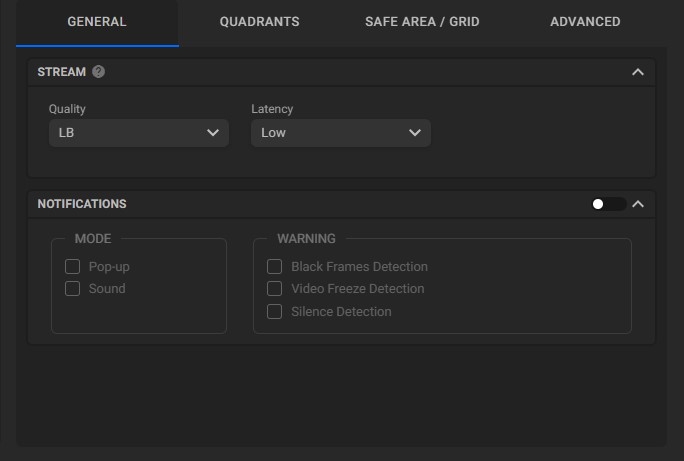
Stream Section:
Features options to customize the preview stream.

- Quality: use it to choose the stream quality from available options;
- Latency: click to choose whether stream latency will be high or low.
Note: for playback and preview, quality and latency options are applied when the asset is loaded, so it is not enough to change the options in the settings, you need to play the asset again.
Notifications Section:
Features options for configuring notifications in the player.

 Toggle button: click to enable / disable notifications overlays;
- Mode: select how notifications will be presented;
a. Pop-up: displays a pop-up warning message on the top right corner;
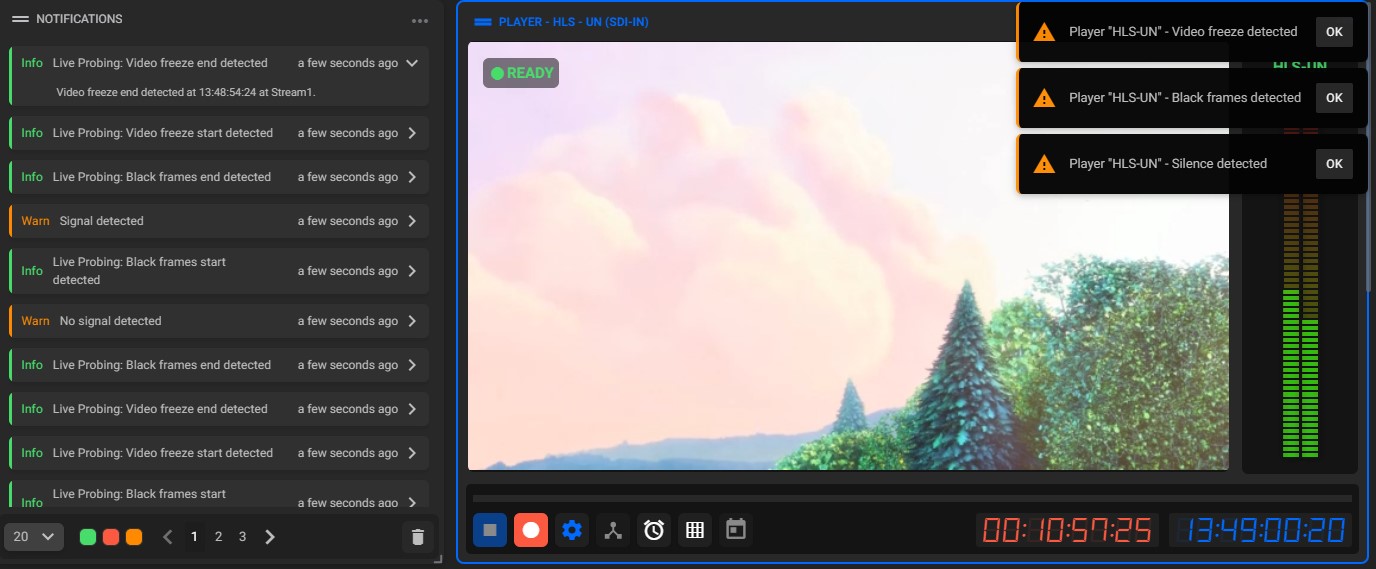
b. Sound: plays a sound alerting of a warning. - Warning: select the types of warnings you want to view. As shown in the image below, only one event of each type will be shown per player, however all occurrences will be shown in the “Notifications” widget.
¶ Quadrants
When activated, the overlays options can be placed across the video area.
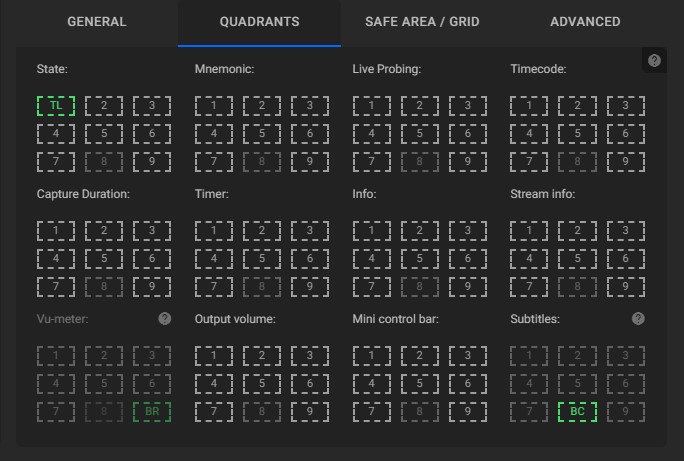
Note: below each option, there is a grid that corresponds to the object’s location in the player. Just click on one of the frames to set the location of the overlay object.
The overlays available are the following:
-
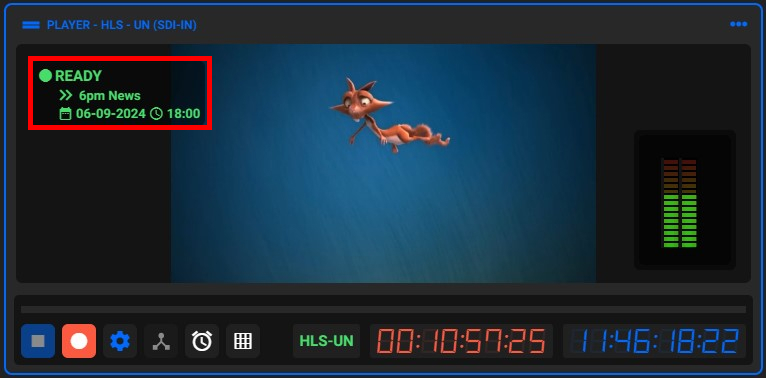
State: shows the player state;
When a recording is scheduled to the selected input channel on the current day, the State overlay will show a warning like the one in the picture below to prevent mistakes:
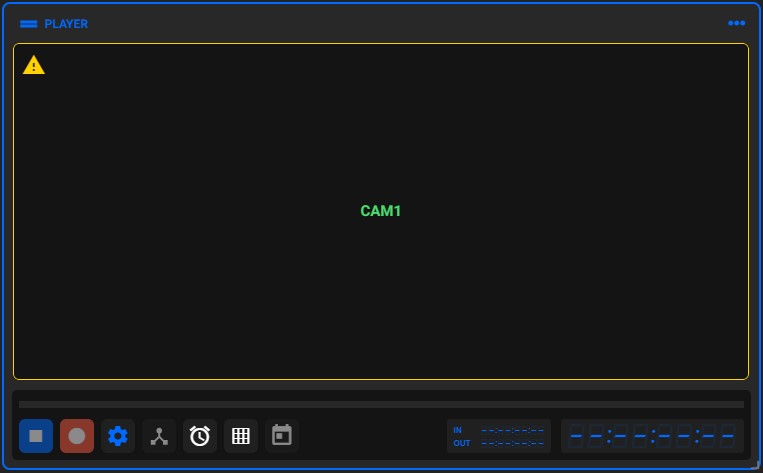
If the status is “not configured”, “service unavailable”, or “no signal”, and the video and audio previews are disabled, the player will show a yellow border, as in the figure below:
-
Mnemonic: shows the player unique name;
-
Live probing: shows an alert icon whenever black frame, video freeze, or silence is detected in the input signal;
-
Timecode: shows the video timecode. After choosing where the timecode will appear in the player, select the type of font that will be used for it in the option “Timecode font”, within the “General section”;
-
Capture duration: shows the duration of the capture operation;
-
Timer: shows the remaining or elapsed time of the asset. After choosing where in the player the timer will appear, select which timer will be displayed under the “Timer Mode” option in the “General section”;
-
Info: shows the information about the input / output video and the player;
-
Stream info: shows some relevant information about the stream;
-
Vu-meter: shows the player volume meter (only one volume meter is available per player). Select how many bars will be shown in the “Vu-Meter” option within the “General section” and they will be displayed in the player accordingly;
-
Output volume: shows a mini volume controller;
-
Mini control bar: shows a small control bar that adapts based on the selected player service. The available options are:
a. Capture mode: shows the Stop, Record, and Workflow buttons;
b. Playout mode: shows the Stop, Play, Pause, Replay, and Eject buttons.The mini control bar remains visible when the video is in full-screen mode.
-
Subtitles: shows the subtitles or closed captions contained in the video.
¶ Safe Area / Grid
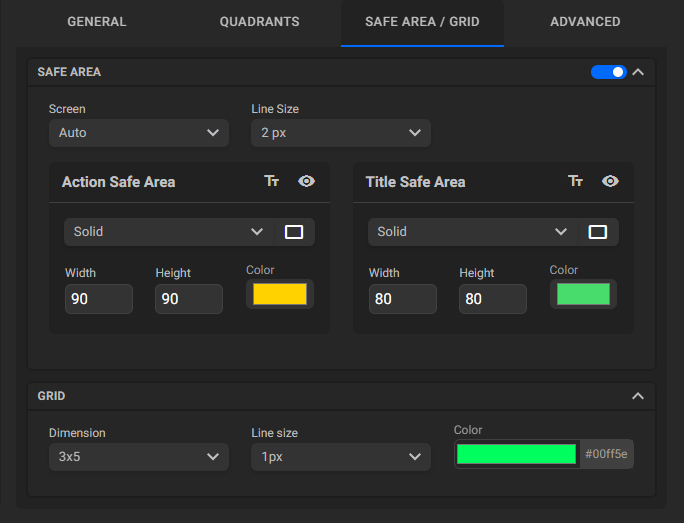
Safe Area Section:
Features options to add a grid demonstrating the two areas where text and actions should be kept. This ensures that the information is not cropped across different types of devices.
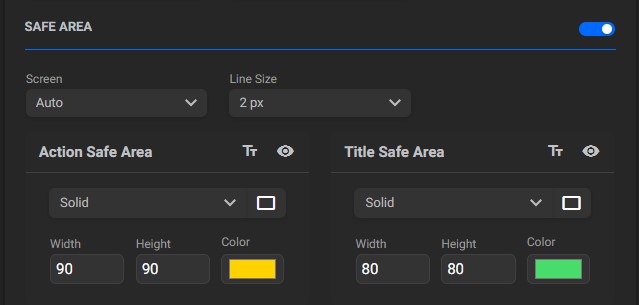
 Toggle button: click to enable / disable grid overlays;
- Screen: choose the screen resolution from the available options. The Auto option will detect the stream resolution and apply the correct safe areas (action and title);
- Line size: select the thickness of the grid lines;
 Show/Hide text: click this button to show or hide text in the action and title grids;
 Show/Hide grid: click this button to show or hide the action and title grids;
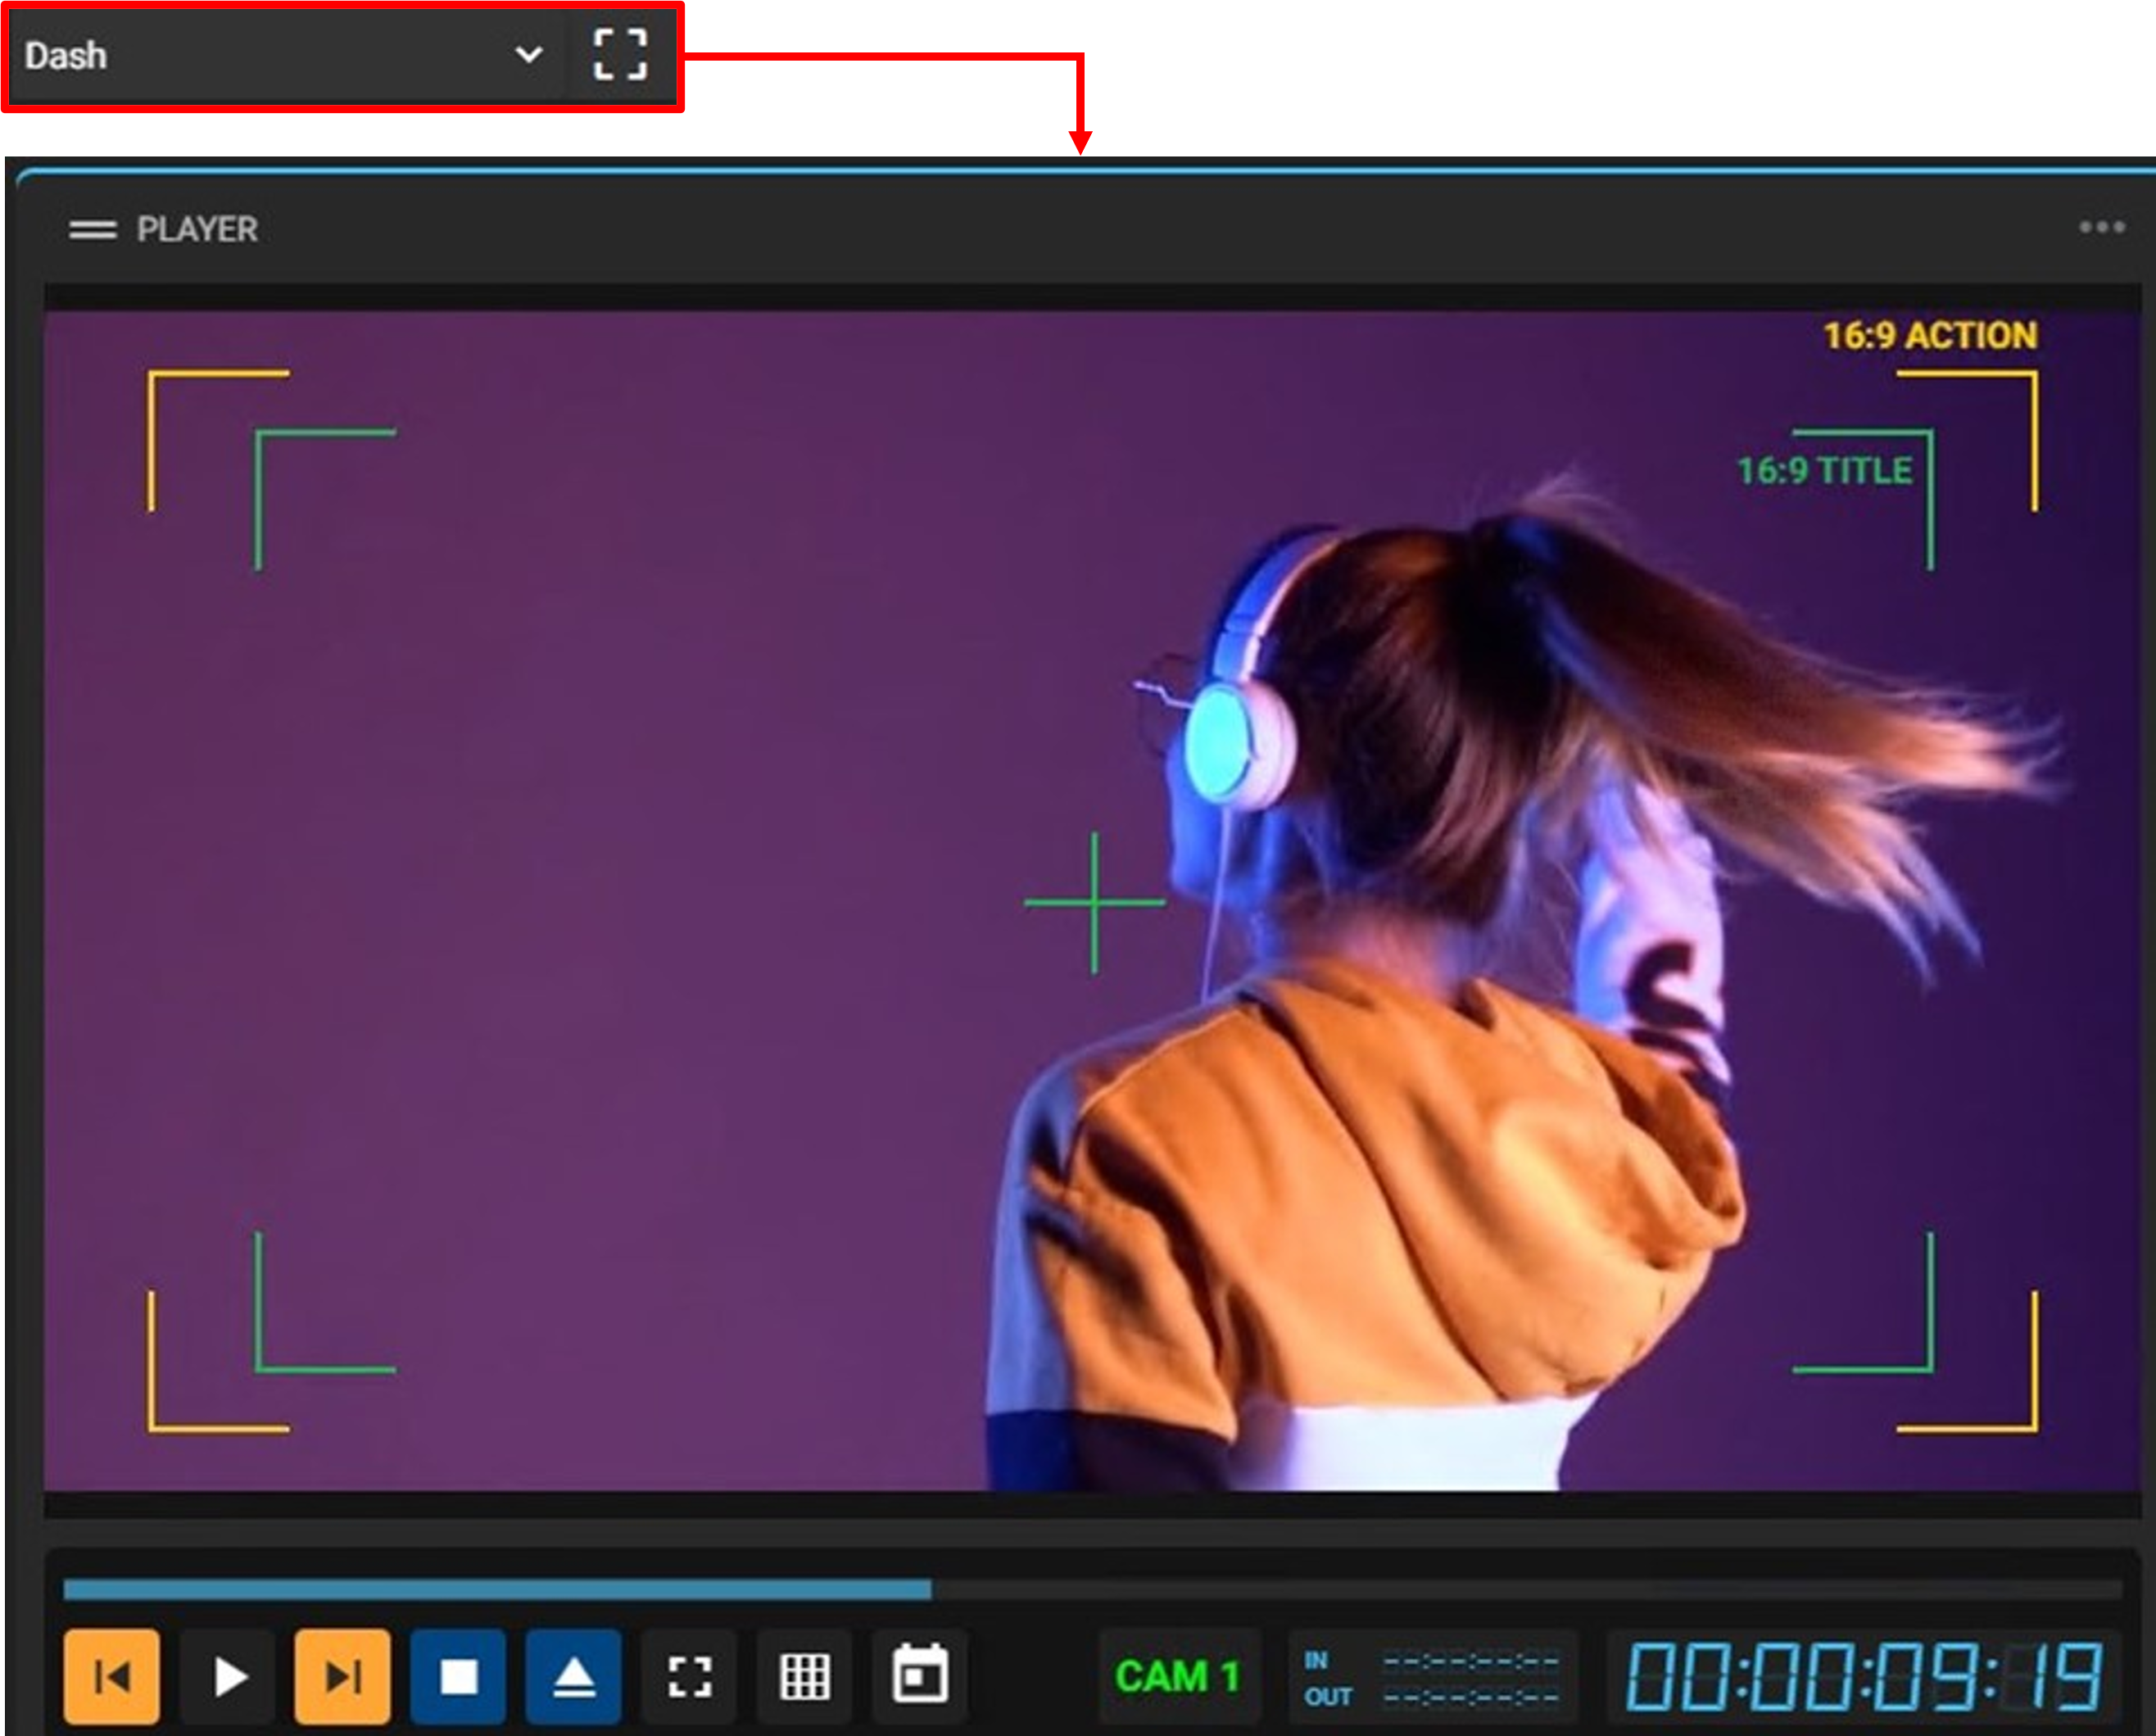
- Change grid type: choose the grid appearance. It can be displayed as shown below:
A square with a solid line all around A square with a dashed line only at the corners 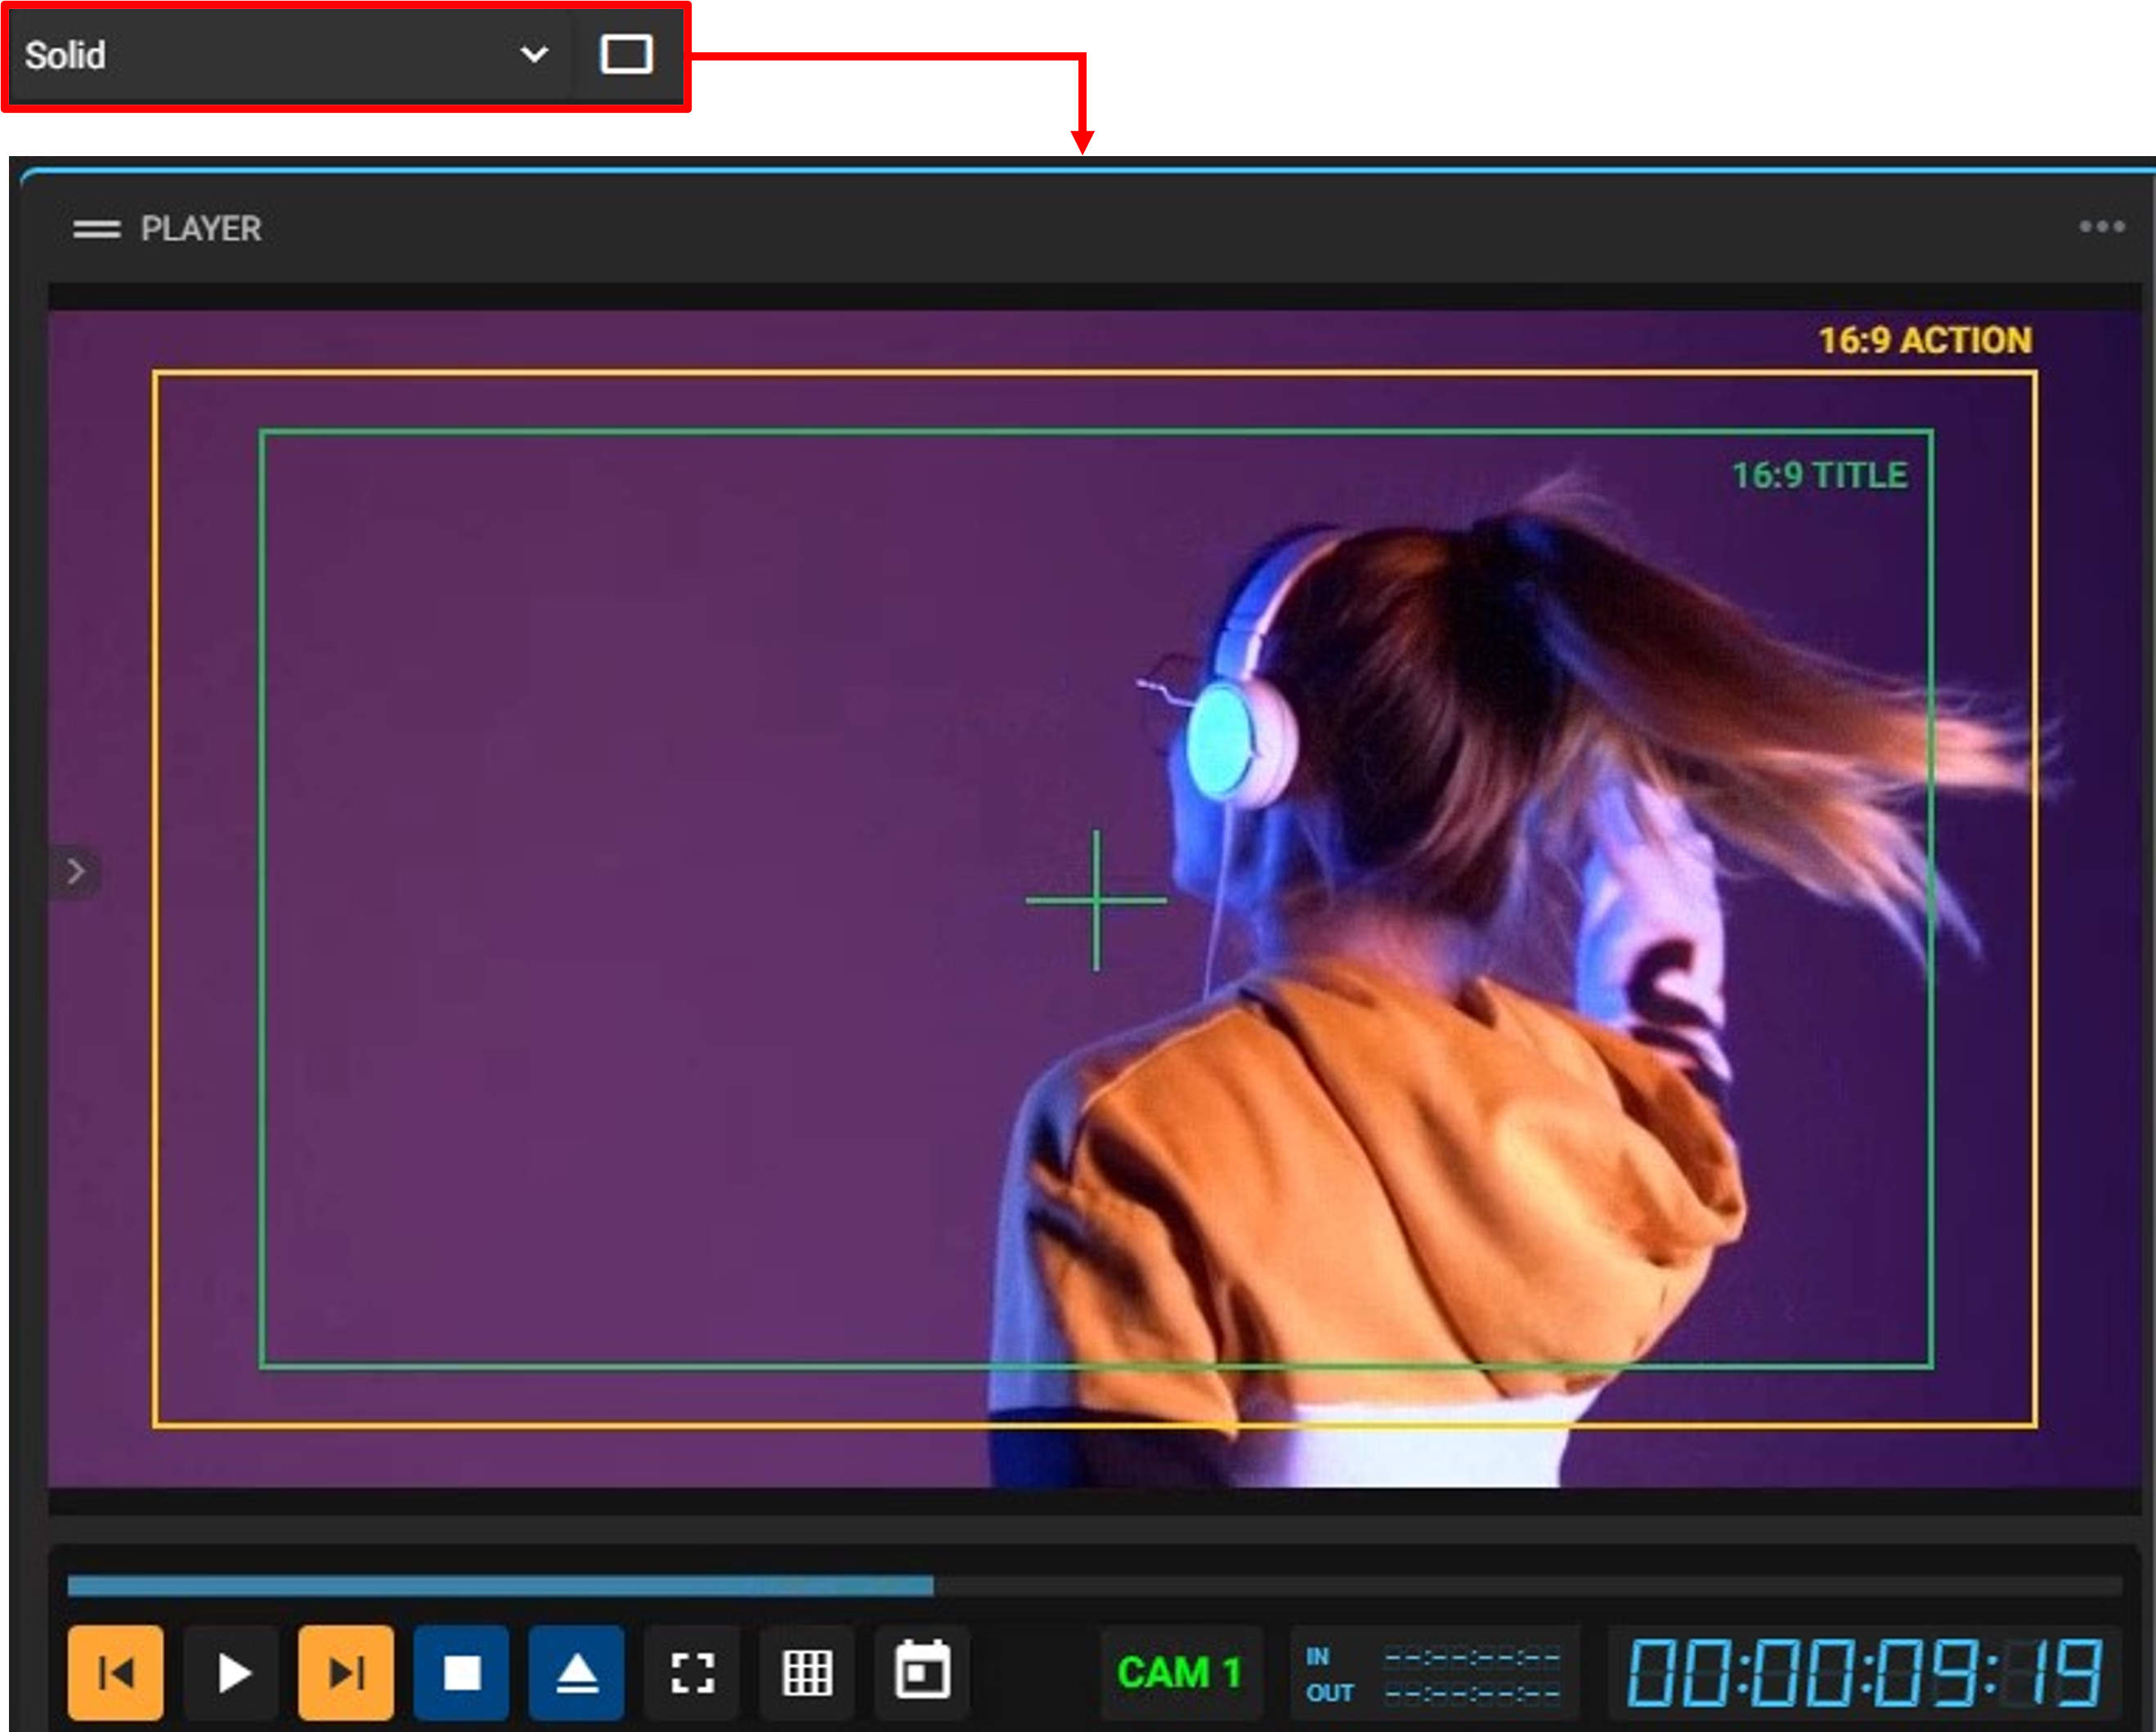
With opacity after the grid line. 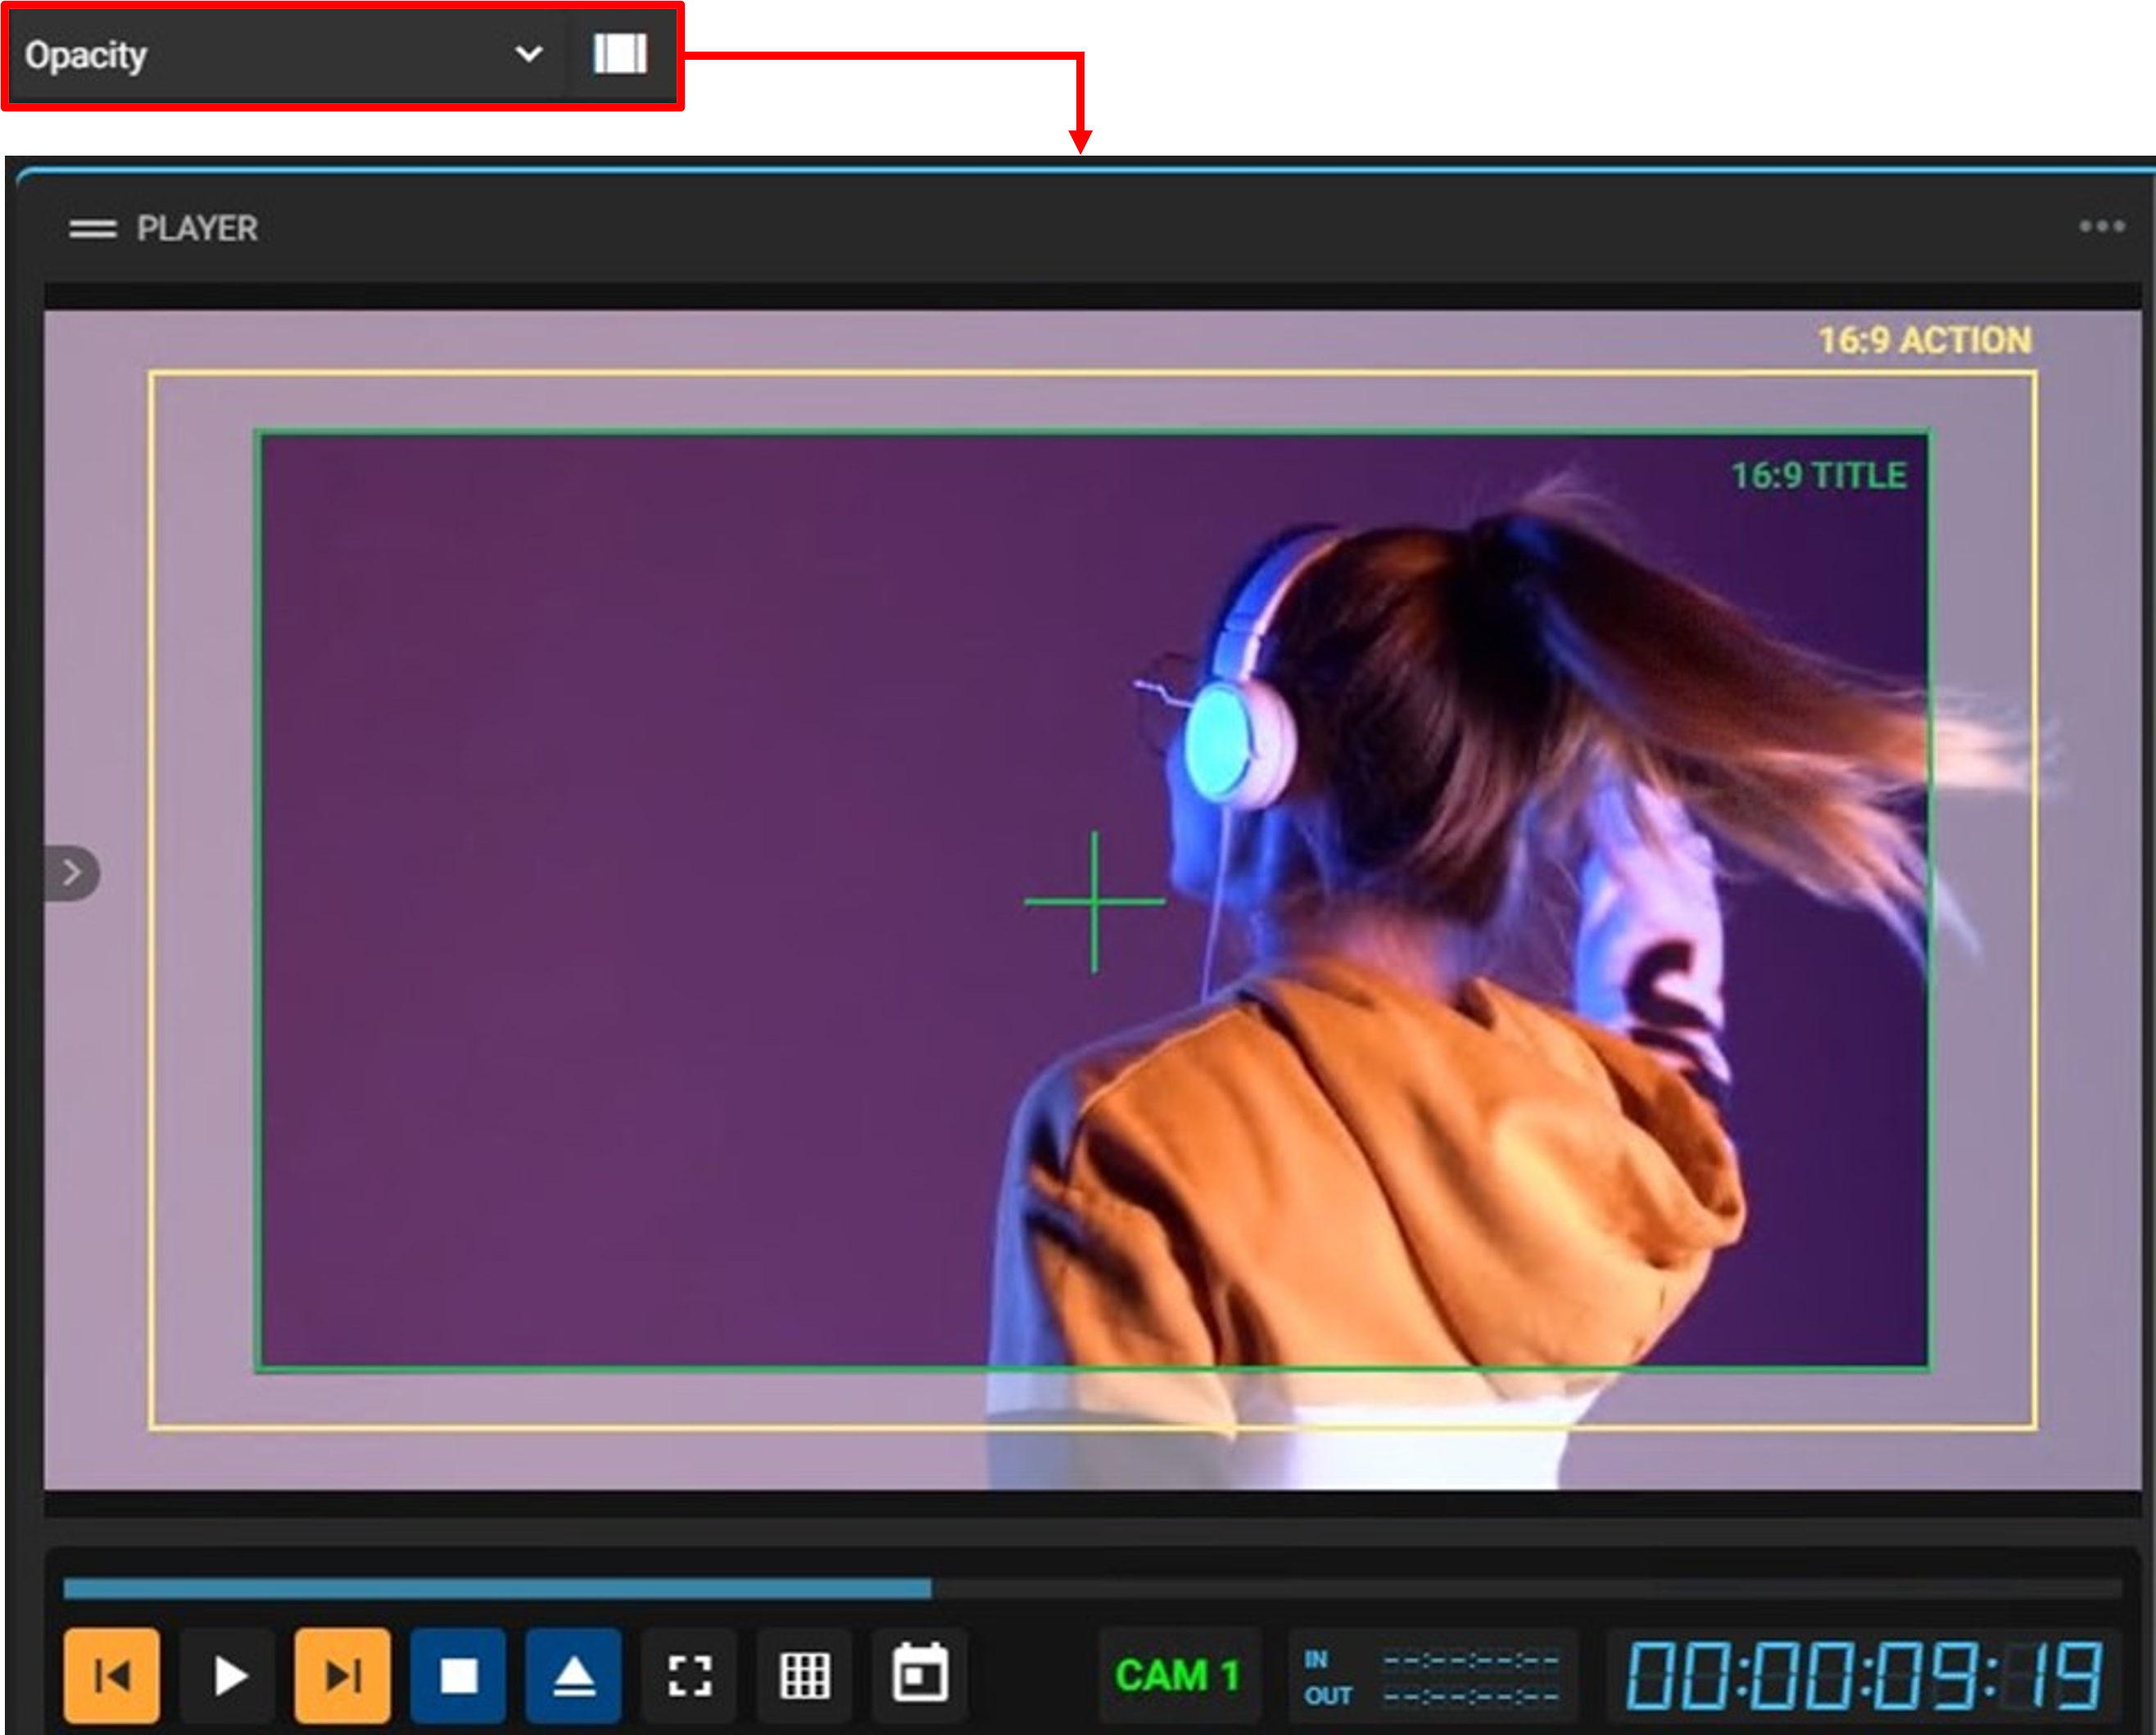
- Width: enter the percentage value for the area width;
- Height: enter the percentage value for the area heigh;
- Color: choose a grid color.
Grid Settings Section:
Features options to overlay gridlines on the video.
- Dimension: specify the number of rows and columns for the grid;
- Line size: select the thickness of the grid lines;
- Color: choose a color for the grid lines.
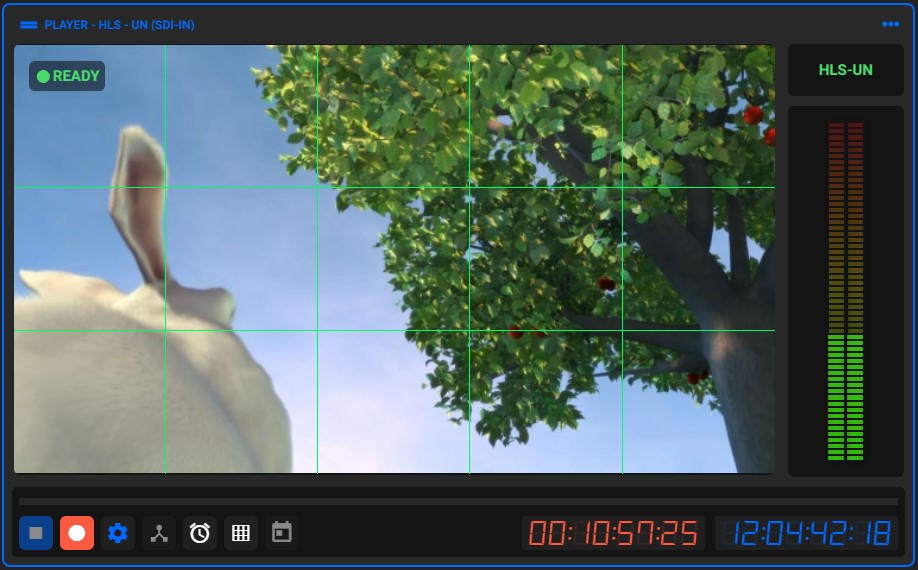
A grid with dimension 3x5 and a line of 1 pixel will look like the one shown below:
¶ Advanced
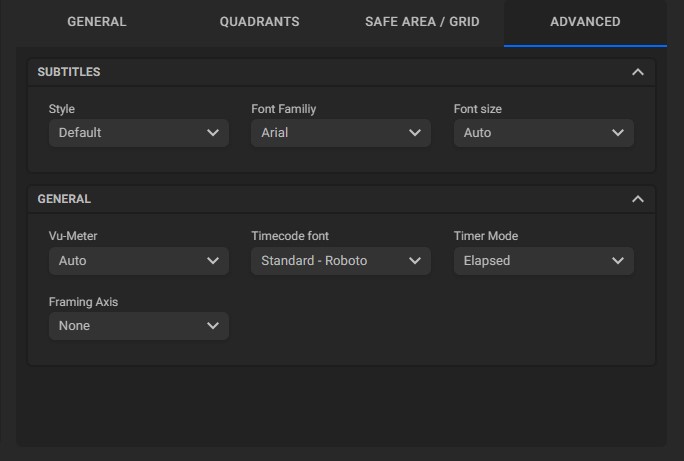
Subtitles Section
Features options to customize the style of subtitles.
- Style: click to select the desired subtitle style from the available options;
- Font family: click to select the desired subtitle font from the available options;
- Font size: click to select the desired subtitle size from the available options.
General Section
Features options to customize some overlays.
- Vu-meter: select the number of volume meter bars that will be presented on the “Vu-meter” overlay;
- Timecode font: choose the timecode font;
- Timer mode: select whether the timer to be displayed will be the remaining time or the elapsed time;
- Framing Axis: place a dot, cross, or both at the center of the player to aid in precise orientation, alignment, focus, marking key points of interest, and aligning elements.
¶ Type of Players
There are different player layouts to better suit the operation you want to perform. It can be switched via the command bar field in the widget settings.
Tips:
- From 2024.06.00 version, dragging an asset from the "Asset Explorer" or "Asset Selection" to the "Player" will start its preview;
- For preview and playout services, you can navigate through the video by editing the player's timecode. This allows you to jump to a specific timecode position, which is especially useful for long or continuously growing assets.
¶ SDI
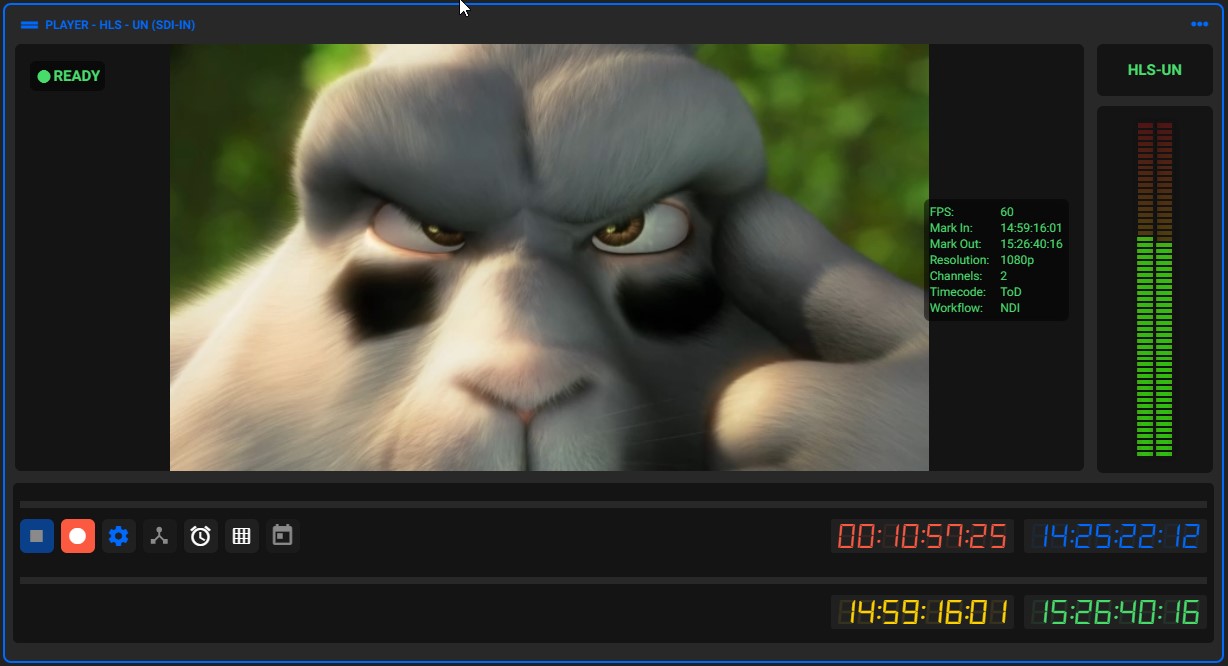
This command bar shows the following buttons:
-
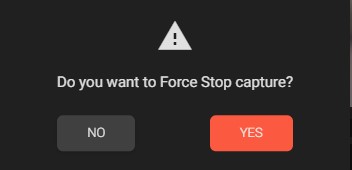
Stop: click to stop the gang recording and keeps the assets. Pressing the button twice (or pressing the button while a capture is already being stopped) will force-stop the capture, which means the final recording will not present any timecode or timestamp;
The force stop action will present the following prompt to confirm such action:
- Record: start recording;
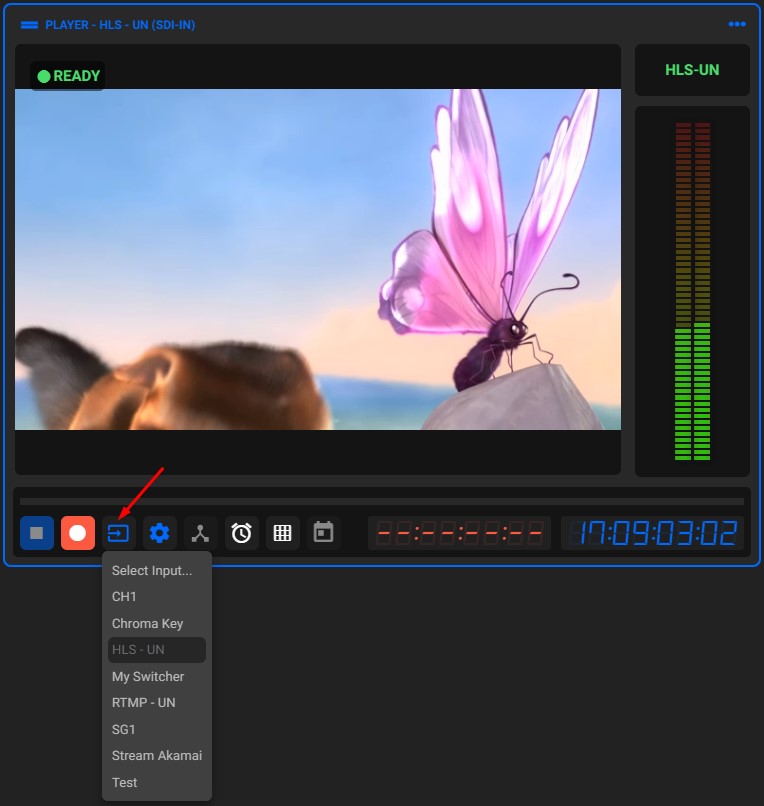
- Select input: click to easily select the signal input. For this button to be displayed, edit the file “
commandBars.json” which is in the path "C:\ProgramData\MOG\MAM4PRO\configs\mWeb\constants” and add the code “{"label": "inputlocation","needUserConfirmation": false}," in the "SDI" area, as shown in the image below;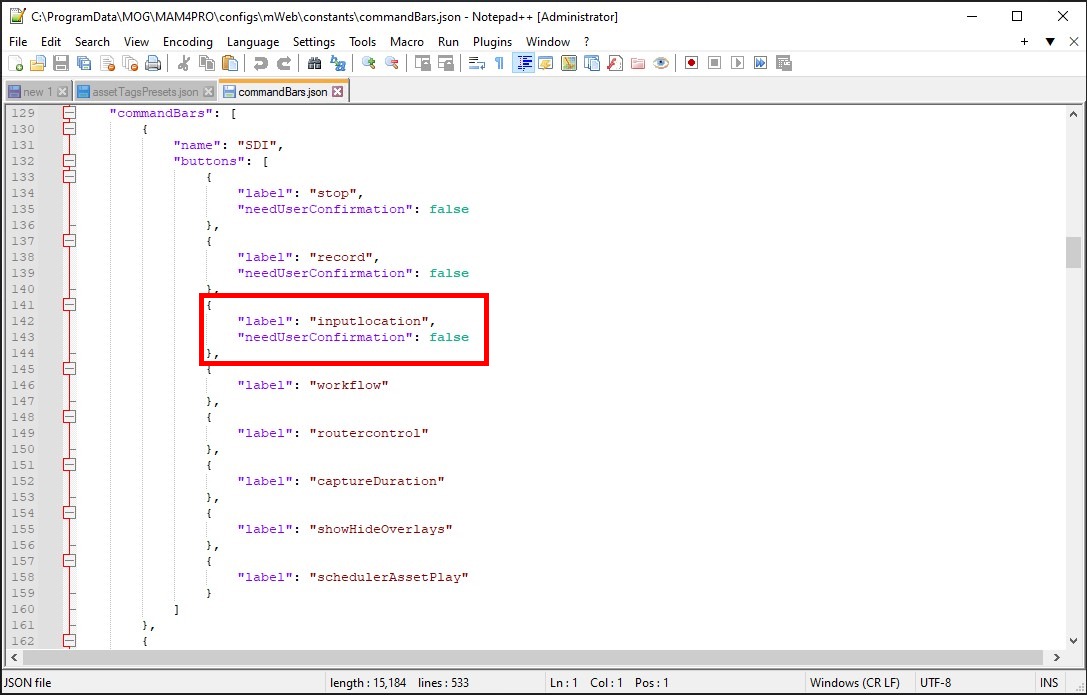
By doing so, the "Select Input" button will be displayed, as shown in the image below:
-
Workflow: click to choose the workflow from the previously configured ones. Notice that to the right of the workflow options is the "Edit"
 button. Click there to quickly edit the output options;
Note: you can hide the “Edit” option in the permissions settings by unchecking the “Workflow Profiles” option. See chapter “Adding Permissions Profile” for more information.
- Router source: to directly control a video router, select a source point on a preconfigured router;
-
Capture timer: set the specific duration for the capture in hh:mm:ss format;

Without the option "Preserve Timeout" selected on every capture the counter will go to default value of 00:00:00.

Once we have the "Preserve Timeout" selected, the duration inserted will be preserved during captures.
- Show/Hide overlays: toggles between showing or hiding player overlays;
- Schedule assets: schedules the playback of the asset loaded in the player. By clicking this button, the following form will be displayed for configuring the event:
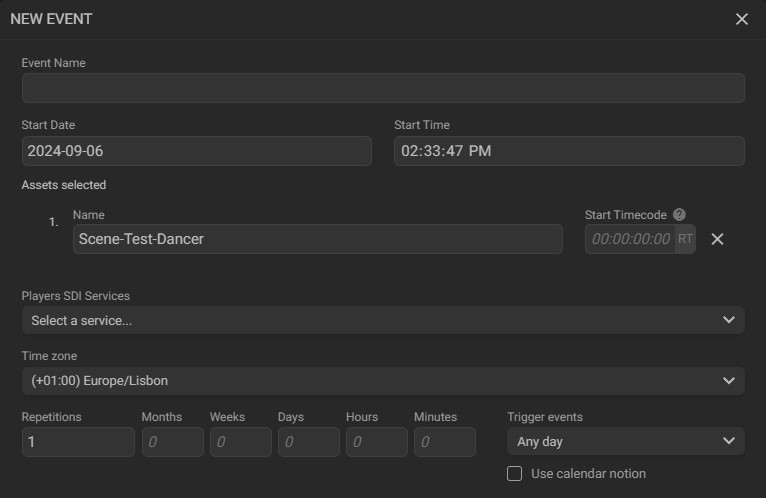
Configure the event by filling in the fields below:
- Event name: enter the name of the new event;
- Start date: click to select the start date of the event in the calendar that will open;
- Start time: click to select the start time of the event in the calendar that will open;
- Asset selected name: shows the asset name. Click on this field to edit its name;
- Asset selected start timecode: shows the asset’s playback start timecode. Click on this field to edit it;
- Players SDI services: select the player service that will be used to play the asset;
- Time zone: click to select the time zone;
- Repetitions: enter the number of repetitions. If there are one or more repetitions of an event, you can configure the frequency with which it will be repeated using the “Months”, “Weeks”, “Days”, “Hours”, and “Minutes” fields;
- Trigger events: select when events will be triggered (any day, only working days, or only weekends);
- Use calendar notion: tick this option to account for time shifts (Daylight Savings Time, Time Zone shifts, etc.).
Note: a playlist is shared between all repetitions of an event. Changing it will apply the changes to all repetitions in a sequence.
Note: you will be able to edit the events created through the Calendar module. Please see page “Edit Event" for how.
¶ SDI + Abort
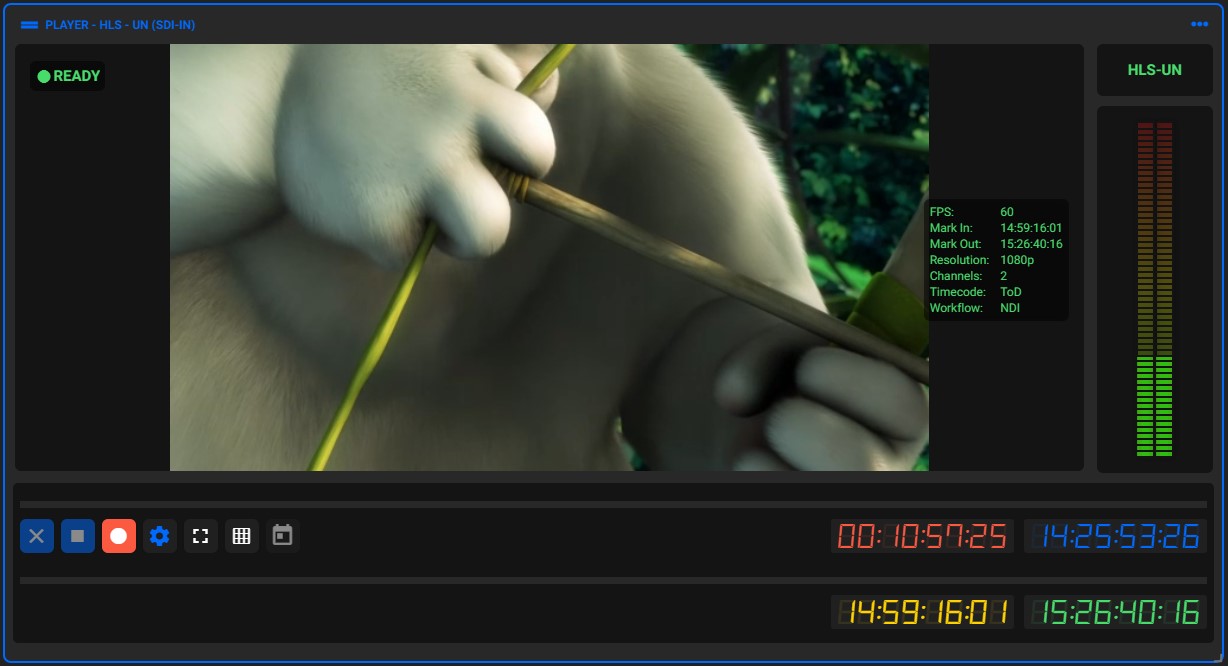
This command bar shows the following buttons:
- Abort record: stops recording and deletes the assets;
-
Stop: click to stop the gang recording and keeps the assets. Pressing the button twice (or pressing the button while a capture is already being stopped) will force-stop the capture, which means the final recording will not present any timecode or timestamp;
The force stop action will present the following prompt to confirm such action:

- Record: start recording;
-
Workflow: click to choose the workflow from the previously configured ones. Note that to the right of the workflow options is the "Edit"
 button. Click there to quickly edit the output options;
Note: you can hide the “Edit” option in the permissions settings by unchecking the “Workflow Profiles” option. See chapter “Adding Permissions Profile” for more information.
- Fullscreen: makes the player fullscreen;
- Show/Hide overlays: toggles between showing or hiding player overlays;
- Schedule assets: schedules the playback of the asset loaded in the player. By clicking this button, the following form will be displayed for configuring the event:

Configure the event by filling in the fields below:
- Event name: enter the name of the new event;
- Start date: click to select the start date of the event in the calendar that will open;
- Start time: click to select the start time of the event in the calendar that will open;
- Asset selected name: shows the asset name. Click on this field to edit its name;
- Asset selected start timecode: shows the asset’s playback start timecode. Click on this field to edit it;
- Players SDI services: select the player service that will be used to play the asset;
- Time zone: click to select the time zone;
- Repetitions: enter the number of repetitions. If there are one or more repetitions of an event, you can configure the frequency with which it will be repeated using the “Months”, “Weeks”, “Days”, “Hours”, and “Minutes” fields;
- Trigger events: select when events will be triggered (any day, only working days, or only weekends);
- Use calendar notion: tick this option to account for time shifts (Daylight Savings Time, Time Zone shifts, etc.).
Note: a playlist is shared between all repetitions of an event. Changing it will apply the changes to all repetitions in a sequence.
Note: you will be able to edit the events created through the Calendar module. Please see page “Edit Event" for how.
¶ SDI-OUT Editor
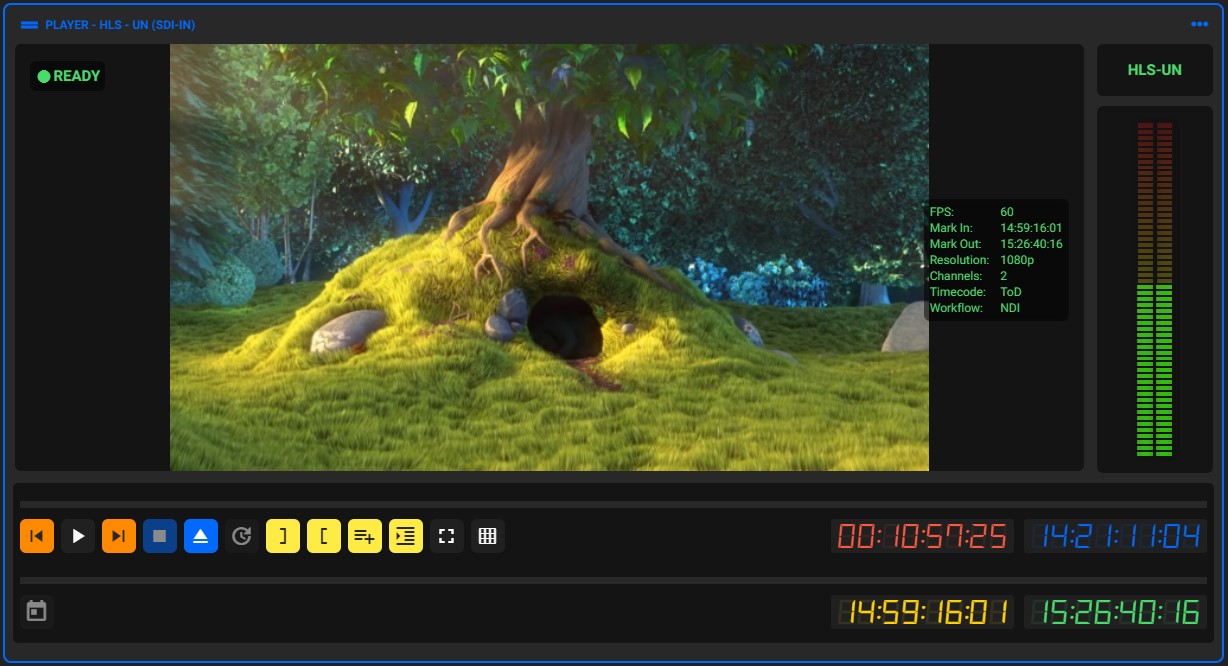
This command bar shows the following buttons:
- Step Backward 1 Frame: rewind a video frame;
- Play/Pause: starts execution of the video or pause the execution of the same;
- Step Forward 1 Frame: advances one frame of video;
- Stop: ends video play;
- Eject: ejects asset;
- Sync: syncs the video preview and output;
- Mark in: marks the start of a video trim;
- Mark out: marks the end of a video trim;
- Add to edit decision list: adds the clip to the currently selected edit decision list;
- Add to playlist builder: adds the clip to the currently selected playlist on the Playlist Builder widget;
- Fullscreen: makes the player fullscreen;
- Show / Hide overlays: toggles between showing or hiding player overlays;
- Schedule assets: schedules the playback of the asset loaded in the player. By clicking this button, the following form will be displayed for configuring the event:

Configure the event by filling in the fields below:
- Event name: enter the name of the new event;
- Start date: click to select the start date of the event in the calendar that will open;
- Start time: click to select the start time of the event in the calendar that will open;
- Asset selected name: shows the asset name. Click on this field to edit its name;
- Asset selected start timecode: shows the asset’s playback start timecode. Click on this field to edit it;
- Players SDI services: select the player service that will be used to play the asset;
- Time zone: click to select the time zone;
- Repetitions: enter the number of repetitions. If there are one or more repetitions of an event, you can configure the frequency with which it will be repeated using the “Months”, “Weeks”, “Days”, “Hours”, and “Minutes” fields;
- Trigger events: select when events will be triggered (any day, only working days, or only weekends);
- Use calendar notion: tick this option to account for time shifts (Daylight Savings Time, Time Zone shifts, etc.).
Note: a playlist is shared between all repetitions of an event. Changing it will apply the changes to all repetitions in a sequence.
Note: you will be able to edit the events created through the Calendar module. Please see page “Edit Event" for how.
¶ SDI-OUT Viewer
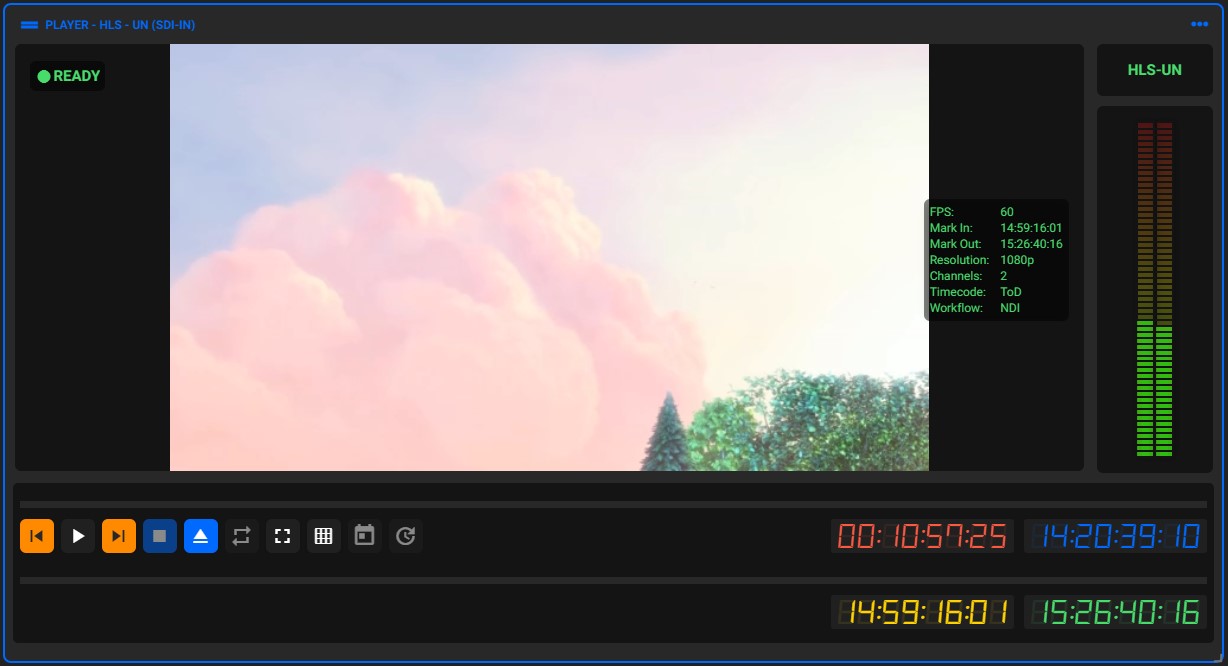
This command bar shows the following buttons:
- Step backward 1 frame: rewind a video frame;
- Play / Pause: starts execution of the video or pause the execution of the same;
- Step forward 1 frame: advances one frame of video;
- Stop: ends video play;
- Eject: ejects asset;
- Loop: play a single asset or playlist in repeat mode;
- Fullscreen: makes the player fullscreen;
- Show / Hide overlays: toggles between showing or hiding player overlays;
- Schedule assets: schedules the playback of the asset loaded in the player. By clicking this button, the following form will be displayed for configuring the event:

Configure the event by filling in the fields below:
- Event name: enter the name of the new event;
- Start date: click to select the start date of the event in the calendar that will open;
- Start time: click to select the start time of the event in the calendar that will open;
- Asset selected name: shows the asset name. Click on this field to edit its name;
- Asset selected start timecode: shows the asset’s playback start timecode. Click on this field to edit it;
- Players SDI services: select the player service that will be used to play the asset;
- Time zone: click to select the time zone;
- Repetitions: enter the number of repetitions. If there are one or more repetitions of an event, you can configure the frequency with which it will be repeated using the “Months”, “Weeks”, “Days”, “Hours”, and “Minutes” fields;
- Trigger events: select when events will be triggered (any day, only working days, or only weekends);
- Use calendar notion: tick this option to account for time shifts (Daylight Savings Time, Time Zone shifts, etc.).
Note: a playlist is shared between all repetitions of an event. Changing it will apply the changes to all repetitions in a sequence.
Note: you will be able to edit the events created through the Calendar module. Please see page “Edit Event" for how.
- Sync: syncs the video preview and output.
¶ SDI-OUT VTR Editor / Print to Tape
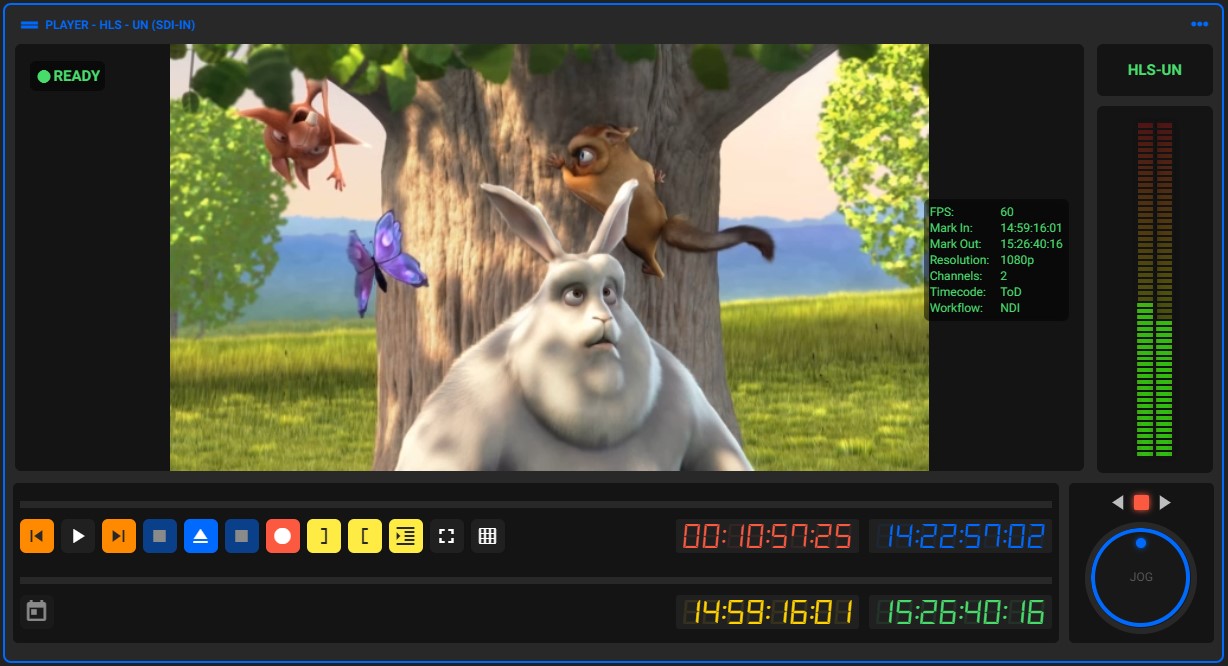
This command bar shows the following buttons:
- Step backward 1 frame: sends “Step Backward 1 Frame” signal to VTR;
- Play/Pause: sends “Play/Pause” signal to VTR;
- Step forward 1 frame: sends “Step Forward 1 Frame” signal to VTR;
- Stop VTR: sends “Stop” signal to VTR;
- Eject: sends “Eject” signal to VTR;
- Stop: stops asset playout;
- Print to tape: sends “Print to Tape” signal to VTR;
- Mark in: marks the start of a video trim;
- Mark out: marks the end of a video trim;
- Add to edit decision list: adds the clip to the currently selected edit decision list;
- Fullscreen: makes the player fullscreen;
- Show/Hide overlays: toggles between showing or hiding player overlays;
- Schedule assets: schedules the playback of the asset loaded in the player. By clicking this button, the following form will be displayed for configuring the event:

Configure the event by filling in the fields below:
- Event name: enter the name of the new event;
- Start date: click to select the start date of the event in the calendar that will open;
- Start time: click to select the start time of the event in the calendar that will open;
- Asset selected name: shows the asset name. Click on this field to edit its name;
- Asset selected start timecode: shows the asset’s playback start timecode. Click on this field to edit it;
- Players SDI services: select the player service that will be used to play the asset;
- Time zone: click to select the time zone;
- Repetitions: enter the number of repetitions. If there are one or more repetitions of an event, you can configure the frequency with which it will be repeated using the “Months”, “Weeks”, “Days”, “Hours”, and “Minutes” fields;
- Trigger events: select when events will be triggered (any day, only working days, or only weekends);
- Use calendar notion: tick this option to account for time shifts (Daylight Savings Time, Time Zone shifts, etc.).
Note: a playlist is shared between all repetitions of an event. Changing it will apply the changes to all repetitions in a sequence.
Note: you will be able to edit the events created through the Calendar module. Please see page “Edit Event" for how.
- Jog/Shuttle: click the wheel icon to switch between jog and shuttle functions:
- Jog: each wheel backwards/forwards step will skip backward or forwards one frame;
- Shuttle: each wheel backwards/forwards step will increment.
Tip: if the Jog/Shuttle button is not showing, increase the size of the player by clicking on the widget’s lower right corner and dragging.
¶ SDI Print to Tape
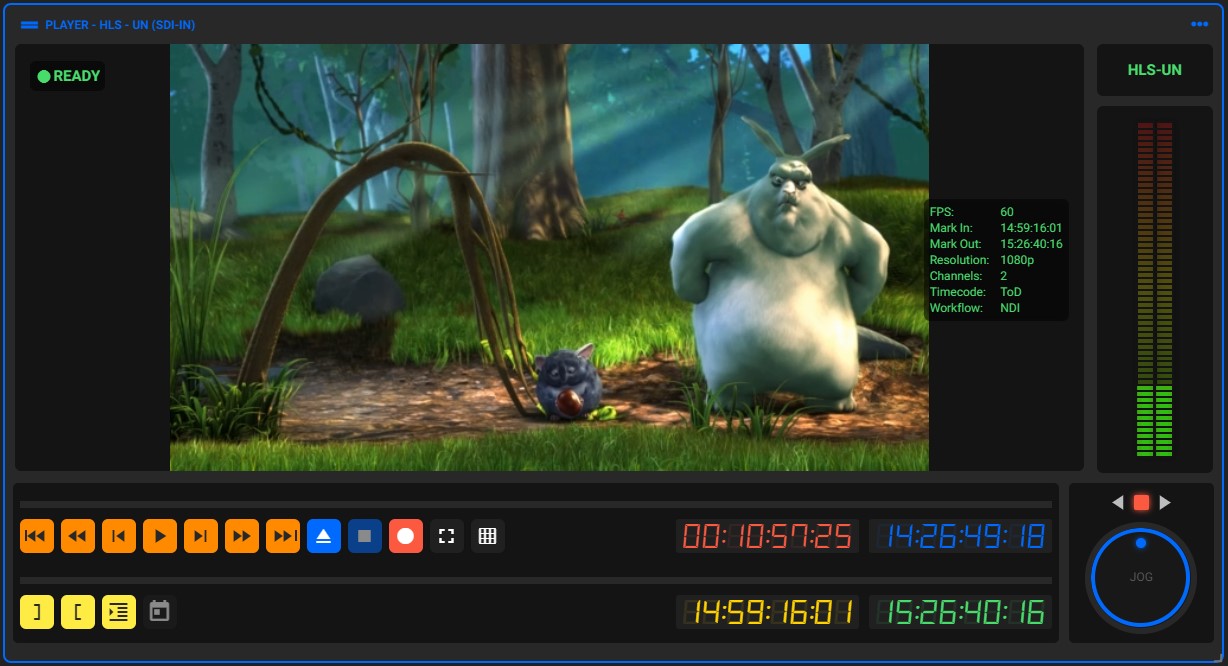
This command bar shows the following buttons:
- Top: goes to the beginning of the tape;
- Fast rewind: fast backwards tape by increments. The increments correspond to: x-1, x-2, x-4, x-8 x-16, x-32 speeds;
- Step backward 1 frame: sends “Step Backward 1 Frame” signal to VTR;
- Play/Pause: sends “Play/Pause” signal to VTR;
- Step forward 1 frame: sends “Step Forward 1 Frame” signal to VTR;
- Fast forward: fast forwards tape by increments. The increments correspond to: x1, x2, x4, x8 x16, x32 speeds;
- End: goes to the end of the tape;
- Eject: sends “Eject” signal to VTR;
-
Stop: click to stop the gang recording and keeps the assets. Pressing the button twice (or pressing the button while a capture is already being stopped) will force-stop the capture, which means the final recording will not present any timecode or timestamp;
The force stop action will present the following prompt to confirm such action:

- Print to tape: sends “Print to Tape” signal to VTR;
- Fullscreen: makes the player fullscreen;
- Show/Hide overlays: toggles between showing or hiding player overlays;
- Mark in: marks the start of a video trim;
- Mark out: marks the end of a video trim;
- Add to edit decision list: adds the clip to the currently selected edit decision list;
- Schedule assets: schedules the playback of the asset loaded in the player. By clicking this button, the following form will be displayed for configuring the event:

Configure the event by filling in the fields below:
- Event name: enter the name of the new event;
- Start date: click to select the start date of the event in the calendar that will open;
- Start time: click to select the start time of the event in the calendar that will open;
- Asset selected name: shows the asset name. Click on this field to edit its name;
- Asset selected start timecode: shows the asset’s playback start timecode. Click on this field to edit it;
- Players SDI services: select the player service that will be used to play the asset;
- Time zone: click to select the time zone;
- Repetitions: enter the number of repetitions. If there are one or more repetitions of an event, you can configure the frequency with which it will be repeated using the “Months”, “Weeks”, “Days”, “Hours”, and “Minutes” fields;
- Trigger events: select when events will be triggered (any day, only working days, or only weekends);
- Use calendar notion: tick this option to account for time shifts (Daylight Savings Time, Time Zone shifts, etc.).
Note: a playlist is shared between all repetitions of an event. Changing it will apply the changes to all repetitions in a sequence.
Note: you will be able to edit the events created through the Calendar module. Please see page “Edit Event" for how.
- Jog/Shuttle: click the wheel icon to switch between jog and shuttle functions.
- Jog: each wheel backwards/forwards step will skip backward or forwards one frame;
- Shuttle: each wheel backwards/forwards step will increment.
Tip: if the Jog/Shuttle button is not showing, increase the size of the player by clicking on the widget’s lower right corner and dragging.
¶ SDI VTR
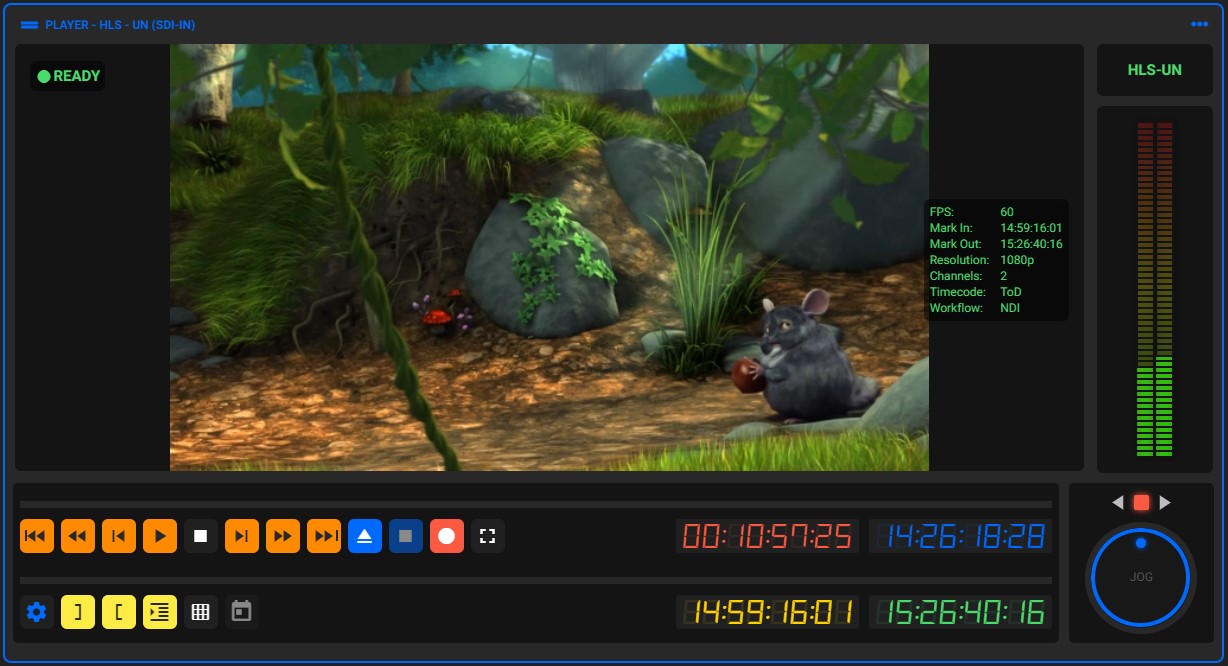
This command bar shows the following buttons:
- Top: goes to the beginning of the tape;
- Fast rewind: fast backwards tape by increments. The increments correspond to: x-1, x-2, x-4, x-8 x-16, x-32 speeds;
- Step backward 1 frame: sends “Step Backward 1 Frame” signal to VTR;
- Play/Pause: sends “Play/Pause” signal to VTR;
- Stop VTR: sends “Stop” signal to VTR;
- Step forward 1 frame: sends “Step Forward 1 Frame” signal to VTR;
- Fast forward: fast forwards tape by increments. The increments correspond to: x1, x2, x4, x8 x16, x32 speeds;
- End: goes to the end of the tape;
- Eject: sends “Eject” signal to VTR;
-
Stop: click to stop the gang recording and keeps the assets. Pressing the button twice (or pressing the button while a capture is already being stopped) will force-stop the capture, which means the final recording will not present any timecode or timestamp;
The force stop action will present the following prompt to confirm such action:

- Record: starts recording;
- Fullscreen: makes the player fullscreen;
-
Workflow: click to choose the workflow from the previously configured ones. Note that to the right of the workflow options is the "Edit"
 button. Click there to quickly edit the output options;
Note: you can hide the “Edit” option in the permissions settings by unchecking the “Workflow Profiles” option. See chapter “Adding Permissions Profile” for more information.
- Mark in: marks the start of a video trim;
- Mark out: marks the end of a video trim;
- Add to edit decision list: adds the clip to the currently selected edit decision list;
- Show/Hide overlays: toggles between showing or hiding player overlays;
- Schedule assets: schedules the playback of the asset loaded in the player. By clicking this button, the following form will be displayed for configuring the event:

Configure the event by filling in the fields below:
- Event name: enter the name of the new event;
- Start date: click to select the start date of the event in the calendar that will open;
- Start time: click to select the start time of the event in the calendar that will open;
- Asset selected name: shows the asset name. Click on this field to edit its name;
- Asset selected start timecode: shows the asset’s playback start timecode. Click on this field to edit it;
- Players SDI services: select the player service that will be used to play the asset;
- Time zone: click to select the time zone;
- Repetitions: enter the number of repetitions. If there are one or more repetitions of an event, you can configure the frequency with which it will be repeated using the “Months”, “Weeks”, “Days”, “Hours”, and “Minutes” fields;
- Trigger events: select when events will be triggered (any day, only working days, or only weekends);
- Use calendar notion: tick this option to account for time shifts (Daylight Savings Time, Time Zone shifts, etc.).
Note: a playlist is shared between all repetitions of an event. Changing it will apply the changes to all repetitions in a sequence.
Note: you will be able to edit the events created through the Calendar module. Please see page “Edit Event" for how.
- Jog/Shuttle: click the wheel icon to switch between jog and shuttle functions;
- Jog: each wheel backwards/forwards step will skip backward or forwards one frame;
- Shuttle: each wheel backwards/forwards step will increment.
Tip: if the Jog/Shuttle button is not showing, increase the size of the player by clicking on the widget’s lower right corner and dragging.
¶ Web Editor
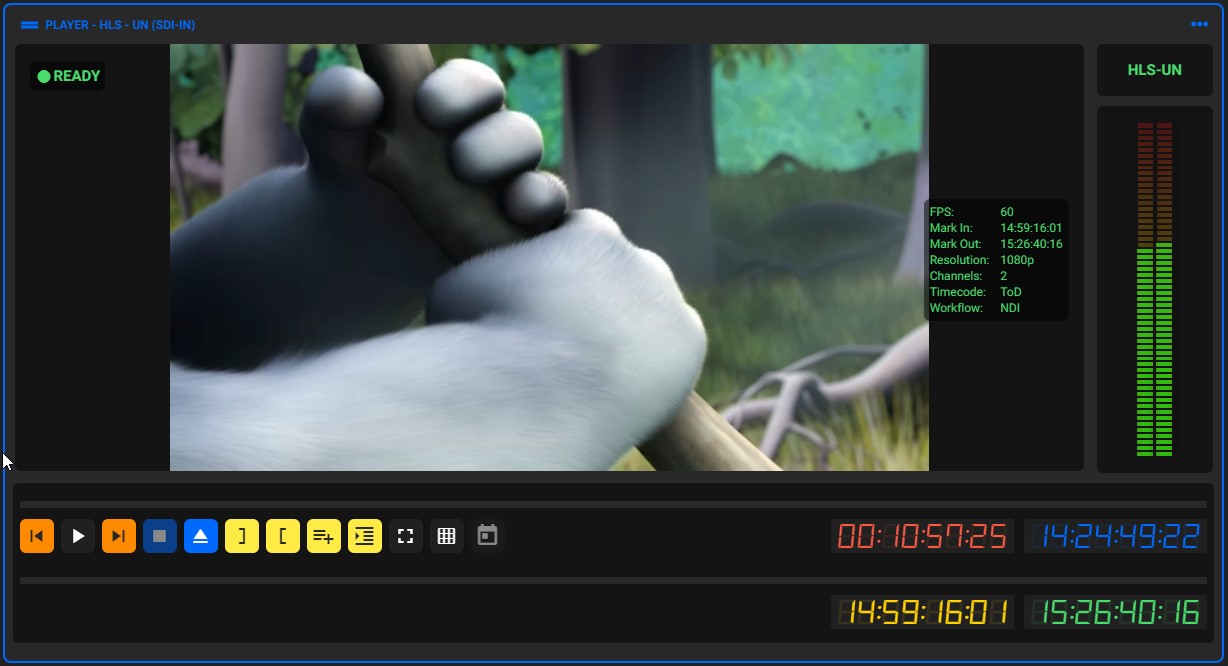
This command bar shows the following buttons:
- Step backward 1 frame: rewind a video frame;
- Play/Pause: plays/pauses the video;
- Step forward 1 frame: advances one frame of video;
- Stop: stops video;
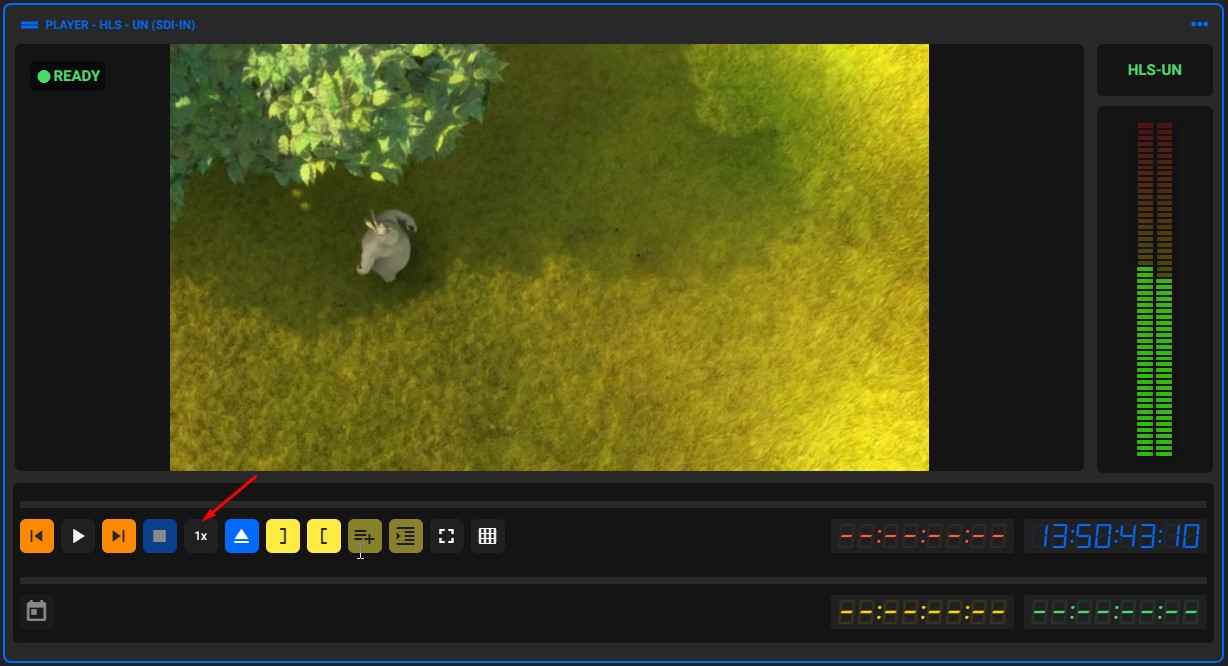
- Playback speed: click to increase and decrease playback speed. For this button to be displayed, edit the file “
commandBars.json” which is in the path "C:\ProgramData\MOG\MAM4PRO\configs\mWeb\constants” and add the code “{"label": "playbackSpeed"}," in the "WEB Editor" area, as shown in the image below;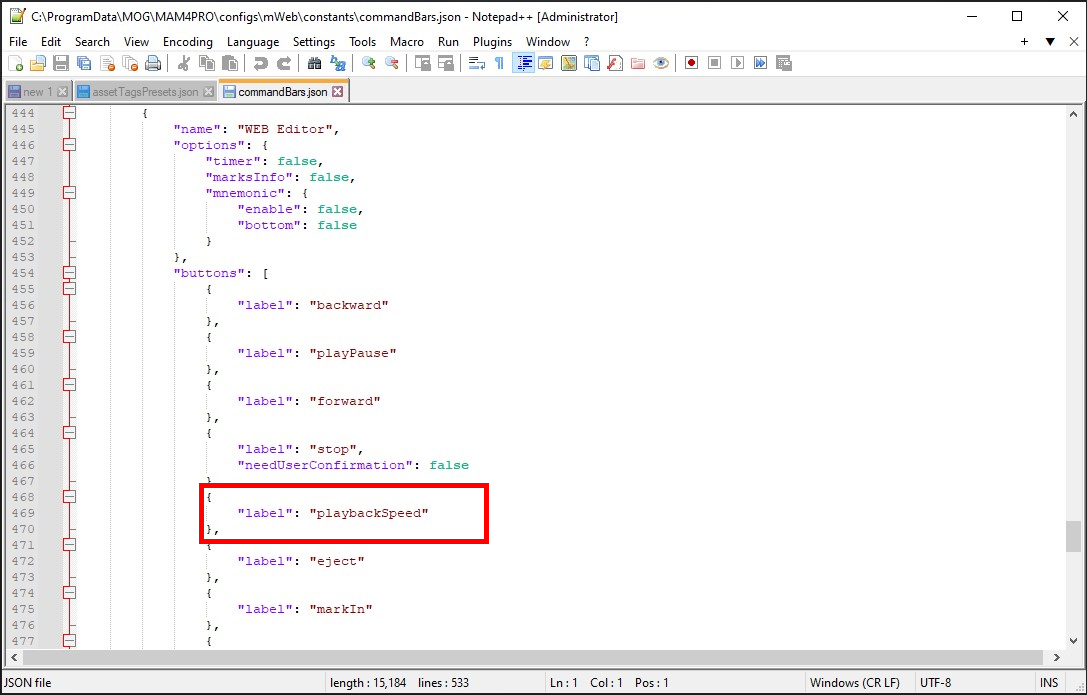
By doing so, the "Playback speed" button will be displayed, as shown in the image below:
- Eject: ejects asset;
- Mark in: marks the start of a video trim;
- Mark out: marks the end of a video trim;
- Add to edit decision list: adds the clip to the currently selected edit decision list;
- Add to playlist builder: adds the clip to the currently selected playlist on the Playlist Builder widget;
- Fullscreen: makes the player fullscreen;
- Show/Hide overlays: toggles between showing or hiding player overlays;
- Schedule assets: schedules the playback of the asset loaded in the player. By clicking this button, the following form will be displayed for configuring the event:

Configure the event by filling in the fields below:
- Event name: enter the name of the new event;
- Start date: click to select the start date of the event in the calendar that will open;
- Start time: click to select the start time of the event in the calendar that will open;
- Asset selected name: shows the asset name. Click on this field to edit its name;
- Asset selected start timecode: shows the asset’s playback start timecode. Click on this field to edit it;
- Players SDI services: select the player service that will be used to play the asset;
- Time zone: click to select the time zone;
- Repetitions: enter the number of repetitions. If there are one or more repetitions of an event, you can configure the frequency with which it will be repeated using the “Months”, “Weeks”, “Days”, “Hours”, and “Minutes” fields;
- Trigger events: select when events will be triggered (any day, only working days, or only weekends);
- Use calendar notion: tick this option to account for time shifts (Daylight Savings Time, Time Zone shifts, etc.).
Note: a playlist is shared between all repetitions of an event. Changing it will apply the changes to all repetitions in a sequence.
Note: you will be able to edit the events created through the Calendar module. Please see page “Edit Event" for how.
¶ Web Viewer
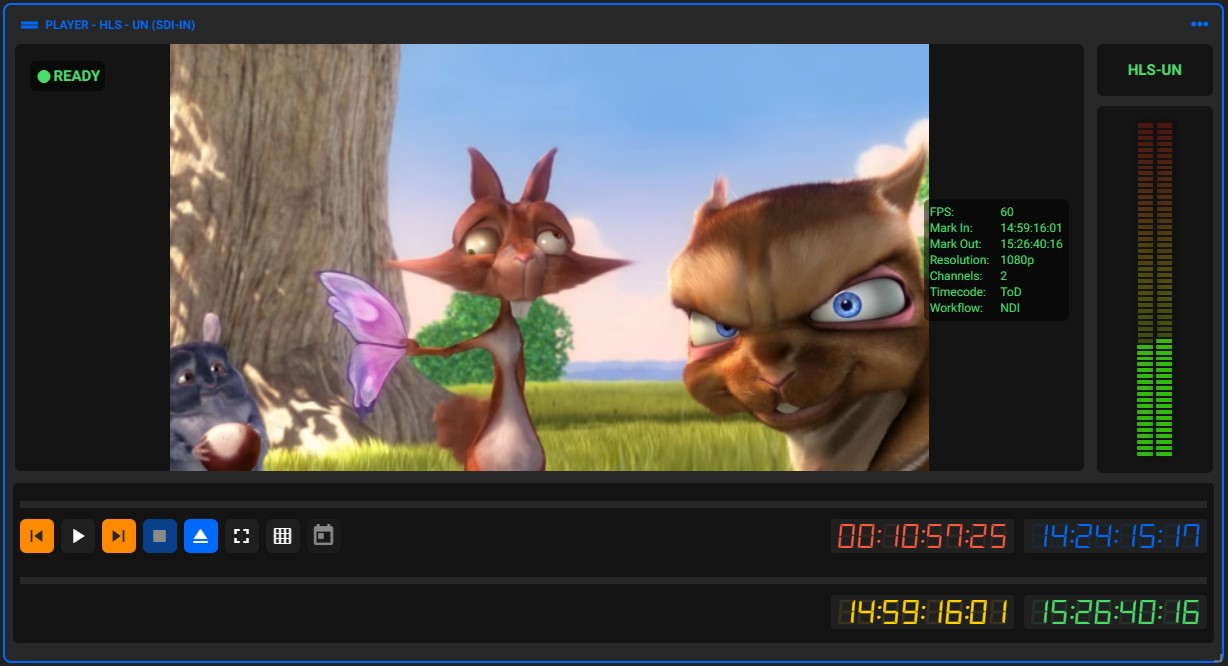
This command bar shows the following buttons:
- Step backward 1 frame: rewind a video frame;
- Play/Pause: plays/pauses the video;
- Step forward 1 frame: advances one frame of video;
- Stop: stops video;
- Eject: ejects asset;
- Fullscreen: makes the player fullscreen;
- Show/Hide overlays: toggles between showing or hiding player overlays;
- Schedule assets: schedules the playback of the asset loaded in the player. By clicking this button, the following form will be displayed for configuring the event:

Configure the event by filling in the fields below:
- Event name: enter the name of the new event;
- Start date: click to select the start date of the event in the calendar that will open;
- Start time: click to select the start time of the event in the calendar that will open;
- Asset selected name: shows the asset name. Click on this field to edit its name;
- Asset selected start timecode: shows the asset’s playback start timecode. Click on this field to edit it;
- Players SDI services: select the player service that will be used to play the asset;
- Time zone: click to select the time zone;
- Repetitions: enter the number of repetitions. If there are one or more repetitions of an event, you can configure the frequency with which it will be repeated using the “Months”, “Weeks”, “Days”, “Hours”, and “Minutes” fields;
- Trigger events: select when events will be triggered (any day, only working days, or only weekends);
- Use calendar notion: tick this option to account for time shifts (Daylight Savings Time, Time Zone shifts, etc.).
Note: a playlist is shared between all repetitions of an event. Changing it will apply the changes to all repetitions in a sequence.
Note: you will be able to edit the events created through the Calendar module. Please see page “Edit Event" for how.
¶ Troubleshooting Player
¶ User Experience in Multiviewer
In your in-house environment you may have multiple MOG systems either standalone or in a farm.
Depending on the number of MOG systems you have in-house that require a multiviewer experience with multiple players in a dashboard needed for monitoring live inputs, the users may face performance issues if they do not have the proper hardware configuration, or the proper licensing required.
For a better user experience, more than 8 players are not advised to be included.
Further information that will allow you to optimize user experience can be found by consulting your product installation manual.
¶ Chrome Freezing During Auto Play
When refreshing the Dashboard during the player’s auto play, Chrome may freeze, if it does, follow the steps below:
- Disable the sound on the player;
- In the Chrome browser, navigate to Settings > Privacy and Security > Site Settings > Additional content settings > Sound;
- In the “Allow” section, click the “Add” button and enter the IP of your system server. Click “Add” to save;
- Go to the desktop, right-click on the Chrome shortcut, and select “Properties”. In the “Target” field, enter the command line shown below. It is important to add them after the quotes, or you will receive an error.
- Command line:
--autoplay-policy=no-user-gesture-required
- Command line: