¶ Calendar
Revision date: 13/nov/2024
MAM4PRO version: 2024.09.00
Schedule different types of operations and control the entire scheduled events for all groups and machines detected.
¶ Navigation and Actions
The calendar is divided into two main sessions:
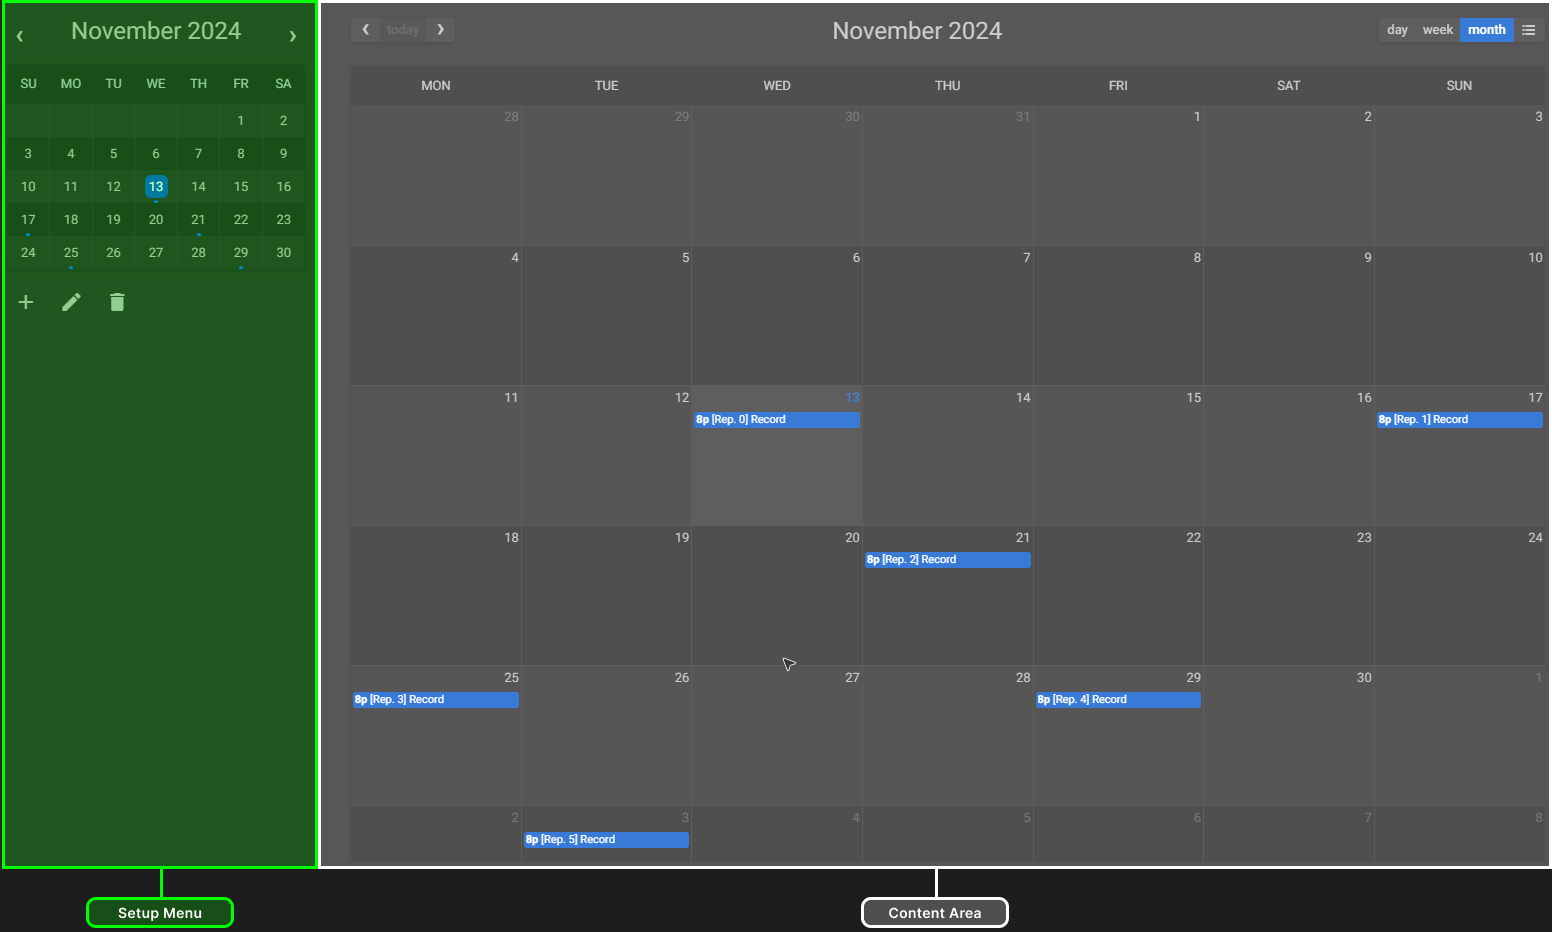
¶ Setup Menu
Browse the calendar, add, edit, and delete events;
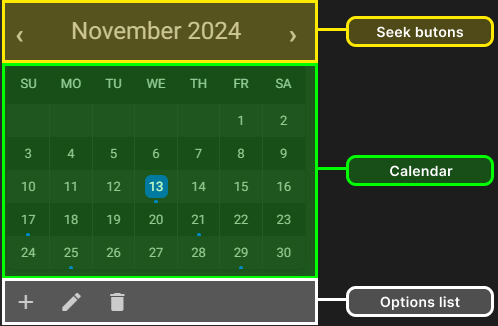
- Seek buttons: allows navigation through the calendar by month;
- Calendar: shows an overview of the month;
- Options list: presents buttons to create, edit, or delete as detailed below.
a. Add: click to add a new item;
b. Edit: click to edit the selected event;
c. Delete: click to delete the selected event.
¶ Content Area
The main events and their repetitions can be viewed on the calendar.
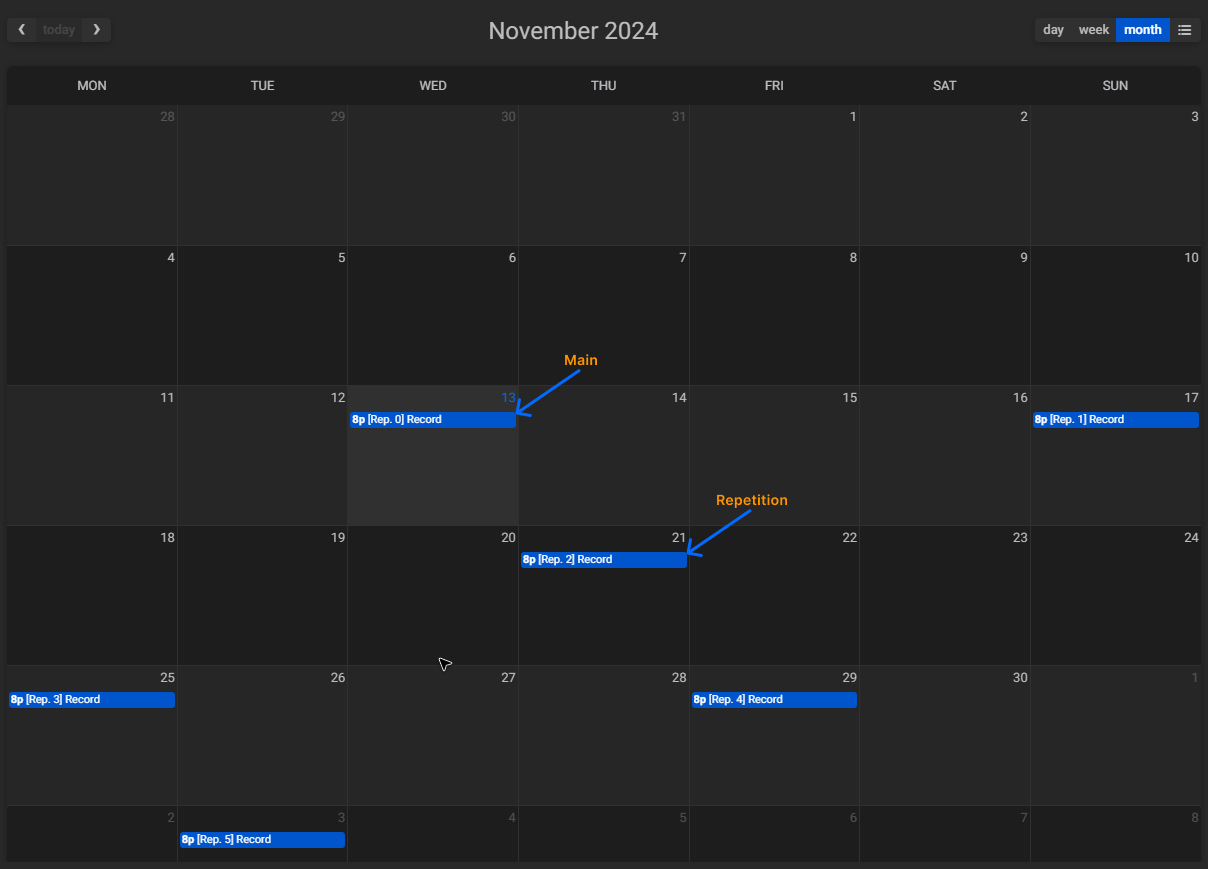
On the top-right corner, there is the option to change the calendar view (day, week, or month).
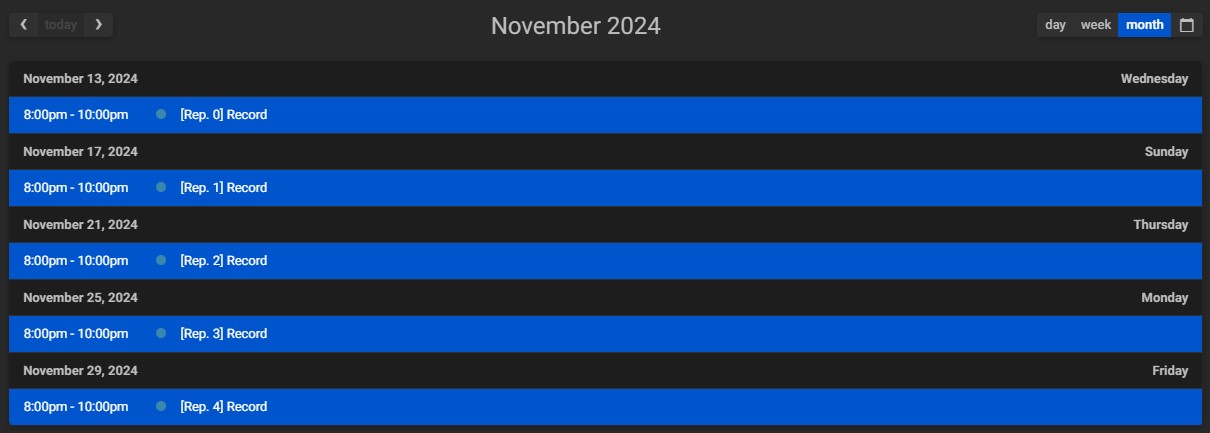
You can click the “Change view”  button to switch the view between calendar or event list by day, week, or month:
¶ Events Search
To reach created events, you can use the calendar seek buttons, which allow monthly, weekly, or daily scrolling.
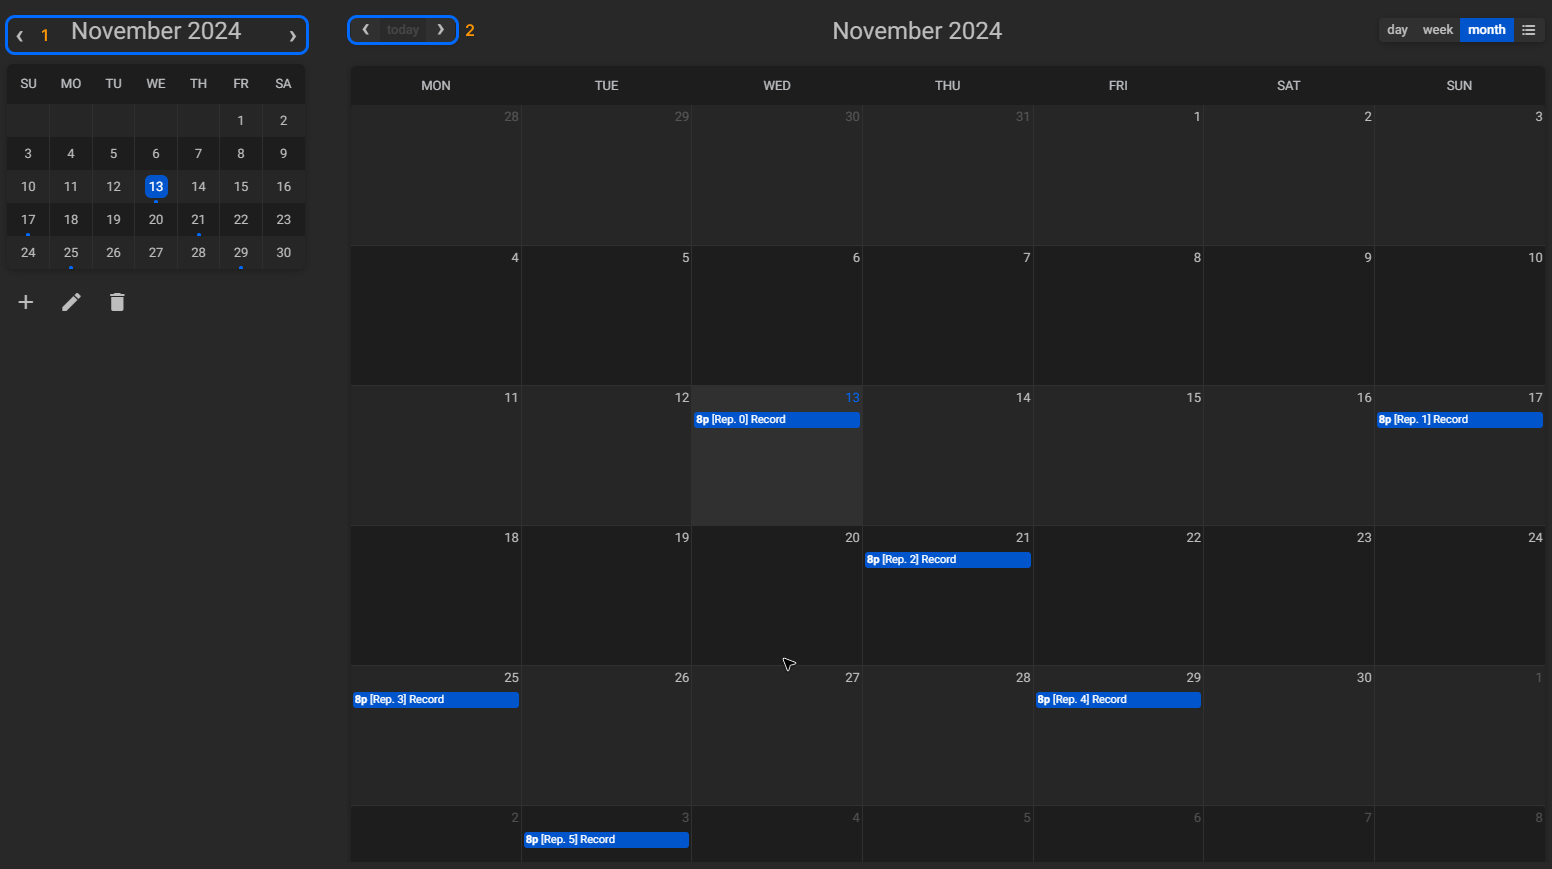
Through the seek buttons in blue square 1, the search will always be monthly, but by the seek buttons in blue square 2 the search will vary according to the type of view selected in the upper right corner (day, week, or month).
¶ Add Event
To create a new event, click on the “Add Event” button below the monthly calendar, or double-click on the preferred date (day).
When adding a new event, the window appearance and available settings vary depending on the type of event you choose from the drop-down box. They can be “Automatic Job”, “Export Activity”, “Export Full Backup”, “Export Logs”, “Gang Record”, “Playout”, “Reboot”, and “Record”.
¶ Automatic Job
Used for creating multiple events which require no user interaction;
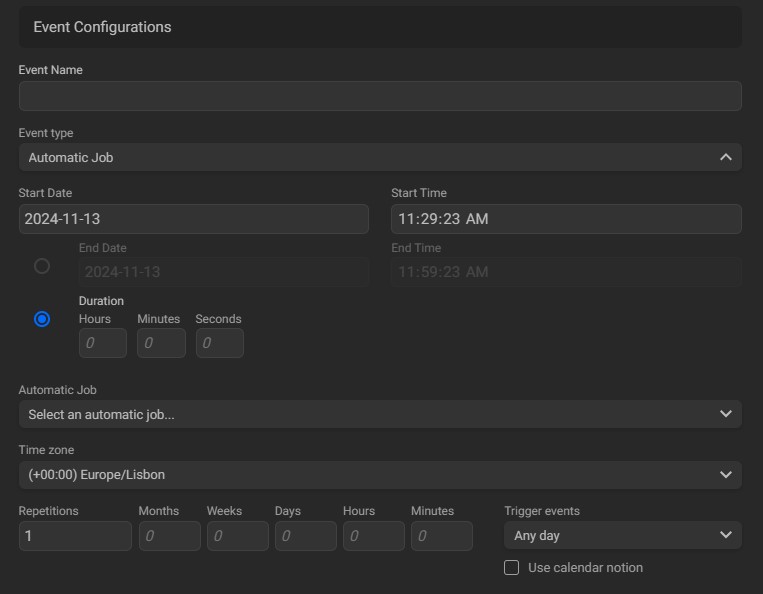
- Event Name: enter the name of the new event;
- Start Date: click to select the start date of the event in the calendar that will open;
- Start Time: click to select the start time of the event in the calendar that will open:
Note: select the end date and end time or the duration of the event to set its finish time.
- Automatic Job: select one of the jobs created in the "Automatic Job" widget;
- Ignore processed: ignore only the files already processed;
- Ignore all: ignore all existing assets in the location;
- Process all: process all assets past and future in the location.
- (only assets with a greater creation date will be processed): tick this box to process the assets whose creation date is greater than the one chosen.
- Time zone: click to select the time zone;
- Repetitions: enter the number of repetitions. If there are one or more repetitions of an event, you can configure the frequency with which it will be repeated using the "Months", "Weeks", "Days", "Hours", and "Minutes" fields;
- Trigger events: select when events will be triggered (any day, only working days, or only weekends);
- Use calendar notion: tick this option to account for time shifts (Daylight Savings Time, Time Zone shifts, etc.).
¶ Export Activity:
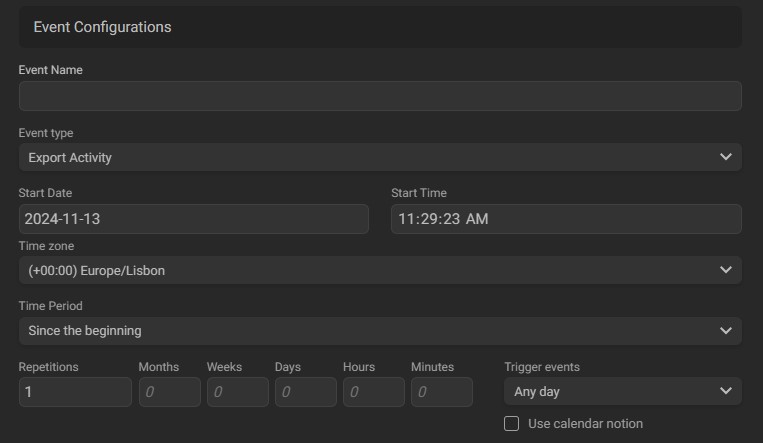
- Event name: enter the name of the new event;
- Start date: click to select the start date of the event in the calendar that will open;
- Start time: click to select the start time of the event in the calendar that will open;
- Time zone: click to select the time zone;
- Time period: click to set a period for the export activity;
- Repetitions: enter the number of repetitions. If there are one or more repetitions of an event, you can configure the frequency with which it will be repeated using the “Months”, “Weeks”, “Days”, “Hours”, and “Minutes” fields;
- Trigger events: select when events will be triggered (any day, only working days, or only weekends);
- Use calendar notion: tick this option to account for time shifts (Daylight Savings Time, Time Zone shifts, etc.).
¶ Export Full Backup:
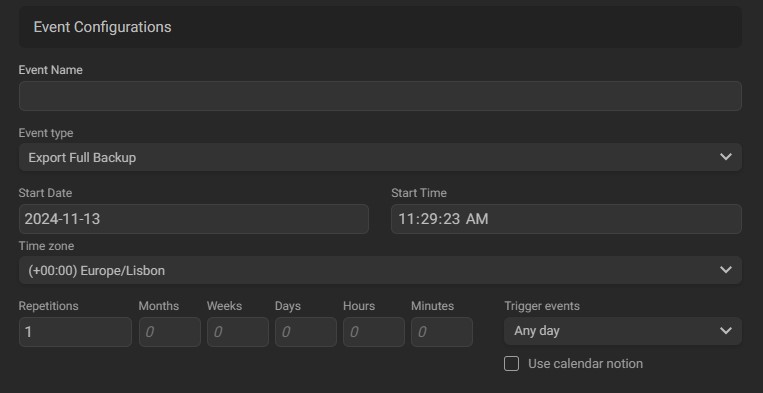
- Event Name: enter the name of the new event;
- Start date: click to select the start date of the event in the calendar that will open;
- Start time: click to select the start time of the event in the calendar that will open;
- Time zone: click to select the time zone;
- Repetitions: enter the number of repetitions. If there are one or more repetitions of an event, you can configure the frequency with which it will be repeated using the “Months”, “Weeks”, “Days”, “Hours”, and “Minutes” fields;
- Trigger events: select when events will be triggered (any day, only working days, or only weekends);
- Use calendar notion: tick this option to account for time shifts (Daylight Savings Time, Time Zone shifts, etc.).
¶ Export Logs
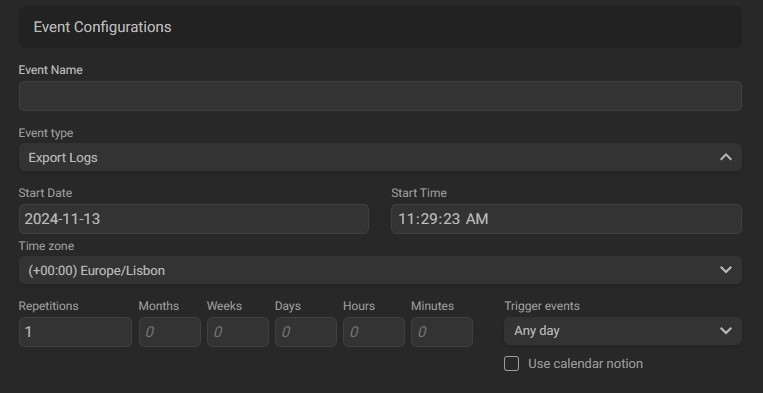
- Event Name: enter the name of the new event;
- Start date: click to select the start date of the event in the calendar that will open;
- Start time: click to select the start time of the event in the calendar that will open;
- Time zone: click to select the time zone;
- Repetitions: enter the number of repetitions. If there are one or more repetitions of an event, you can configure the frequency with which it will be repeated using the “Months”, “Weeks”, “Days”, “Hours”, and “Minutes” fields;
- Trigger events: select when events will be triggered (any day, only working days, or only weekends);
- Use calendar notion: tick this option to account for time shifts (Daylight Savings Time, Time Zone shifts, etc.).
¶ Gang Record
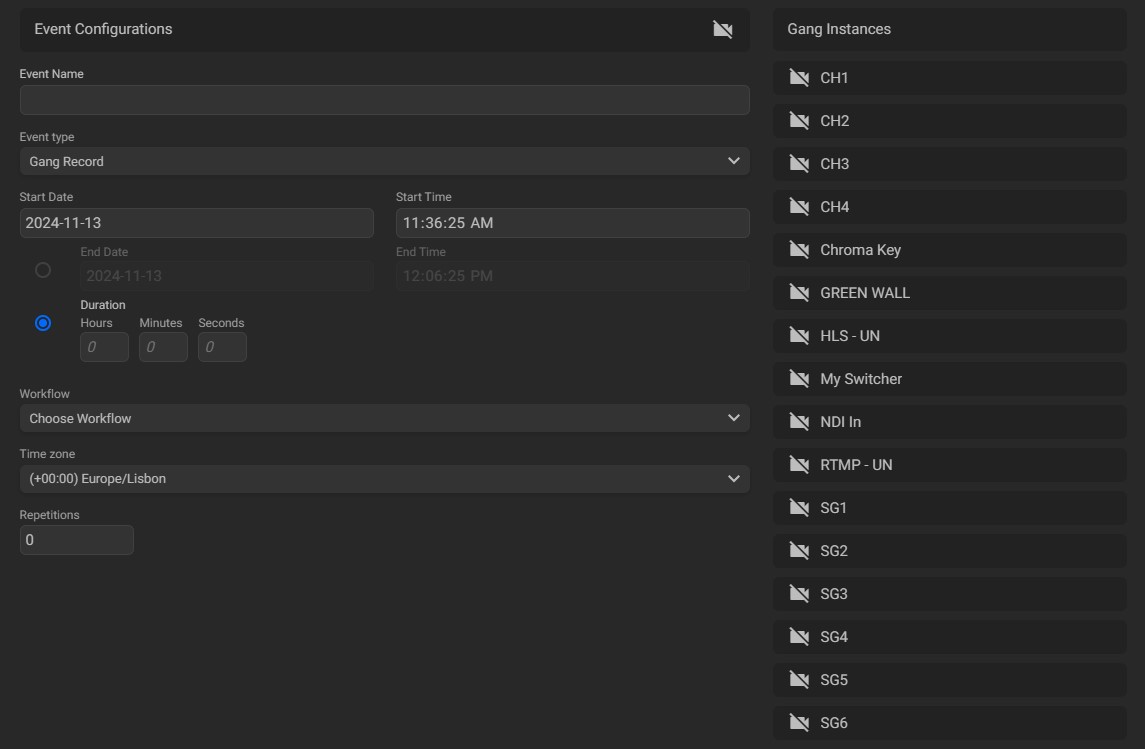
- Event Name: enter the name of the new event;
- Start date: click to select the start date of the event in the calendar that will open;
- Start time: click to choose the start time of the event;
Note: select the end date and end time or the duration of the event to set its finish time.
- Workflow: choose a recording workflow;
- Metadata user fields: fill in the required metadata fields before executing workflows. The fields shown in this area will differ based on the metadata profile selected for each workflow;
- Time zone: configure the time zone;
- Repetitions: enter the number of repetitions. If there are one or more repetitions of an event, you can configure the frequency with which it will be repeated using the “Months”, “Weeks”, “Days”, “Hours”, and “Minutes” fields;
- Trigger events: select when events will be triggered (any day, only working days, or only weekends);
- Use calendar notion: tick this option to account for time shifts (Daylight Savings Time, Time Zone shifts, etc.);
- Gang instances: choose the channels that will be part of the gang record by clicking on them.
Note that above the “Event name” field, there is a “Remove gang options”
button. By clicking this button, the channels in the “Gang instance” area will be removed from the screen and the “Event type” will be changed to “Record”.
¶ Playout
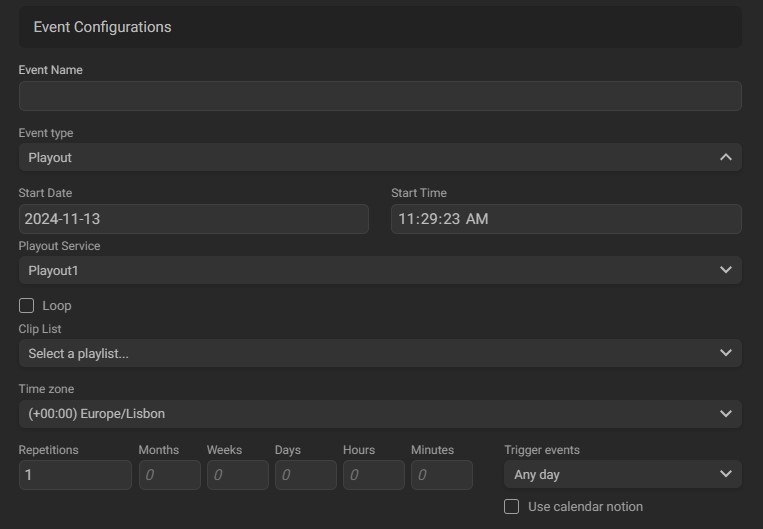
- Event Name: enter the name of the new event;
- Start date: click to select the start date of the event in the calendar that will open;
- Start time: click to select the start time of the event in the calendar that will open;
- Playout service: click to select from the available playout instances;
- Loop: select the “Loop” option, if you want the clip or clip list, to loop;
- Clip list: select a playlist created in the “Playlist Builder” or “Playout Control” widgets;
- Time zone: click to select the time zone;
- Repetitions: enter the number of repetitions. If there are one or more repetitions of an event, you can configure the frequency with which it will be repeated using the “Months”, “Weeks”, “Days”, “Hours”, and “Minutes” fields;
- Trigger events: select when events will be triggered (any day, only working days, or only weekends);
- Use calendar notion: tick this option to account for time shifts (Daylight Savings Time, Time Zone shifts, etc.).
¶ Reboot
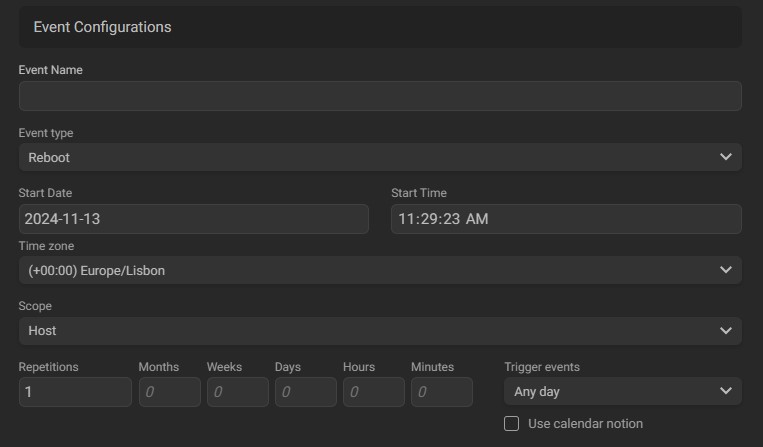
- Event Name: enter the name of the new event;
- Start date: click to select the start date of the event in the calendar that will open;
- Start time: click to select the start time of the event in the calendar that will open;
- Time zone: click to select the time zone;
- Scope: select whether the reboot will be from the host machine only or the entire group;
- Repetitions: enter the number of repetitions. If there are one or more repetitions of an event, you can configure the frequency with which it will be repeated using the “Months”, “Weeks”, “Days”, “Hours”, and “Minutes” fields;
- Trigger events: select when events will be triggered (any day, only working days, or only weekends);
- Use calendar notion: tick this option to account for time shifts (Daylight Savings Time, Time Zone shifts, etc.).
¶ Record
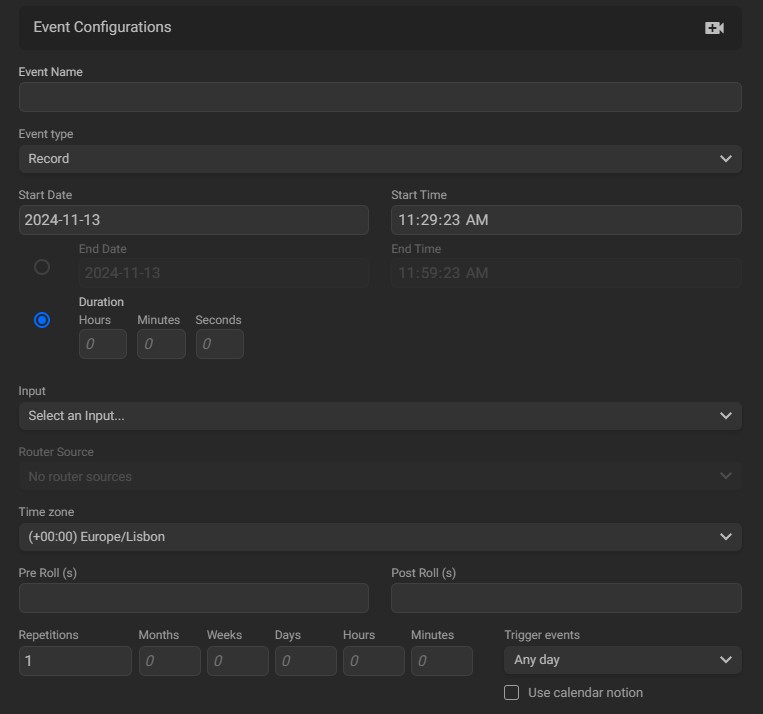
- Event Name: enter the name of the new event;
- Start date: click to select the start date of the event in the calendar that will open;
- Start time: click to select the start time of the event in the calendar that will open;
Note: select the end date and end time or the duration of the event to set its finish time.
- Input: select a stream or SDI as video input (chapters “Adding Streams Input Channels” or “Adding SDI/HDMI Channels”);
- Router source: click to select a router source, if available (chapter “Adding Video Router”);
- Workflow: choose a recording workflow;
- Metadata user fields: fill in the required metadata fields before executing workflows. The fields shown in this area will differ based on the metadata profile selected for each workflow;
- Time zone: configure the time zone;
- Pre/Post roll(s): configure the number of pre and post-roll seconds;
Note: when commuting an SDI signal there may be a delay between the router communication and MAM4PRO which could cause a capture to fail. To prevent an eventual failure a 2 second Pre-Roll is implemented by design. Changing an actual value in the Pre-Roll setting will also take the additional 2 seconds into consideration.
- Repetitions: enter the number of repetitions. If there are one or more repetitions of an event, you can configure the frequency with which it will be repeated using the “Months”, “Weeks”, “Days”, “Hours”, and “Minutes” fields;
- Trigger events: select when events will be triggered (any day, only working days, or only weekends);
- Use calendar notion: tick this option to account for time shifts (Daylight Savings Time, Time Zone shifts, etc.).
Note that above the “Event name” field, there is an “Add gang options”
button. Clicking this button changes the “Event type” to “Gang record” and displays the “Gang instance” area on the right, where you can select which channels will be part of the gang record.
¶ Edit Event
It is possible to edit a sequence of events or just one occurrence.
To start editing, select the event to edit and click the edit button below the calendar or simply double-click on the chosen event and change the fields, as indicated in the chapter “Add Event”.
If the selected event is part of a sequence of repetitions, the screen below will be presented:
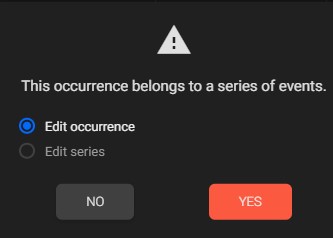
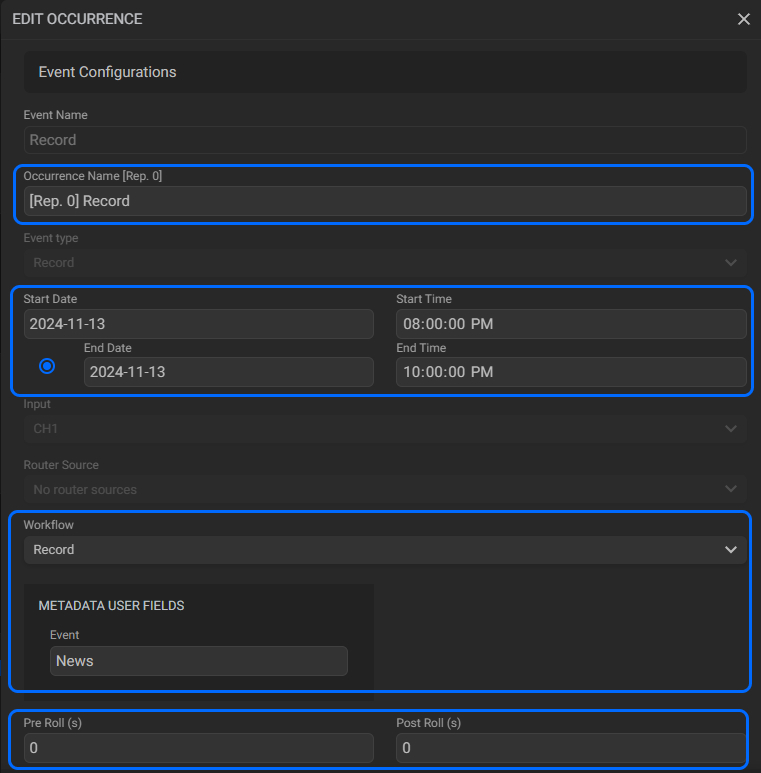
- Edit an occurrence: when editing a single occurrence of a repetition series the fields “Start Date”, “Start Time”, “End Date”, “End Time”, “Duration”, “Workflow”, and Pre/Pos Roll(s) will be available for editing;
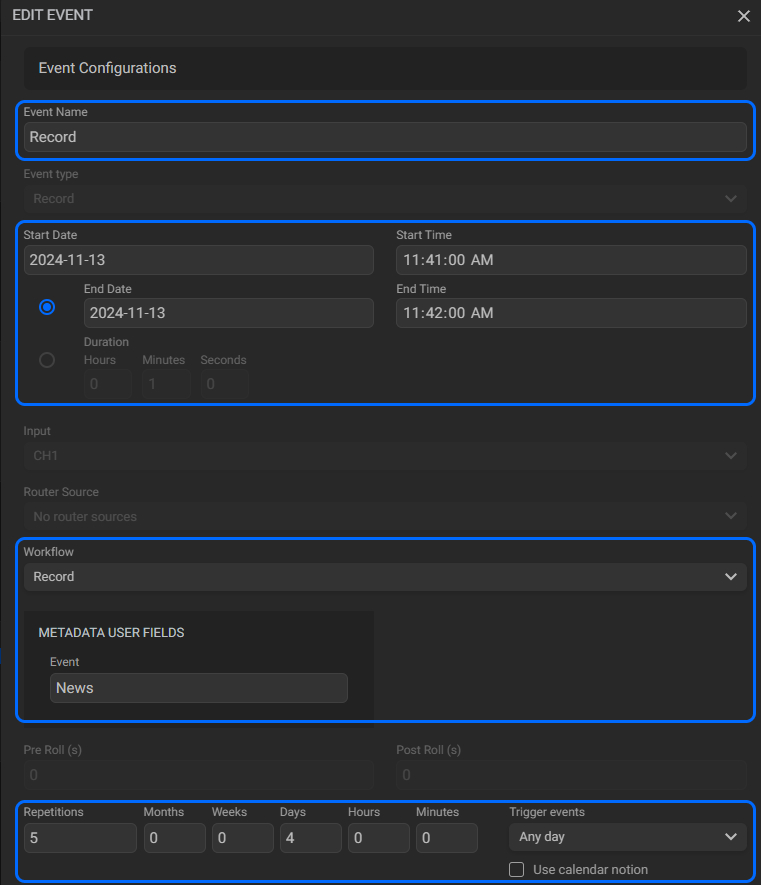
- Edit a series of events: when editing a series of already started events, you can edit only the settings of “Start Date”, “Start Time”, “End Date”, “End Time”, “Duration”, “Workflow” and the repetition fields.
¶ Delete Event
-
Click on the event to be deleted and click on the delete button below the calendar;
-
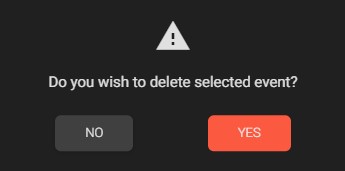
The confirmation message below will be displayed:
-
Click “Yes” to confirm the deletion or “No” to cancel.
If the selected event is part of a sequence of repetitions, the screen below will be presented: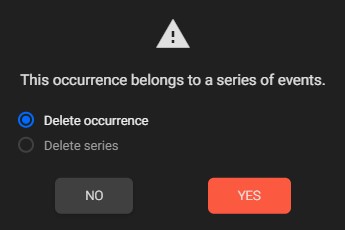
Select the desired option and click “Yes” to confirm the deletion or “No” to cancel.
Upon deletion of an event or series of events, it will be completely deleted and no history will be retained even if it has already occurred.