¶ Creating an Ingest Workflow
Revision date: 19/nov/2024
Software version: 2024.09.00
- In the Navigation menu (left of the screen) click the “WORKFLOWS” module and then on “Workflow Profiles”;

- In the options list area (lower-left corner) click the “Add”
 button to configure the workflow;
¶ Output Tab
In this tab fill in the form with the information below:
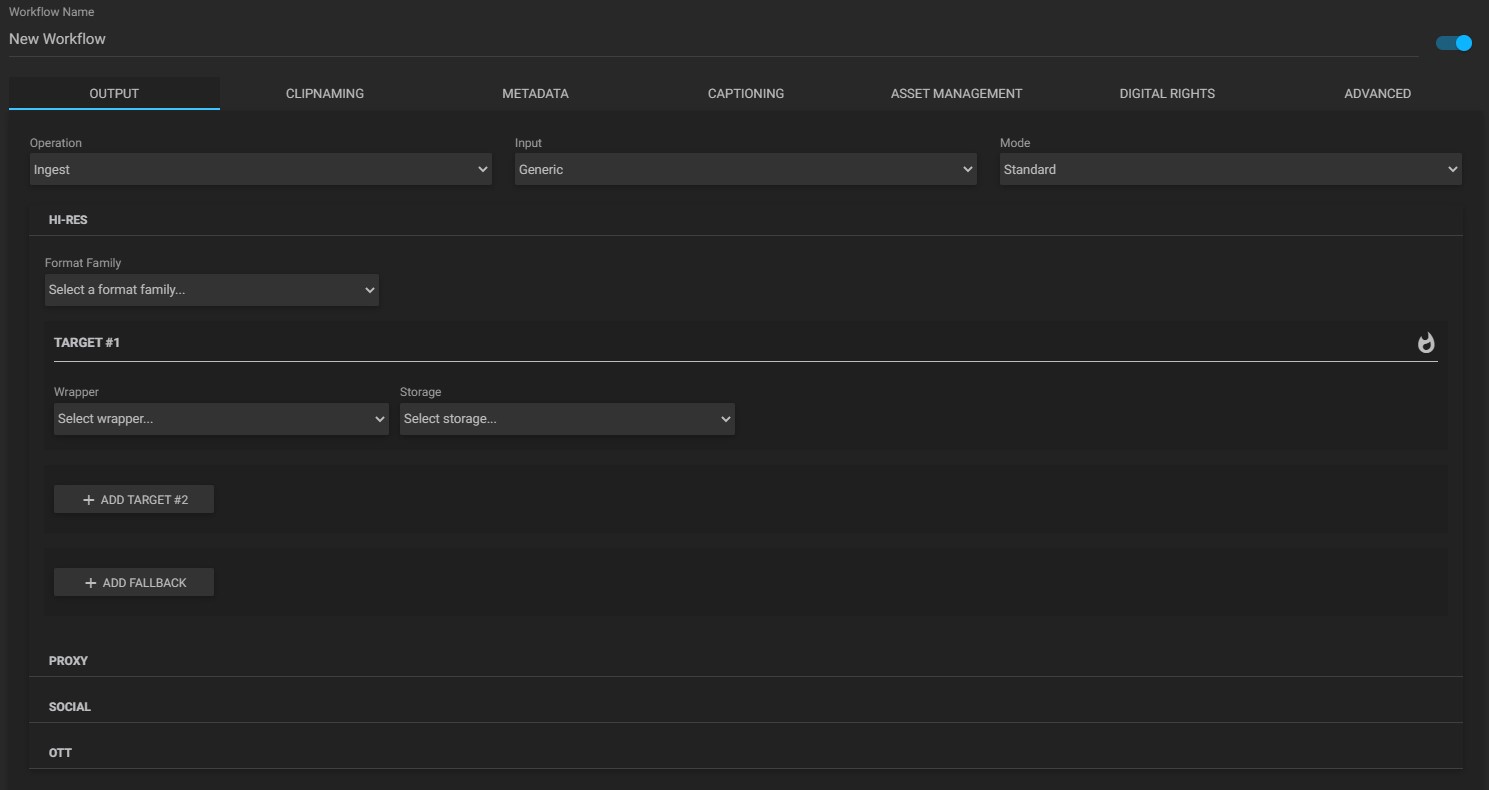
- Workflow name: enter the name of the new workflow profile;
- Disable workflow checkbox: this option is enabled by default, but if it is disabled the workflow will be unavailable for use anywhere in the system;
Note: the “Workflow Name” field and the “Disable Workflow” checkbox are always visible, regardless of which tab you are working on.
-
Operation: select the “Ingest” option;
-
Input: select the desired input type from the available options. If you choose the “Generic” input type, all asset types will be supported except for AAF;
-
Mode: select the operation mode. They can be;
a. Standard: default ingest mode that can be used to make manual or automatic ingest;
b. Merge: merge assets to form just one clip;
c. Merge as a sequence: merges assets to form a sequence of clips. -
Hi-Res settings: if applicable, configure high-resolution output options;

a. Format family: select, among the existing options, the format family for the media to be ingested;
b. Format subfamily: select, among the existing options, the format of the subfamily. These options vary depending on the chosen format family;
c. Format: select, among the existing options, the video format to be ingested. These options vary depending on the chosen format subfamily;
d. Wrapper: select, among the existing options, the type of wrapper for the media to be ingested;
e. Storage: select, among the existing options, the location of the output file. The options presented here are the storages that were previously configured. See chapter “Adding Storage” for more information;
f. Base path: enter the base path for the output file to be written into;
g. Burnt-in timecode (BITC) : activate this option to embed timecode, text or blur plates in the media being processed, as configured in the Transform tab;
h. Add target: click this button to add another target location. New Wrapper, Storage, and Base path options will appear for the second target;
i. Add fallback: you can specify a fallback target to be used if access to the mais targets (particularly network-based ones) fails. In such cases, only local drive storage options are available for fallback.
Tip: refer to this page to easily and conveniently check the full list of supported encoders for MOG products.
-
Proxy settings: if applicable, configure proxy output options;
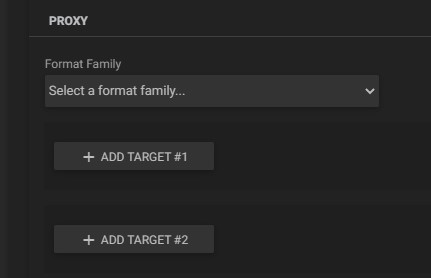
a. Format family: select, among the existing options, the format family for the media to be ingested;
b. Format subfamily: select, among the existing options, the format of the subfamily. These options vary depending on the chosen format family;
c. Format: select, among the existing options, the video format to be ingested. These options vary depending on the chosen format subfamily;
d. Wrapper: select, among the existing options, the type of wrapper for the media to be ingested;
e. Storage: select, among the existing options, the location of the output file. The options presented here are the storages that were previously configured. See chapter “Adding Storage” for more information;
f. Base path: enter the base path for the output file to be written into;
g. Burnt-in timecode (BITC) : select this option to embed the timecode in the media being processed;
h. Add target: click this button to add another target location. New Wrapper, Storage, and Base path options will appear for the second target;
i. Add fallback: you can specify a fallback target to be used if access to the main targets (particularly network-based ones) fails. In such cases, only local drive storage options are available for fallback. -
Social settings: if applicable, configure output options for social networks;

a. Upload: check this box to enable video uploading for the selected social media platform;
b. Stream: check this box to enable video streaming for the selected social media platform;
c. Burnt-in button: select this option to embed timecode or text in the media being processed. Configure what will be embedded in the Advanced > Transform tab. There are independent switches for upload and stream options.
 -
OTT settings: if applicable, set output options to OTT;

a. Add format: click this button to enable a new output format. If selected, new “Format Family”, “Format Sub Family” and “Format” options will appear for each new target format;
b. Format family: select, among the existing options, the format family for the media to be ingested;
c. Format subfamily: select, among the existing options, the format of the subfamily. These options vary depending on the chosen format family;
d. Format: select, among the existing options, the video format to be ingested. These options vary depending on the chosen format subfamily;
e. Wrapper: select, among the existing options, the type of wrapper for the media to be ingested;
f. Storage: select, among the existing options, the location of the output file. The options presented here are the storages that were previously configured. See chapter “Adding Storage” for more information;
g. Base path: enter the base path for the output file to be written into;
h. Burnt-in timecode (BITC) : select this option to embed the timecode in the media being processed.
 -
Files settings: if applicable, configure output options for image ingest.
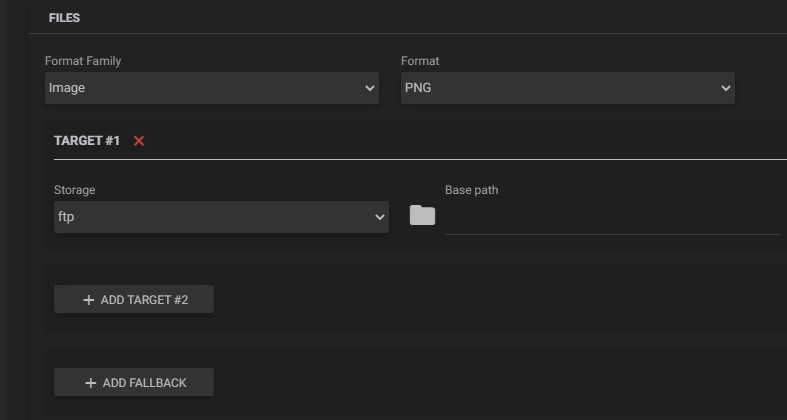
a. Format family: select, among the existing options, the format family for the media to be ingested;
b. Format: select, among the existing options, the video format to be ingested. These options vary depending on the chosen format subfamily;
c. Storage: select, among the existing options, the location of the output file. The options presented here are the storages that were previously configured. See chapter “Adding Storage” for more information;
d. Base path: enter the base path for the output file to be written into;
e. Burnt-in timecode (BITC) : select this option to embed the timecode in the media being processed;
f. Add target: click this button to add another target location. New Wrapper, Storage, and Base path options will appear for the second target;
g. Add fallback: you can specify a fallback target to be used if access to the main targets (particularly network-based ones) fails. In such cases, only local drive storage options are available for fallback.
¶ Clipnaming Tab
In this tab, select from the configured naming templates (chapter “Creating a Naming Template”) which will be used to name the assets generated by the execution of the current workflow;

If the workflow target is a sequence, the “Sequence Clip Naming” tab will be enabled to choose the naming template.
When a naming template is selected, information about the naming template appears, as well as some advanced options, which include:

- Reset counters button: click this button to reset existent counters;
- Reset counters automatically: tick this box to enable the automatic resetting of the counters’ values, for each ingests operation;
- Reset counters on metadata change: tick this box to enable the automatic resetting of the counters’ values when there is a change in metadata.
- Recover on metadata match: resumes the count where it was the last time the workflow was run whenever the other metadata fields match those from previous runs. Great option for incrementing takes of specific episodes and scenes recordings. For example, a workflow was configured with a clipnaming that has the fields “Episode” and “Scene” to be filled in by the operator. Before starting the recording, the “Episode” field was filled with “2” and the “Scene” with 1. When starting the recording, the “Take” field (MAM4PRO default) was automatically filled with 1. After other recordings of other episodes were recorded there was a need to record another take for episode 2, scene 1. When filling in the metadata with this information, the take will resume where it left off, that is, the next recording will take over take 2.
Tip: to delete the selected template, click on the “Clear”
button on the right side of the selection box.
¶ Metadata Tab
In this tab, select from the configured metadata profiles (chapter “Creating a Metadata Profile”) which will be used for the current workflow.

Tip: to delete the selected template, click on the “Clear”
button on the right side of the selection box.
¶ Captioning Tab
In this tab, you can set different sidecars for Hi-Res, Proxy, and OTT resolutions;

- Add a new sidecar: click this button to add a new sidecar to the operation output;
- Select a sidecar: choose a sidecar from the available sidecar types;
- Select storage: select from the existing options the storage location for the sidecar;
- Burnt-in
 button: select this option to embed the subtitle in the media being processed.
¶ Asset Management Tab
In this tab you can configure different check-ins for your assets. It is possible to adopt different configurations for Hi-res, Proxy, and OTT resolutions.

- Add a new MAM output: click this button to add a new asset management output file;
- Select a MAM type: choose the type of MAM output file from the pre-configured MAM file types (chapter “Adding Asset Management”);
- Select a location: select from the previously configured options the storage location for the MAM file (chapter “From a MAM”);
- Location path: enter the folder path containing the intended file;
- Select an xslt (optional): select the XML output model previously inserted in chapter “System Settings”, step 3. If this field is not filled, the default MOG model will be assumed;
- Live: check this option to generate Live streams to Vizzi. This option is only available when using the Vizzi MAM type;
- Update: check this option to use the Vizzi backend to upload a VOD using our transcoding operation. This option is only available when using the Vizzi MAM type, which implies the use of inputs from Generic S3, Amazon S3, or IBM.
Notes:
- For outputs of types MP4, OP1a, OP1b, MPEG, QT, MPEG_TS, WEBM, IMF, MATROSKA, and WAV it is also possible to select whether the outputs should be added to one or more collections. For this, in the "Select a MAM type" field, select the collection option, and in the "Select a location" field choose the collection to which the asset should be added;
- When the operation finishes, the output(s) will be automatically added to the collection and set as offline. It may take up to one minute for the output asset to be updated from offline to online;
- When the internal monitor verifies that the outputs are available, the assets will be set online, and their metadata will be updated;
- Check-in will not work for multiple-file outputs (e.g., OPAtom) and for captures with a max record duration (because they result in multiple files);
- The output asset will check for an XML sidecar with the same name and in the same directory (not whatever XML is specified under the Asset Management tab).
¶ Digital Rights Tab
In this tab, you can select the DRM provider for each output;

- Select DRM type: choose the type of DRM to be used;
- Select a Digital rights provider: select the DRM provider previously inserted in the chapter “Adding a Digital Rights Management Provider”.
Note: at the moment, MAM4PRO supports only the Vizzi DRM Hub. For the DRM provider to be used, check-in on the Vizzi (“Asset Management Tab”) must also be configured for the corresponding outbound destination.
¶ Advanced Tab
In this tab, it is possible to define some specific options as we will see below.
¶ Generic
Configure the workflow behavior in the options shown below.
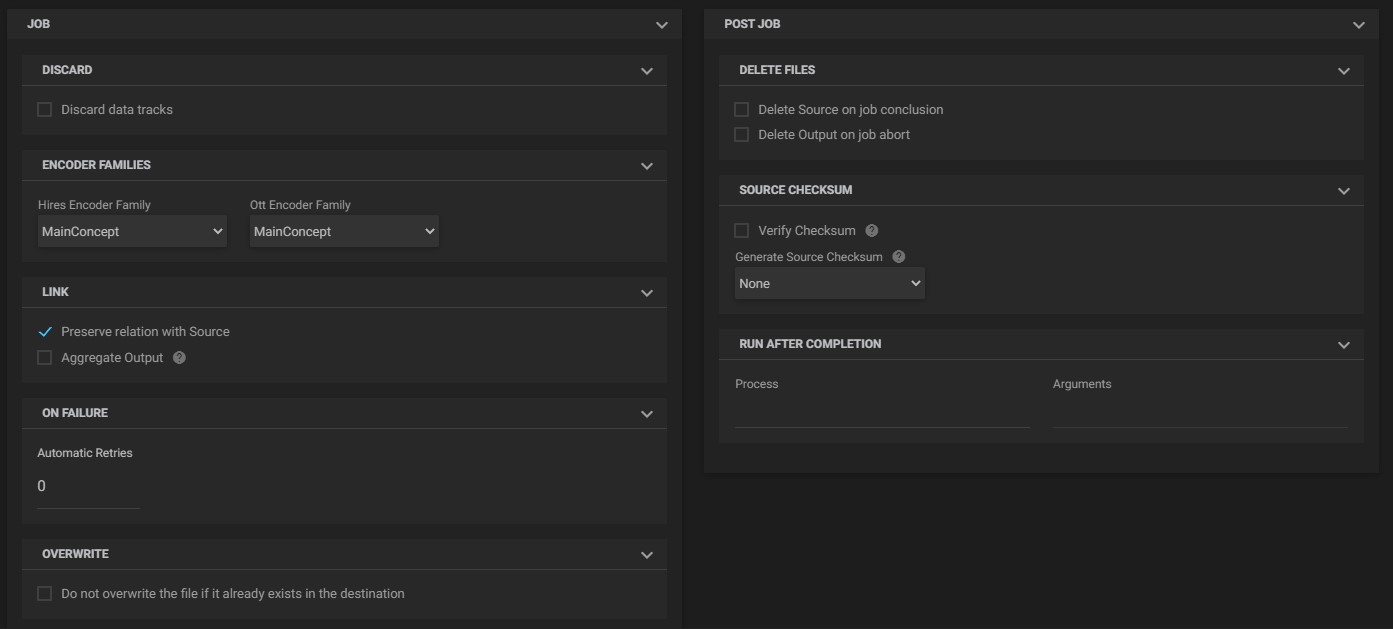
Job:
- Discard data tracks: discards AVID’s data tracks;
- Ignore unrendered effects: check this box to ignore some unrendered effects inside an AVID sequence;
- Hires encoder family: select the encoder family. The available options will vary depending on the selected output format;
- OTT encoder family: select from the existing options the OTT encoder family;
- Fragmented MP4: click to enable the generation of fragmented MP4 files;
- Preserve relation with source: check this box to keep the UMID relation, between the output asset and the original file;
- Aggregate output: check this box to keep the UMID relation between output assets;
- Automatic retries: enter the number of times the workflow will be retried in case of failure. Valid for file-based workflows;
- Do not overwrite the file if it already exists in the destination: check this box to prevent the operation from overwriting an existing file;
- Start sequence timecode: enter the timecode that will replace the start sequence timecode of the asset. It can only be used when the “Merge as sequence” mode is selected in the “Output” tab;
- Priority: choose between three levels of execution priority for each operation and target;
- Source path append level: enter the source folder depth, to be replicated for the output asset folder path. “-1” appends the whole source path;
- RDD9 Single Partition: check this box to assemble all RDD9 components into a single partition;
- Add clip number suffix to each clip in the sequence: check this box to add a clip suffix number to each clip in a sequence, when clip naming is activated;
- Sort by sequence on XML file (Automatic Job Only): check this box to process the sequential assets with the info from a source XML file. This works for automatic jobs;
- Generate a temporary side-by-side index table for growing compatibility: check this box to enable the generation of growing files using Grassvalley Edius SDK.
Format:
- Segment duration: enter the segment duration in seconds for outputs which wrapper is CMAF, HLS, HLS fMP4, and MPEG-DASH. The value must be between 1 and 60 seconds;
- Max Playlist Segments: enter the number of segments to include in the HLS playlist.
Post Job:
- Delete source on job conclusion: when this option is activated, the asset will be deleted from the source location after the job conclusion;
- Delete referenced files on job conclusion: check this box to remove referenced sources from the AAF file on AVID sequences;
- Delete output on abort: select to delete artifacts when an ingest, copy or move operation is aborted;
- Active Format Description: choose between “Preserve”, “Discard” and “Override” the asset’s Active Format Description. If “Override” is selected, the following option will appear:
a. Override value: select between the active format options available. - Run after completion: this option allows running a command/process automatically after finishing the workflow;
a. Process: enter the process to run;
b. Arguments: enter the process arguments. - Verify checksum: if this option is checked, the copy operation will also perform a checksum verification;
- Generate source checksum: select from a list the type of file you want to generate with the output checksum.
¶ Metadata
Configure the metadata behavior in the options shown below.
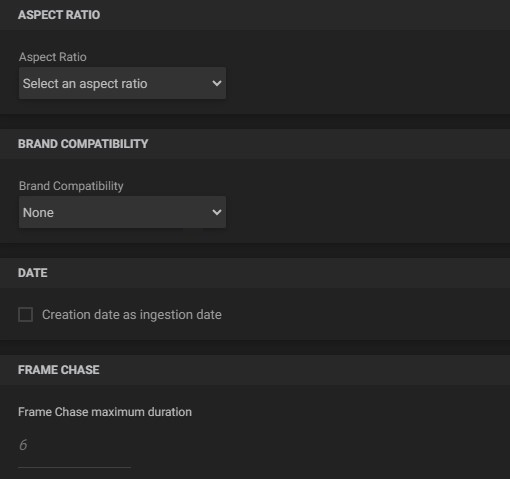
The “Metadata” tab presents the following configuration options:
Aspect Ratio:
- Aspect ratio: select from the various output conversion aspect ratios available;
- Avid OPAtom library: select the desired Avid OPAtom library. The available options have two big differences:
a. MXF-SDK (legacy): MXF OPATOM created using MOG SDK;
b. AMT and AMT-3 (legacy): MXF OPATOM created using Avid Media Toolkit (AMT).
Note: we recommend using the AMT-3 library as the default.
Brand Compatibility:
For outputs with the Avid OP-Atom wrapper you can choose the brand compatibility for Sony XAVC Intra and Panasonic AVC-Intra codecs in order to make the output fully compatible with the desired codec/brand.
Date:
- Creation date as ingestion date: check this box to set the asset’s creation date as the ingest date, instead of the original asset’s creation date;
Export Avid:
- Ignore AAF start timecode: check this box to ignore the start timecode in AVID environments, using AAFs;
- Set safe color limiter: check this box to force the output to be compliant with Broadcast Safe Colors. It requires to transcode;
Frame Chase:
- Frame chase maximum duration: eenter the maximum number of hours that FrameChase will be active. The maximum value is 6 hours;
Timecode:
- Start timecode: enter a new start timecode if you want to override the asset start timecode;
- Preserve source timecode track: check this box to preserve original timecode track.
Behavior:
- Behavior: select between copying all files (media and sidecars), only media, or only sidecars.
¶ Video
Configure the video behavior in the options shown below.
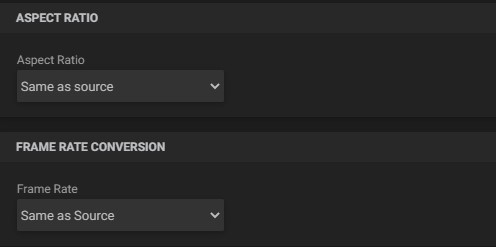
The “Video” tab presents the following configuration options:
Aspect Ratio:
- Aspect ratio: select from the various output conversion aspect ratios available;
Frame Rate:
- Frame Rate Conversion: select from the various output conversion frame rates available. Selecting “Same as source” turns off frame rate conversion;
¶ Audio
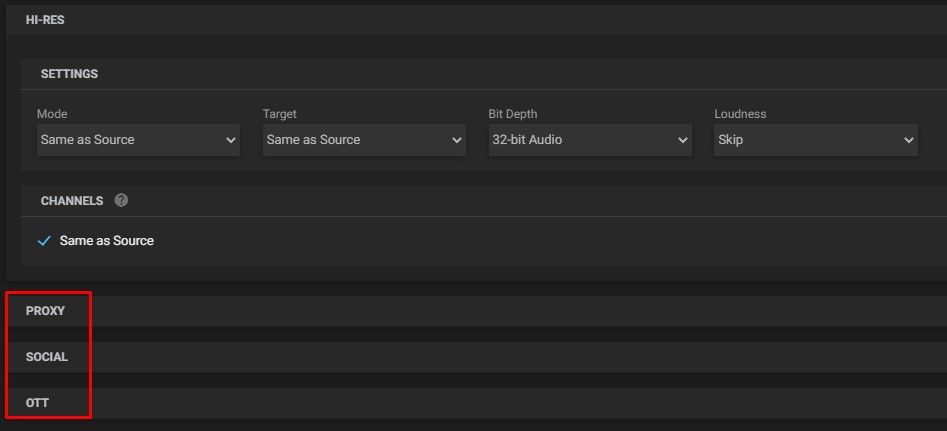
Configure the workflow audio behavior. It is possible to adopt different configurations for each type of output (Hi-res, Proxy, Social, and OTT).

The “Audio” tab presents the following configuration options:
Settings:
- Mode: select the input audio mode;
- Target: select from the existing options the output target audio mode;
- Bit depth: choose from the existing options the output audio resolution;
- Loudness: choose from the existing options the volume normalization.
Channels:
- Same as Source: uncheck this option if you want to set the number of audio output channels;
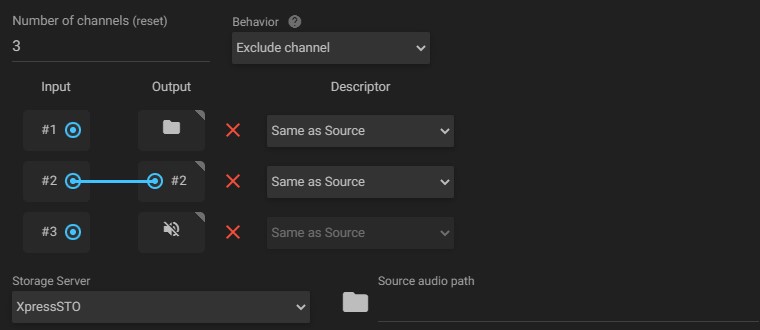
- Number of Channels (reset): enter the number of output audio channels. Click on the word “(reset)” to the right of the “Number of channels” field to reset the channel mapping;
- Behavior: select how the operation will behave when the desired number of audio channels is not found;
- Include silence: includes a silent audio track on the missing audio channels;
- Exclude channel: excludes the missing audio channel;
- Abort: aborts the operation.
- Output/Input channels: assign input channels to output channels. Clicking on an output channel allows you to assign an alternative audio track to be used as that audio channel. In that case, the options are:

- Normal: allows the association of input channels with output channels. To do this, click on any input channel and keep the mouse button pressed to draw a line up to the output channel. Output channels that do not have an associated connection will be automatically mapped to the respective input channel;
Before Save After Save 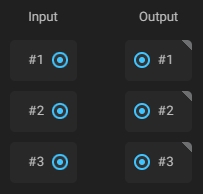
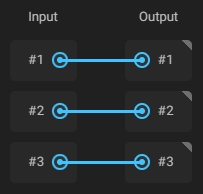
In this example, the 3 audio channels will be mapped automatically after saving. Input 1 will be mapped to output 1, input 2 will be mapped to output 2, and input 3 will be mapped to output 3.
Note: an output can only have one input associated with it, but an input can be associated with more than one output.
- Folder: allows selection of input audio track folder path. When selecting this option, the following fields will appear:
- Storage server:select the input audio track storage server from the pre-configured storages;
- Source audio path:select the input audio track folder path;
- Align audio to:choose when will the added audio track start.
- Silence: mute the output channel.
- Normal: allows the association of input channels with output channels. To do this, click on any input channel and keep the mouse button pressed to draw a line up to the output channel. Output channels that do not have an associated connection will be automatically mapped to the respective input channel;
- Remove connection button: click this button
 to reset the corresponding output channel settings or select the line to be deleted (it will turn yellow) and press the delete key.
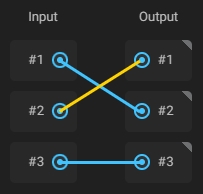
Independently of the method used, only connections and channel modes will be cleared, descriptors will not be changed.
- Descriptor: click to select the descriptor (Same as Source, PCM, Dolby-E) for the corresponding channel. Output channels in silence mode will have no associated descriptor.
When configuring different output destinations, MAM4PRO will present them in the “Audio Options” tab, allowing different audio mappings. To navigate between the different outputs, scroll down and configure the desired output.
¶ Transform
The “Transform” tab presents some configuration options for burning and transforming the output:
Timecode: configure the format and location of the timecode to be inserted into the output. This will only apply to targets with burnt-in enabled. To do this, on the “Output” tab, click on the “Burt-in Timecode” button  on the right side of the target;

- Activation check box: click on this box, located to the right of the Timecode section, to enable and disable the inclusion of timecode in the output video;
- Position: choose the position of the burnt-in timecode;
- Text color: select the color of the burnt-in timecode text;
- Box color: select the color of the burnt-in timecode box;
- Font size: enter the size of the burnt-in timecode font.
Text: configure a text to be inserted into the output. This will only apply to targets with burnt-in enabled. To do this, on the “Output” tab, click on the “Burt-in Timecode” button  on the right side of the target;

- Activation check box: click on this box, located to the right of the Timecode section, to enable and disable the inclusion of timecode in the output video;
- Position: choose the position of the burnt-in text;
- Text color: select the color of the burnt-in text;
- Box color: select the color of the burnt-in text box;
- Text: enter the text to be overlayed;
- Font size: enter the font size of the burnt-in text.
Overlays: configure some overlay to be inserted into the output;

- Activation check box: click on this box, located to the right of the Timecode section, to enable and disable the inclusion of timecode in the output video;
- Storage server: select the storage server for the overlay file input;
- Path: enter the base path folder for the overlay file input;
- Behavior: select the behavior of the burnt-in overlay. The available options are:
a. Freeze: the overlay displays a still image;
b. Loop: loops the input overlay;
c. Play once: plays the input overlay only once. - Relative position: the overlay is in the relative position of the output asset;
a. Position: choose from the available positions;
b. Size: enter the size of the burnt-in overlay in percentage. - Absolute position: the overlay is in the absolute position of the output asset;
a. Video width: enter the width of the output video;
b. Video height: enter the height of the output video;
c. Overlay width: enter the width of the burnt-in overlay;
d. Overlay height: enter the height of the burnt-in overlay;
e. X: enter the horizontal position of the burnt-in overlay;
f. Y: enter the vertical position of the burnt-in overlay. - “+ Overlay #2”: click to add one more overlay to the output. When adding a new overlay, the button “+ Overlay #3” will appear below and so on, allowing you to insert as many overlays as necessary.
LUT: color correction filter applied from an input LUT file.

- Activation check box: click on this box, located to the right of the Timecode section, to enable and disable the inclusion of timecode in the output video;
- Storage server: select the storage server for the LUT file input;
- Path: enter the base path folder for the LUT file input.
BLUR: configure your output to show identified license plates with a blur. This will only apply to targets with burnt-in enabled. To do this, on the “Output” tab, click on the “Burt-in Timecode” button  on the right side of the target;

- License Plates: will identify and blur the license plates found.
- Overlay: select between an opaque color box or the blur of the license plate. Depending on the chosen type, the options will be:
- Intensity: set the blur intensity between 1 to 5;
- Blur color box: click to set the blur color. When clicking on the box, a color picker will be displayed to choose the color. This can be done by clicking on the desired color or by typing the color value in RGB.
- Overlay: select between an opaque color box or the blur of the license plate. Depending on the chosen type, the options will be:
UPSCALE: converts a low-resolution video to a higher resolution one;

- Mode: click to select from the available options the resize mode;
- Video width: enter the width value that the output should have;
- Video height: enter the height value that the output should have.
CROP: eliminate black margins by cropping the video with reference to the viewing area;
If a video has different types of margins at different timestamps (e.g., the video is 16:9 and letterbox, but during a flashback, the film director decided to include a part that is 4:3 and pillarbox), the crop will always be performed considering the maximum viewing area. The output file will have new dimensions, but the aspect ratio will remain the same.

- Automatic black margins crop: automatically crop previously detected black margins. For this option to work correctly, a metadata enhancement workflow must have already been executed for the desired source so that the asset’s metadata has the required info for the crop to occur;
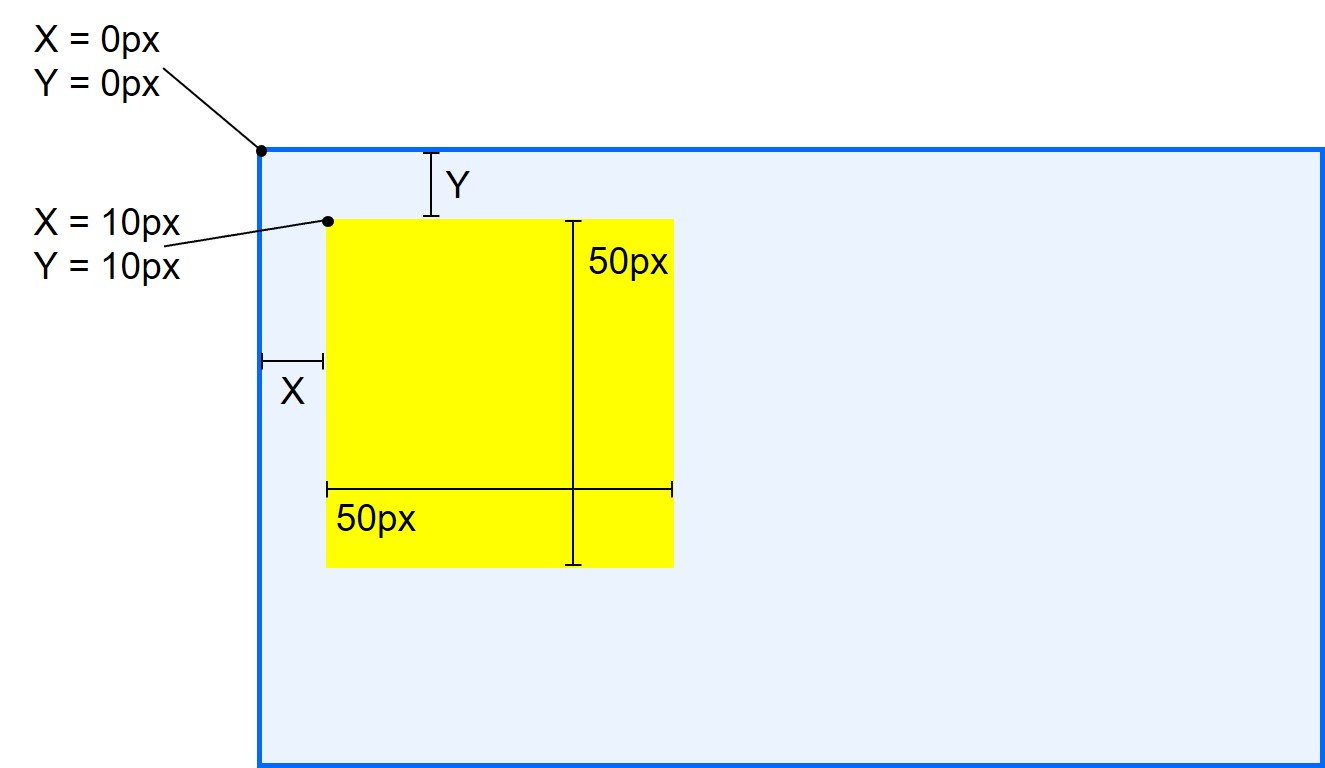
- X: enter the value where the crop will start horizontally;
- Y: enter the value where the crop will start vertically;
- Video width: enter the width value that the output should have;
- Video height: enter the height value that the output should have.
The upper left corner is considered as the origin point, that is, where X and Y have values 0. For example, if we wanted to set absolute values and set X and Y to 10px and width and height to 50px, we would get the following result:
With this functionality you can, for example, ensure that your video has one of the formats below:

You can also correct margins like these:

Note: some encoders have size restrictions, so although a black margins crop is performed, new black margins might be added later if the encoder only works with a specific set of dimensions.
VIDEO: configure video effects;

- Reduce video flashing: click to enable automatic reduction of flashing or patterned effects.
AUDIO: configure automatic removal of audio disturbances and distortions.

- Remove audio clicks: click to enable automatic removal of clicks from the input audio;
- Remove audio clipping: click to enable automatic removal of clipping from the input audio restoring affected samples.