¶ Basic Navigation
Revision date: 03/sep/2024
MAM4PRO version: 2024.07.00
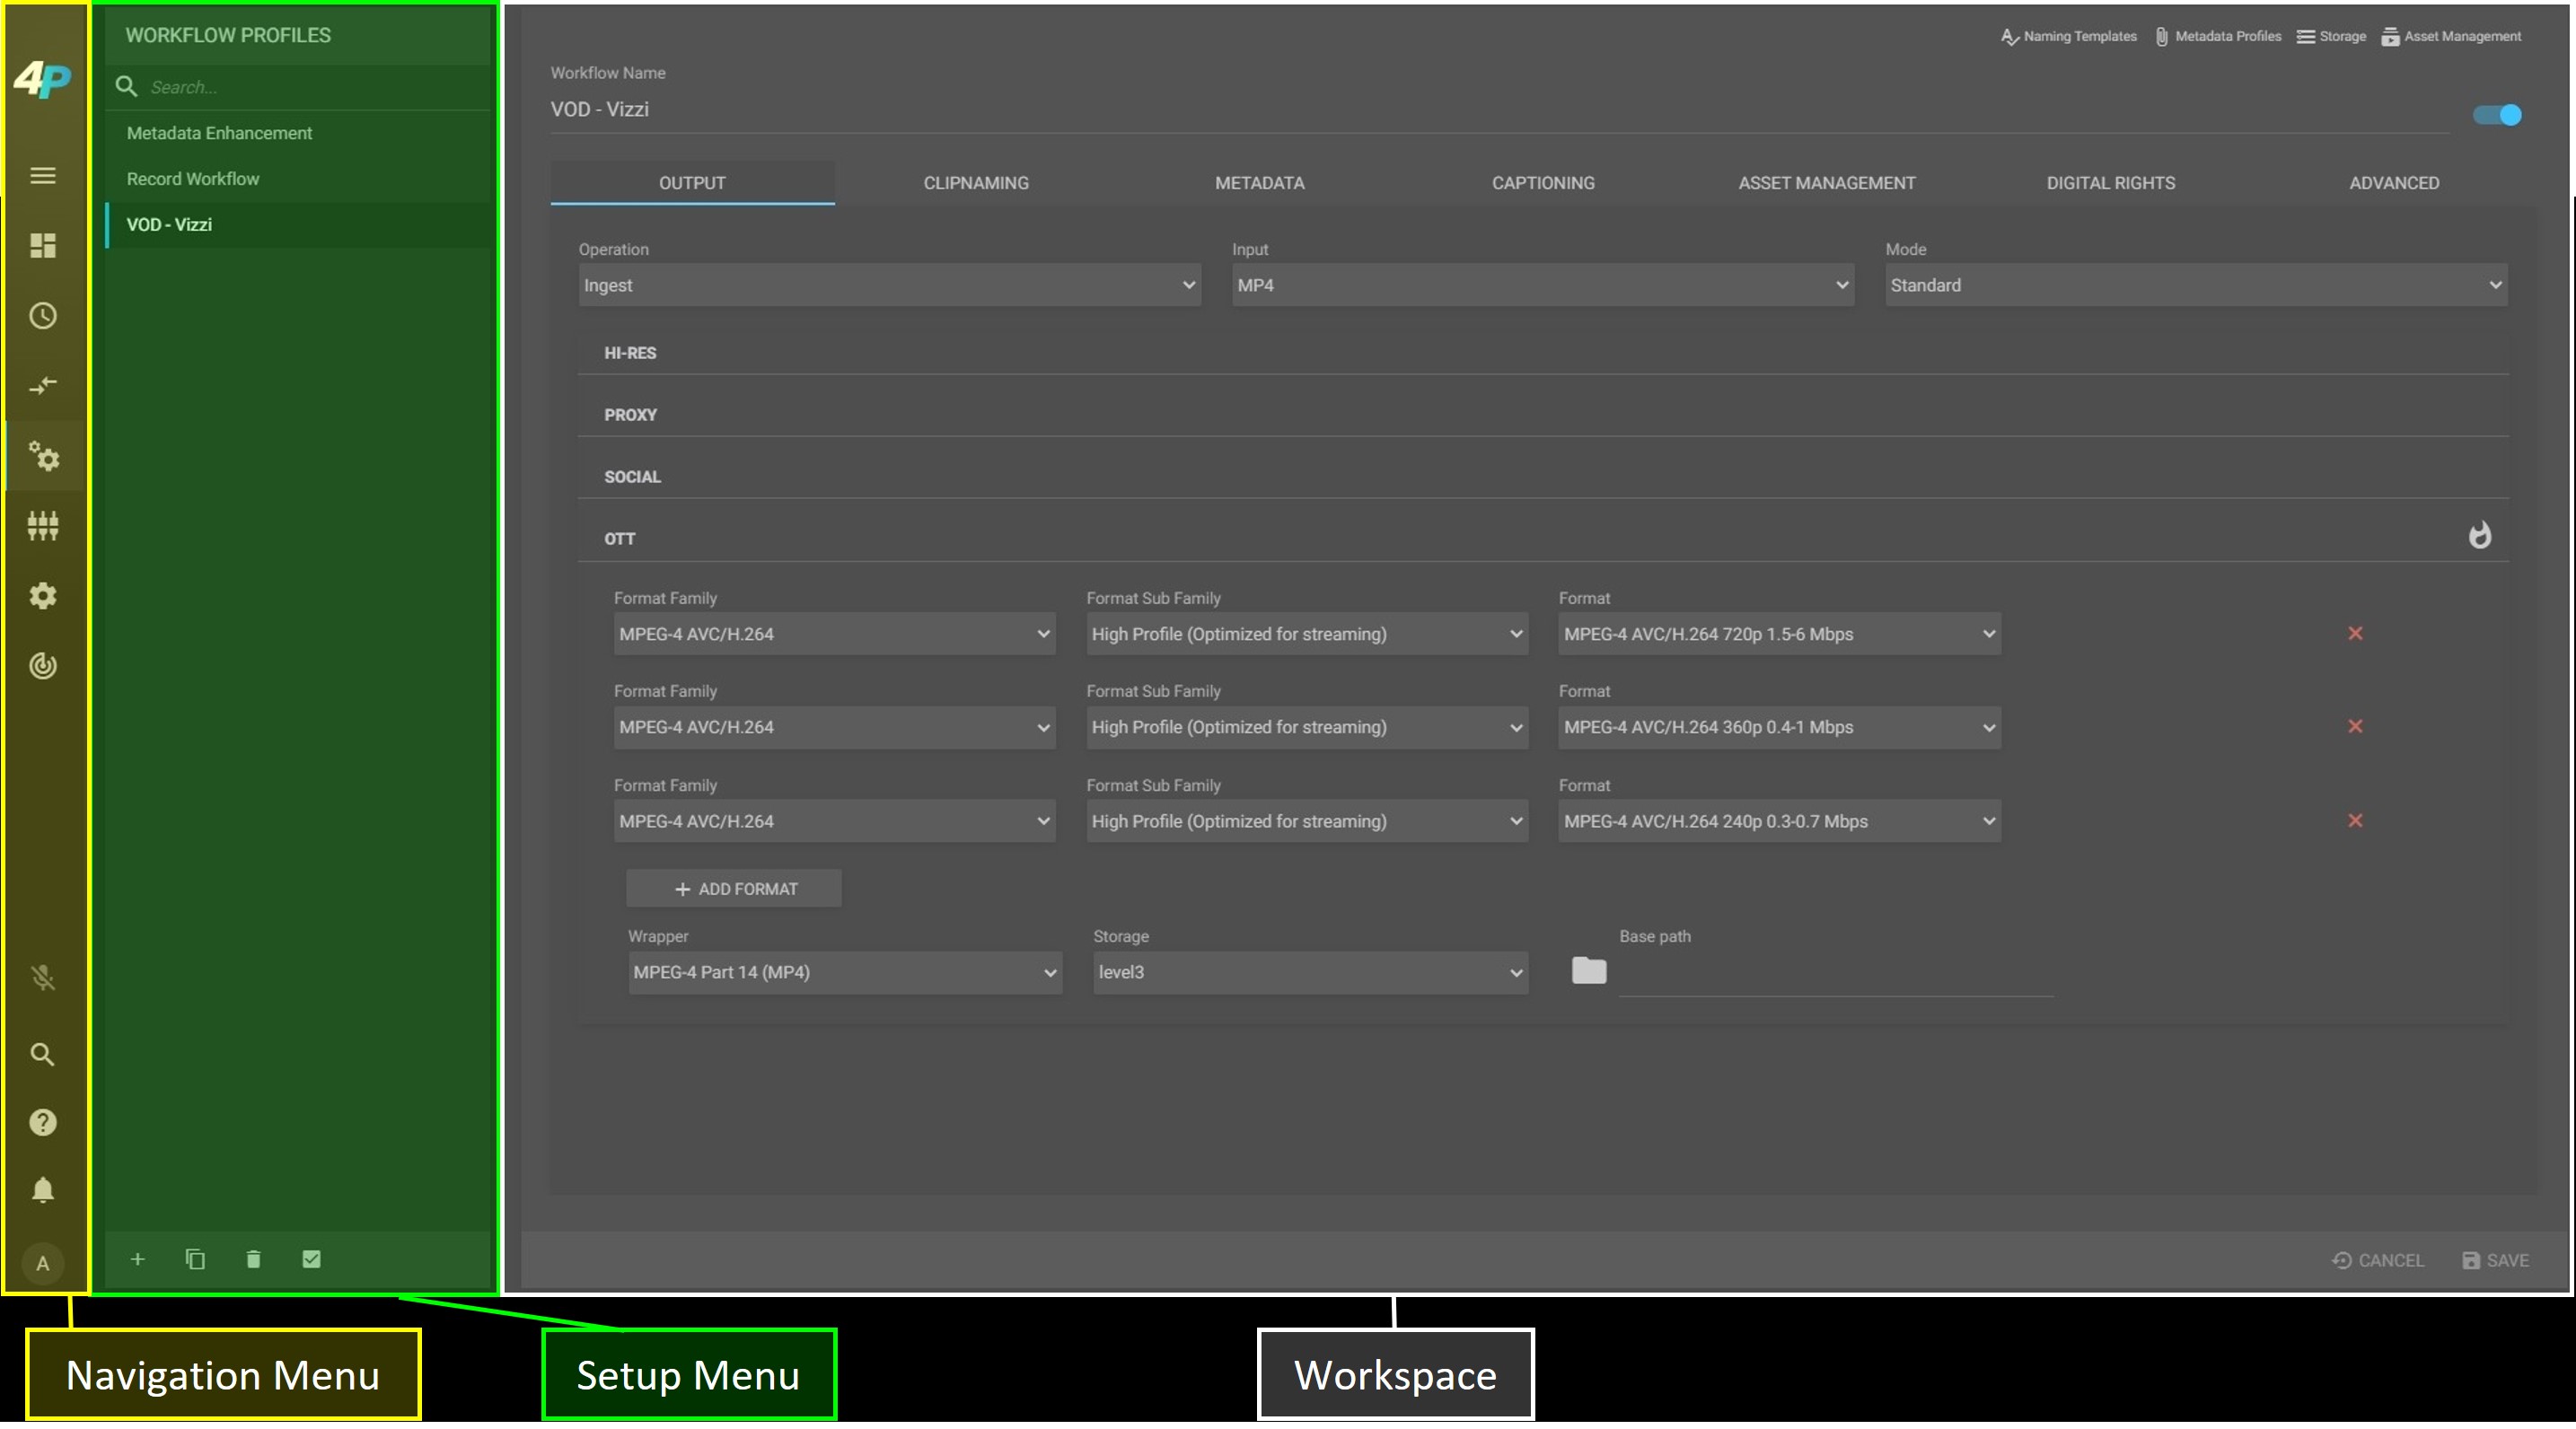
In general, is divided into 3 main sections:
- Navigation menu: enables navigation between the different modules of MAM4PRO, allowing you to quickly navigate from one tab to another;
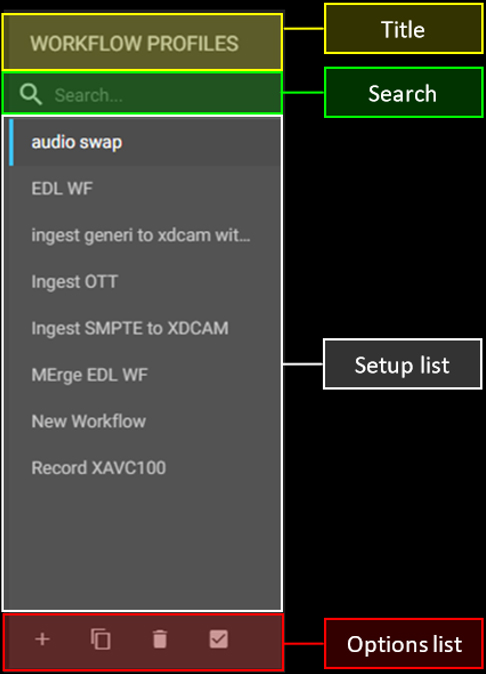
- Setup menu: shows the currently displayed page title; a search field for items created in this menu; a list of items added and a bottom bar with options for adding, duplicating, deleting, and selecting or deselecting all;
- Workspace: displays content and the settings of the selected menu. All configurations are performed in this area
The Dashboard, Scheduler, and Environment’s menus have different sections from those shown above and will be detailed in their chapters.
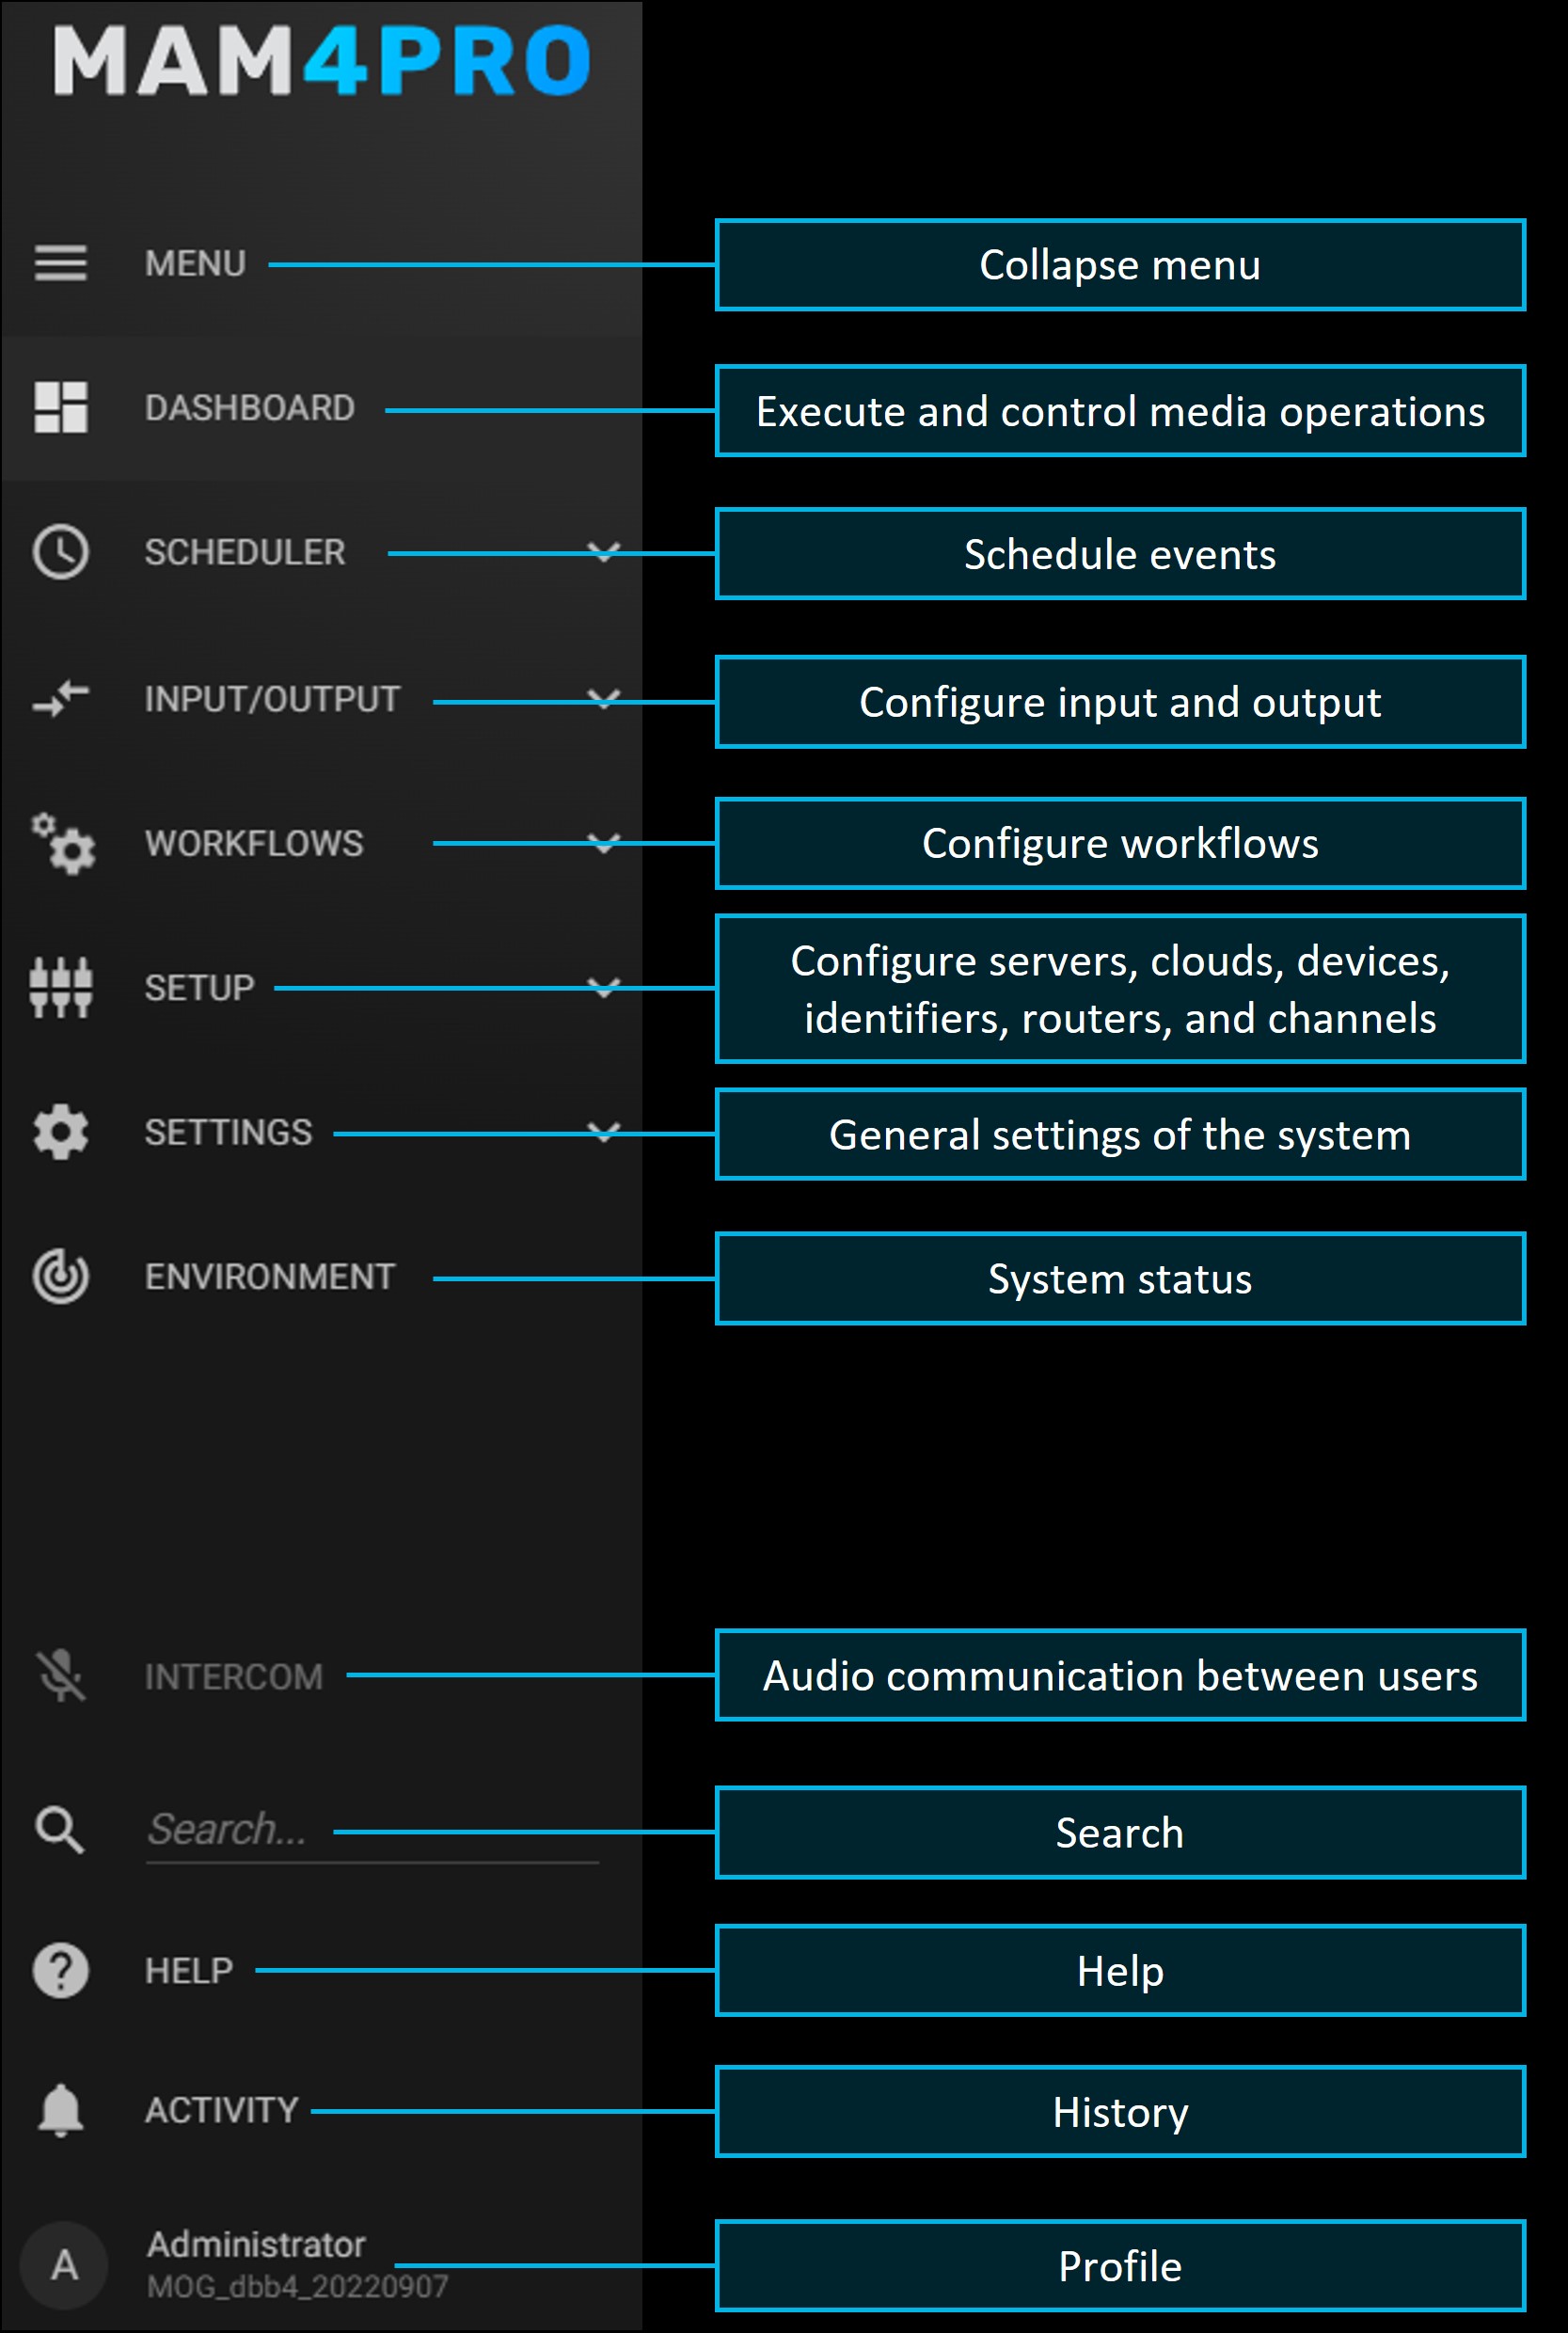
¶ Navigation Menu
Navigate through all pages.
¶ Collapse Menu
By clicking on this menu, the navigation menu will open with all the MAM4PRO modules.
¶ InterCOM
InterCOM is a stand-alone system that allows communication between all users who are associated with the same core without the need for integration with third-party tools.
Before start using this tool from an external browser, you need to configure Chrome to allow access to your microphone. To do this, follow the instructions below:
- In Chrome, go to the URL “chrome://flags”;
- Search for "Insecure origins treated as secure";
- On that option enter the IP address where MAM4PRO is installed or the URL if you are using an ingress server (page Ingress);
- After inserting the IP / URL click on the "Relaunch" option at the bottom of the page so that the browser can reload and update the flags;
Example:

- Once the browser is reloaded, please insert theMAM4PRO IP address or the URL in the browser;
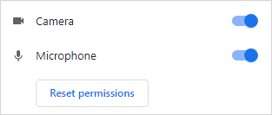
As soon as you connect to the MAM4PRO server a pop-up will be shown requesting permission to access the microphone. Click on the microphone toggle to grant access;
-
Once this is done, head over to MAM4PRO and login. You will notice on the left side menu bar that the InterCOM option is now highlighted:

There are two ways to start using the interCOM:
- Push-to-talk: in this mode, each user will speak while holding the left mouse button pressed on the interCOM icon or the F2 key on the keyboard;
- Toggle: in this mode, the communication will be opened when executing the start command and will remain open until receiving the stop command. To start/stop communication in this mode, short-click the left mouse button on the interCOM icon or press the F2 key on the keyboard once.
The different interCOM statuses can be:
 Listening / muted: the system is ready to speak and is actively listening;
 Listening / muted: the system is actively listening;
 Speaking: the communication is activated and the user is speaking;
 Listening: the communication is activated and the user is listening;
 Connected / mic off: the system is connected but the user has no browser permission to speak.
Notes:
- When using the interCOM in push-to-talk mode, it is not possible to speak and listen simultaneously;
- It is possible to access the interCOM web app by scanning the QR Code that is present in the users' settings, in the "Web app links" section. When scanning the QR Code, the Chrome browser will open, and the login will be performed automatically.
To configure which users will have access to interCOM, see the Permissions page.
¶ Web App
InterCOM is also available as a Web APP and in the same way, it will allow communication between all users who are associated with the same core without the need for integration with third-party tools.
InterCOM content can be accessed using the Chrome web browser or using a shortcut icon on the work user environment or on your smartphone.
¶ How to Create a Web App on Windows PC
Accessing from the Chrome, enter the URL http://#######/interCOM/index.html in the Web browser replacing “#######” with the hostname or IP of the machine and click on the 3 dots in the upper right corner.
A few options are shown, head over to the “More Tools” option and afterward click on the “Create shortcut…” option.
A Create shortcut pop-up will be displayed, give it a name, or live the default name (interCOM).
Make sure that the option “Open as window” is enabled.
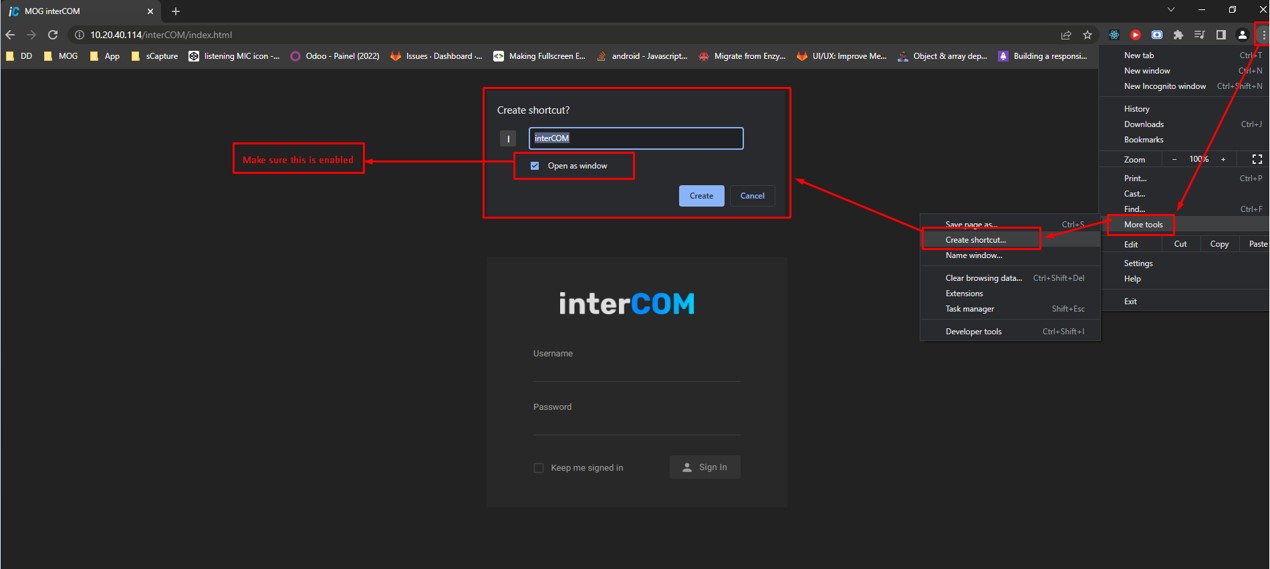
At this point, you will be able to access the shortcut and open the application directly from the desktop. If more convenient, add the created shortcut to the Start menu.
![]()
¶ Starting the Web App
By double-clicking on the web app Icon, you will have access to the login screen, where you can enter your credentials, which are the same as those of MAM4PRO.
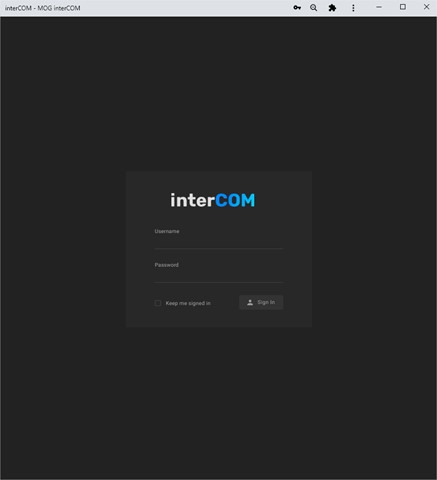
For ease of use, you can click on the “Keep me signed in” option so that every time you open the web application you do not need to insert your credentials and go directly to the interCOM.
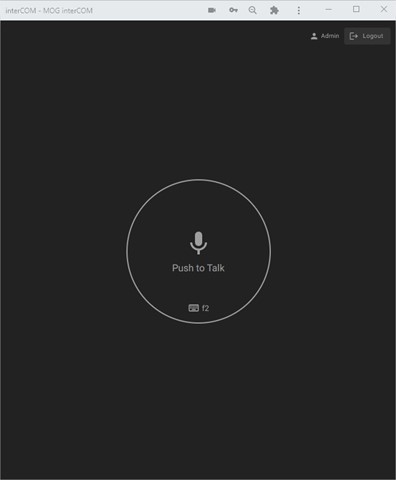
Once opened, it will look like the image below. For faster use, you can resize the window and place it in a corner of the screen.
Notes:
- As mentioned, since this is a push-to-talk system, you will have to keep pressing the "Push to talk" button while talking. A red circle will be highlighted to let you know you can speak;
- If the web app was created on an Android phone/tablet or a PC with a touch screen function, the usage is a little different as you don't have to keep pressing the button, just tap once to talk;
- It is possible to access the interCOM web app by scanning the QR Code that is present in the users' settings, in the "Web app links" section (page Adding Users). When scanning the QR Code, the Chrome browser will open, and the login will be performed automatically.
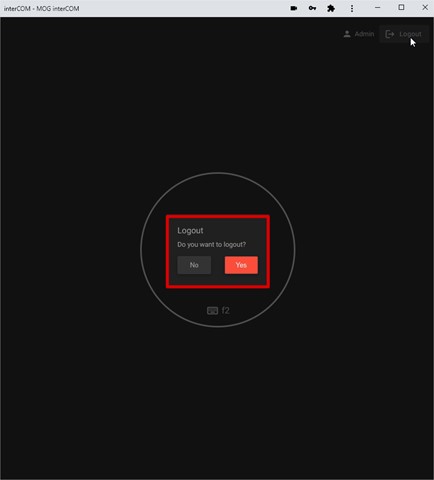
When you want to exit the application, just click the “Logout” button.
¶ How to Create the Web App for Android Devices
The process of creating the web application on Android is similar to creating it on a Windows PC.
Accessing from the Chrome, enter the URL http://#######/interCOM/index.html in the web browser replacing “#######” with the hostname or IP of the machine and click on the 3 dots in the upper right corner.
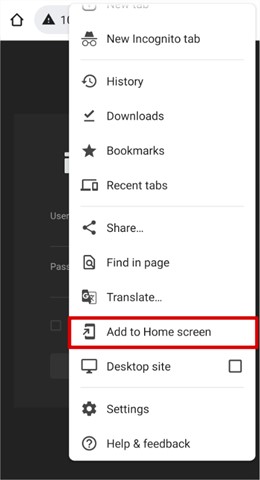
A few options are shown, head over to the “Add to Home screen” option and click on it.
A pop-up box will appear where you can enter the web app name and add it to your home screen.
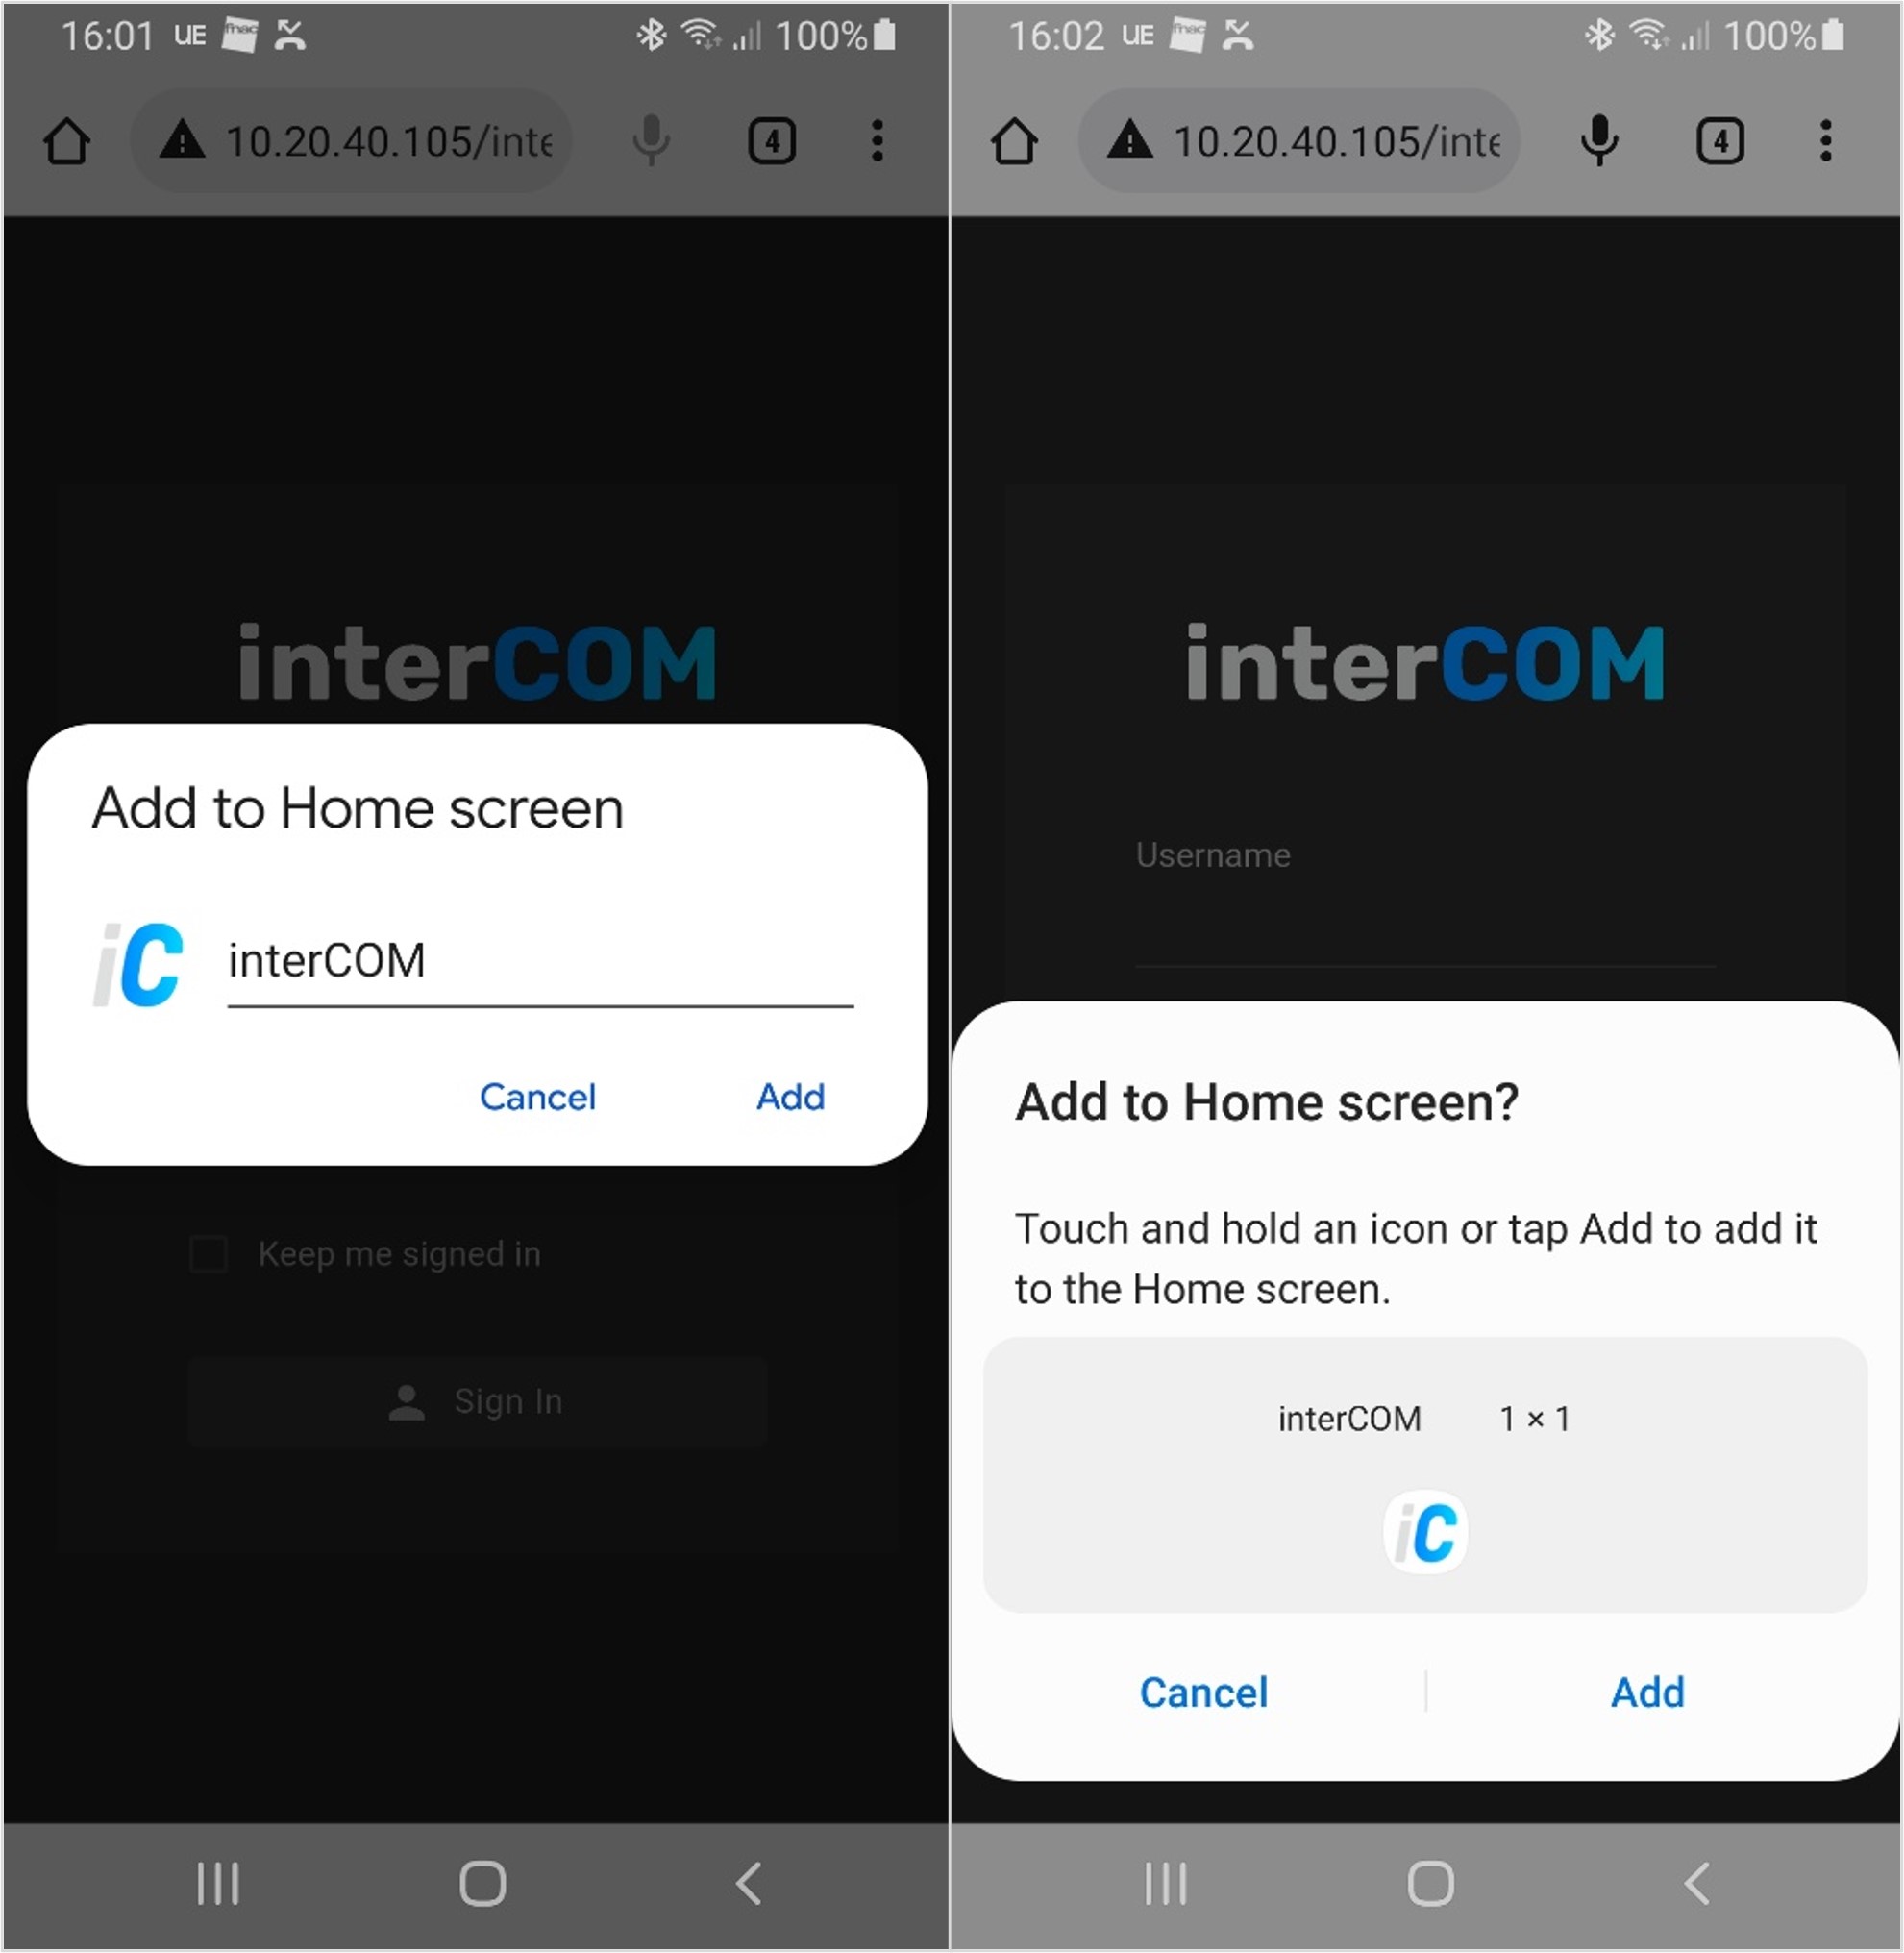
You now be able to click on the InterCOM icon and start the application:
![]()
Below is an example of the app in idle, while talking, and while listening modes.
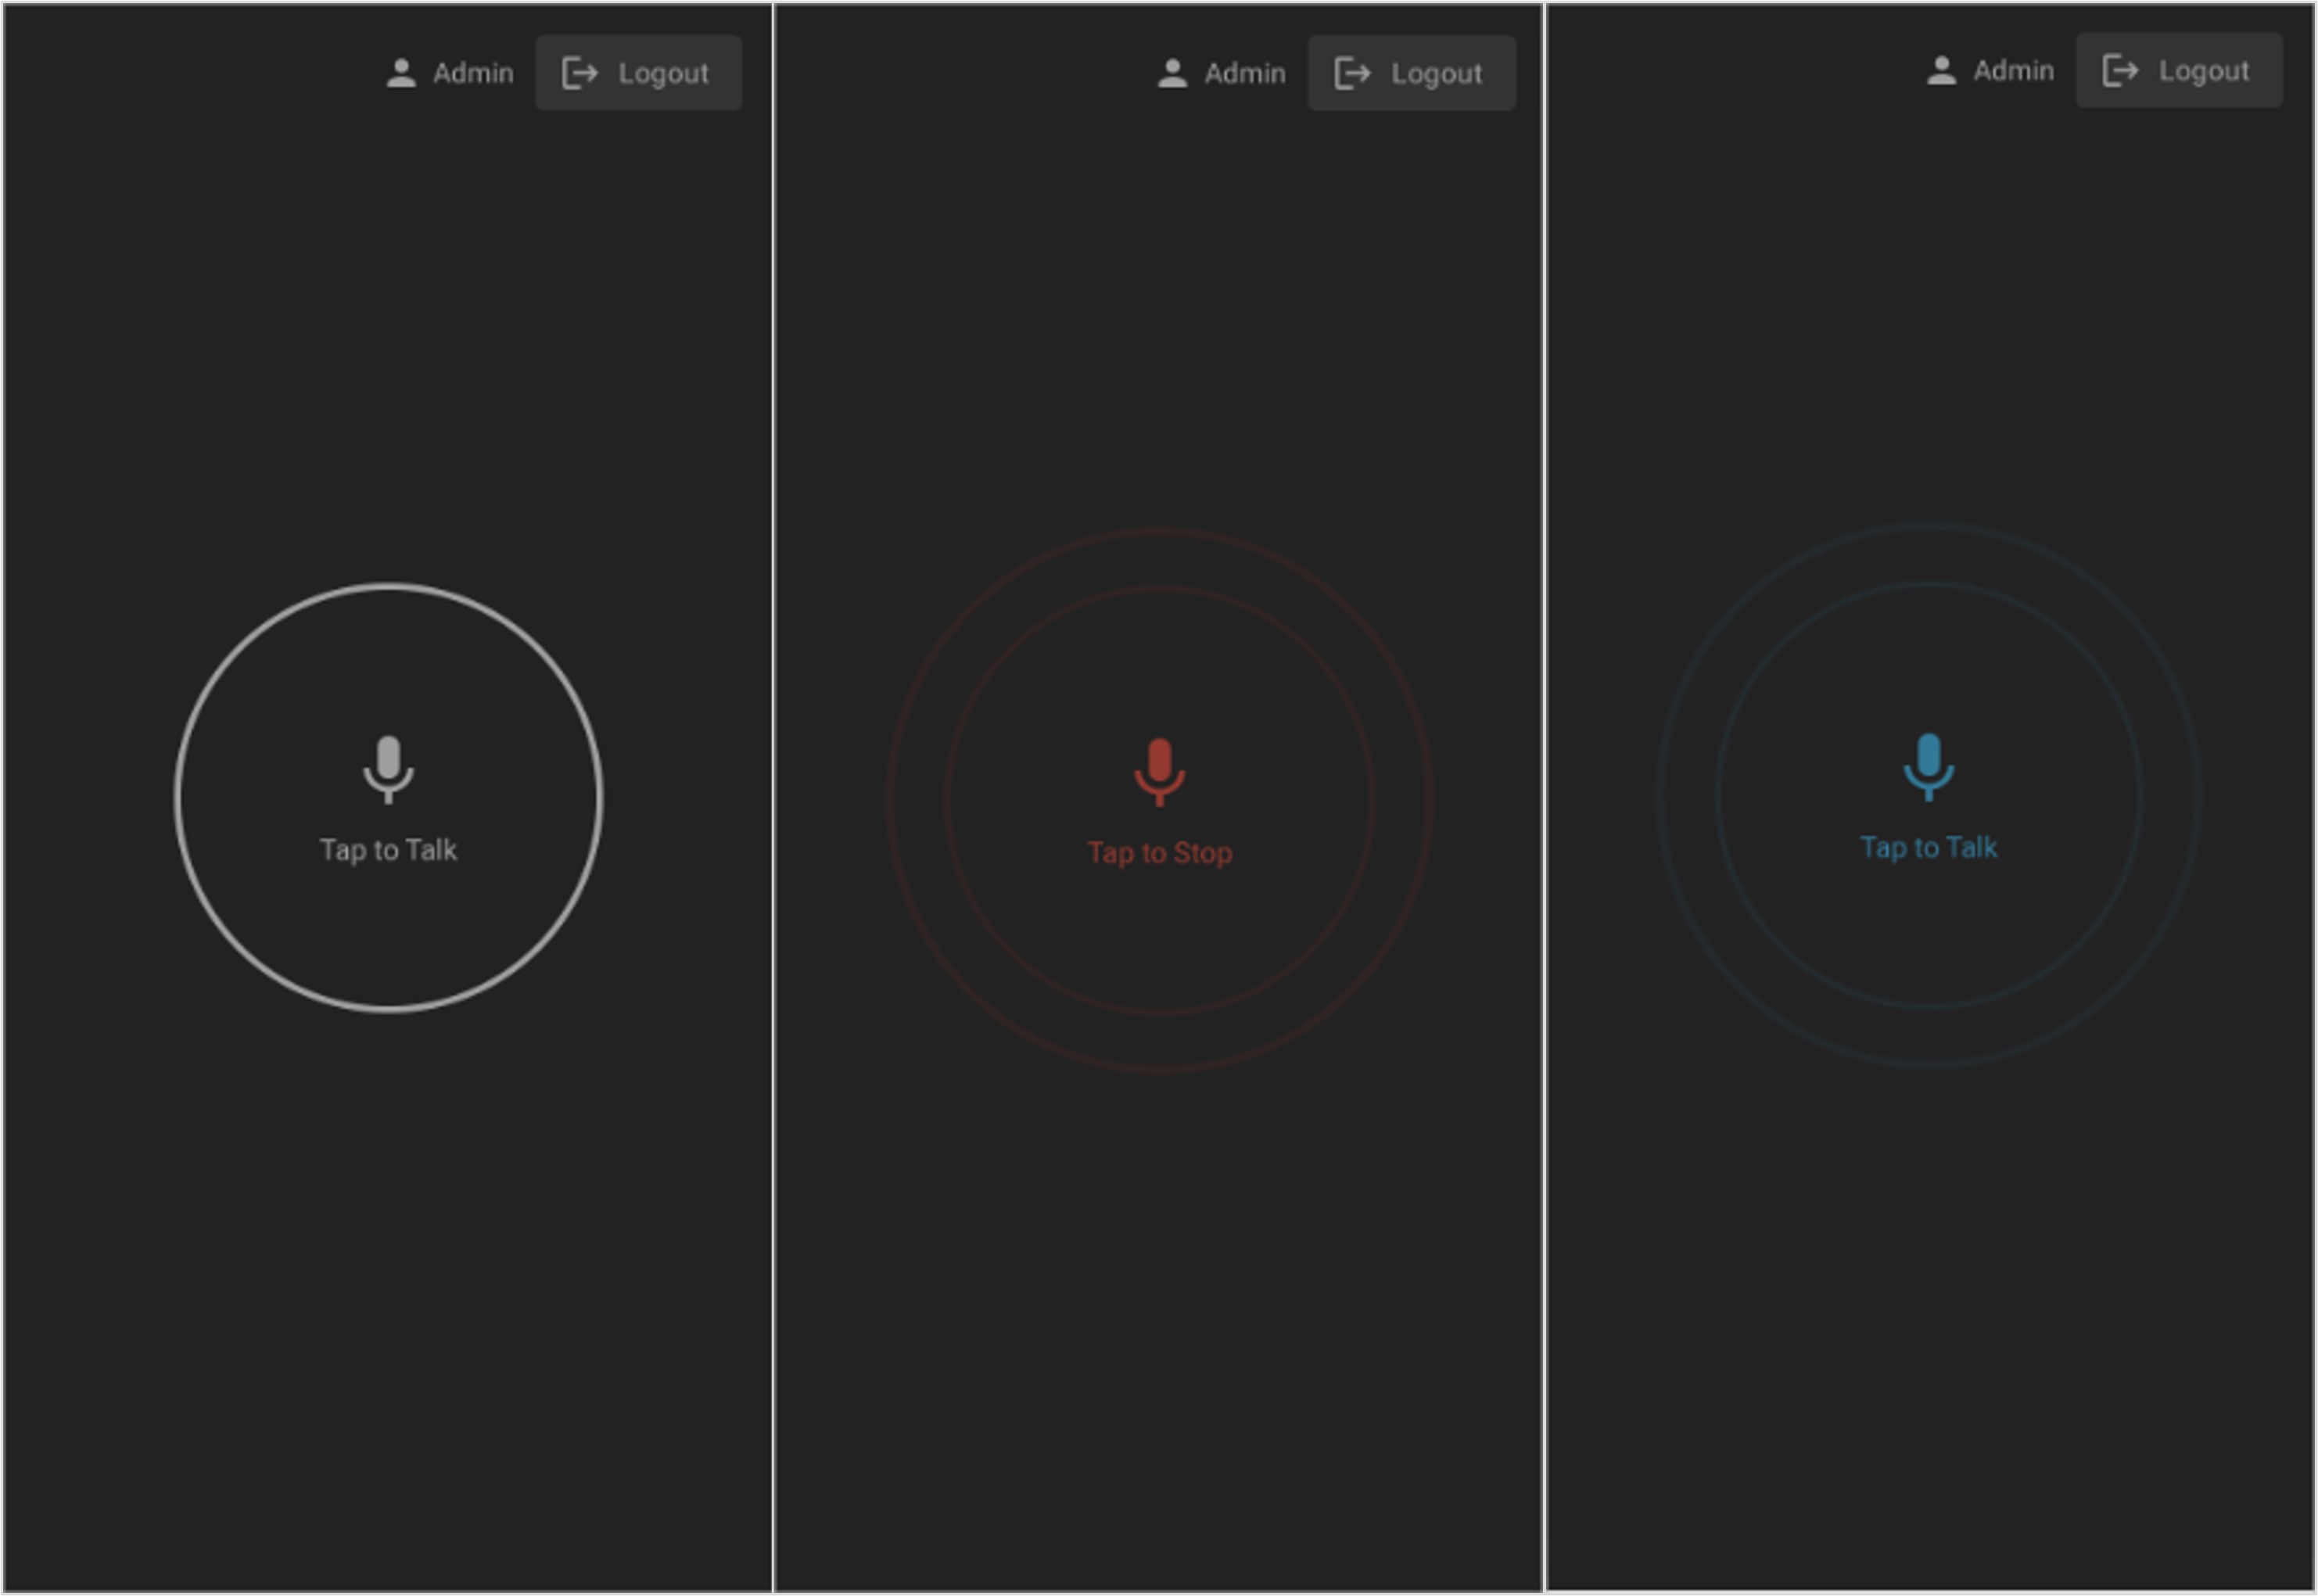
Notes:
- As mentioned above, when working with the web app on an Android smartphone, tablet, or a PC with a touch screen, the message will be “Tap to...” as opposed to the Windows app displaying the message “Push to...”;
- It is possible to access the interCOM web app by scanning the QR Code that is present in the users' settings, in the "Web app links" section (chapter X). When scanning the QR Code, the Chrome browser will open, and the login will be performed automatically.
¶ Configuration Files
The appplication content will be in “C:\Program Files\MOG\MAM4PRO\mCore\www_mSRv3\WebSite\interCOM\configs\”.
You will have access to the settings in the “configs.json” file. The options are:
- Hostname: allows including a different hostname where interCOM will connect to;
- Use ingress: ingress exposes HTTP and HTTPS routes from outside the cluster to services inside the cluster;
- Rest URL port: rest port setting to connect to;
- Shortcut: name and shortcut key setting.

Note: for use with the MAM4PRO ingress server you will have to change the “useIngress” option to “true” and enable the possibility to ingress/listen for HTTP (port 80) and HTTPS (port 443) requests.
For more information consult the chapter “Ingress”.
¶ Search
The search field allows you to search for any of MAM4PRO’s configuration tabs and quickly navigate to them.
¶ Help
The “Help” tab presents a few helpful sub-tabs for helping on how to use MAM4PRO.
The first component, which is common to all tabs, is the “Go to” text box. This field works the same way as the “Search” field present on the navigation menu (chapter “Search”).
There are three ways of closing the help menu:
- Click on the close button on the top right corner;
- Press on the “Esc” key;
- On the search tab, type the name of a menu you wish to go to. Select one of the options resulting from the term entered and you will be redirected to the chosen menu.
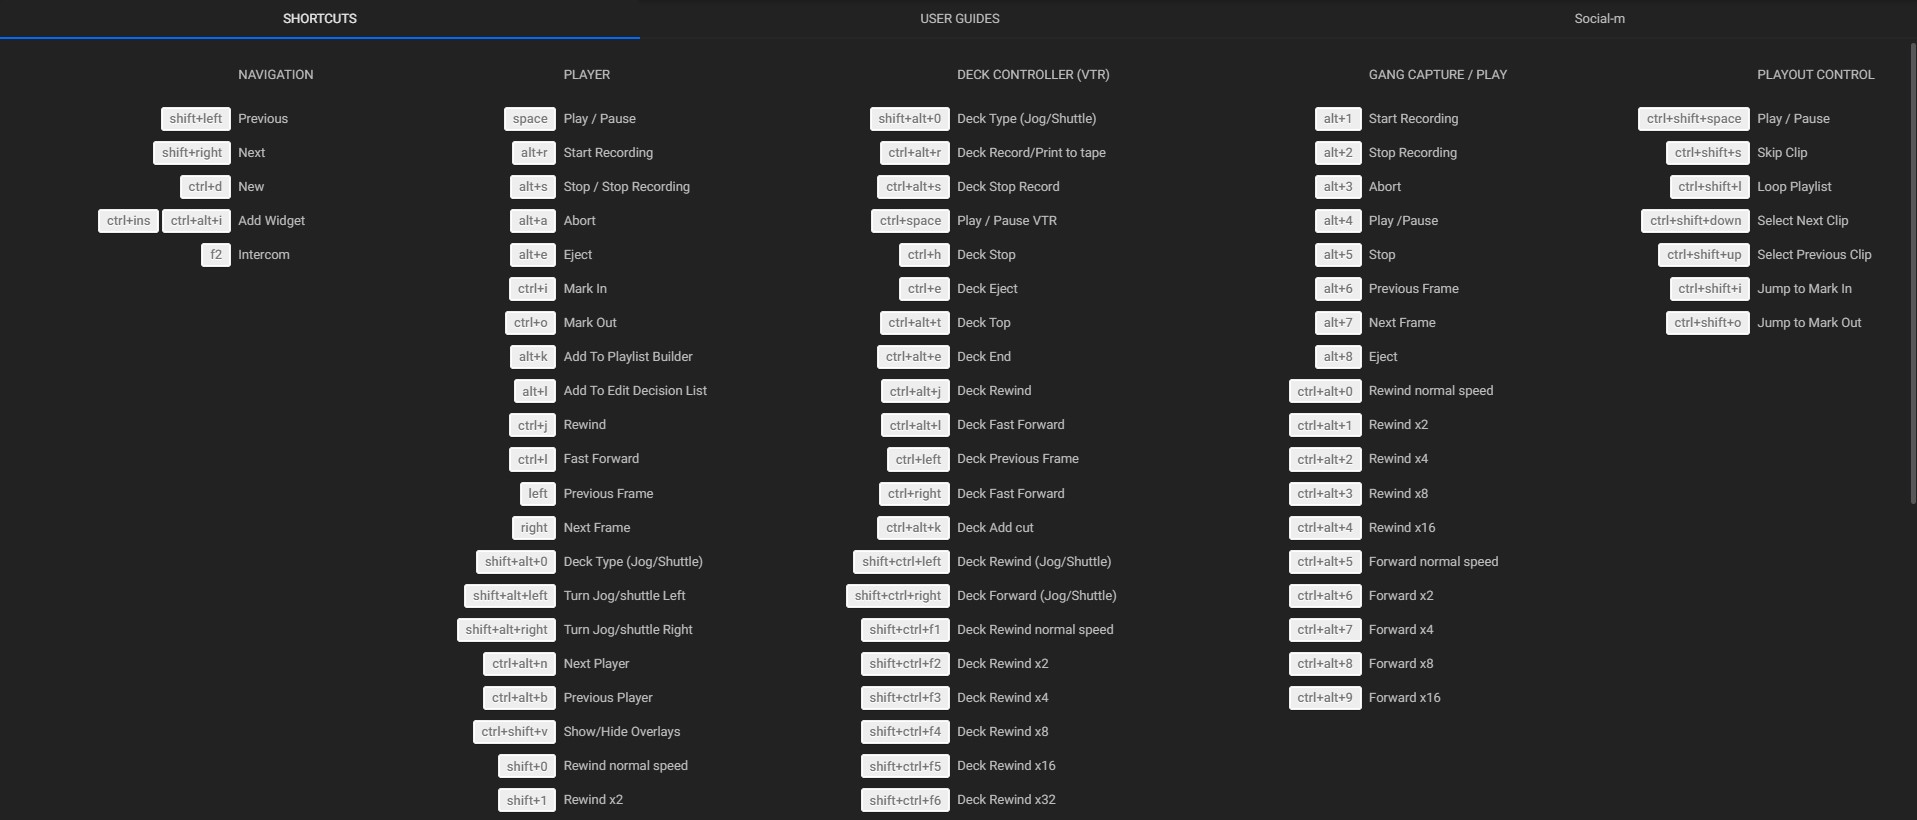
¶ Shortcuts
The first tab presents a guide with the MAM4PRO shortcuts that can be used to perform quick actions. This tab shows different shortcuts depending on the module you are currently on.
Tip: you can use these shortcuts to set up a shuttle to easily operate the MAM4PRO (see chapter “Integrating with Shuttle Device”).
¶ Check Out the User Guides
On the “User Guides” tab, the user can check a tour through MAM4PRO or review some useful resources.
The available options are:
- Launch current tour: launches a tour on the menu that you are currently in;
- Check all tours: shows the available tours, as well, like the ones that were already completed;
- User manual: you can view the user manual in a new tab by clicking the “View”
 button.
¶ Install the Social-m Plugin
The Social-m plugin helps to ingest media from social media.
This plugin is offered as an option for the following products: mDECK Grand io, mDECK Grand av, mDECK Grand rp, mDECK Grand dn, mDECK Solid io, mDECK Densu io, mCODER Grand s, mCODER Grand av, mCODER Densu s2, mCODER software, MAM4PRO, and 4PRO mediaMOVE
Install the plugin accessing the “Help” menu, then the “Social-m” tab, and click the “Download” button to extract the files to a folder of your choice.
Access Google Chrome, put in the Chrome address bar: “chrome://extensions”. In the upper right corner activate “Developer Mode”:

In the upper left corner, click on “Load Unpacked”, point to the previously extracted folder:
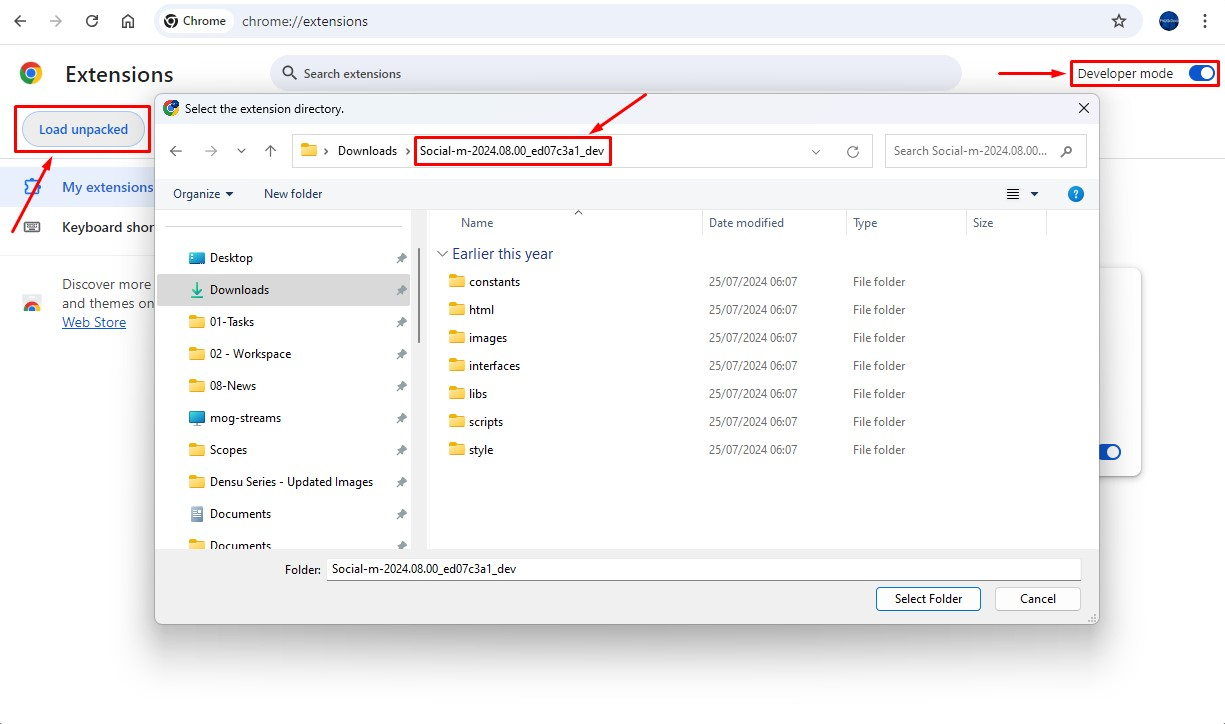
Finally, in the Chrome address bar the extension will be visible:
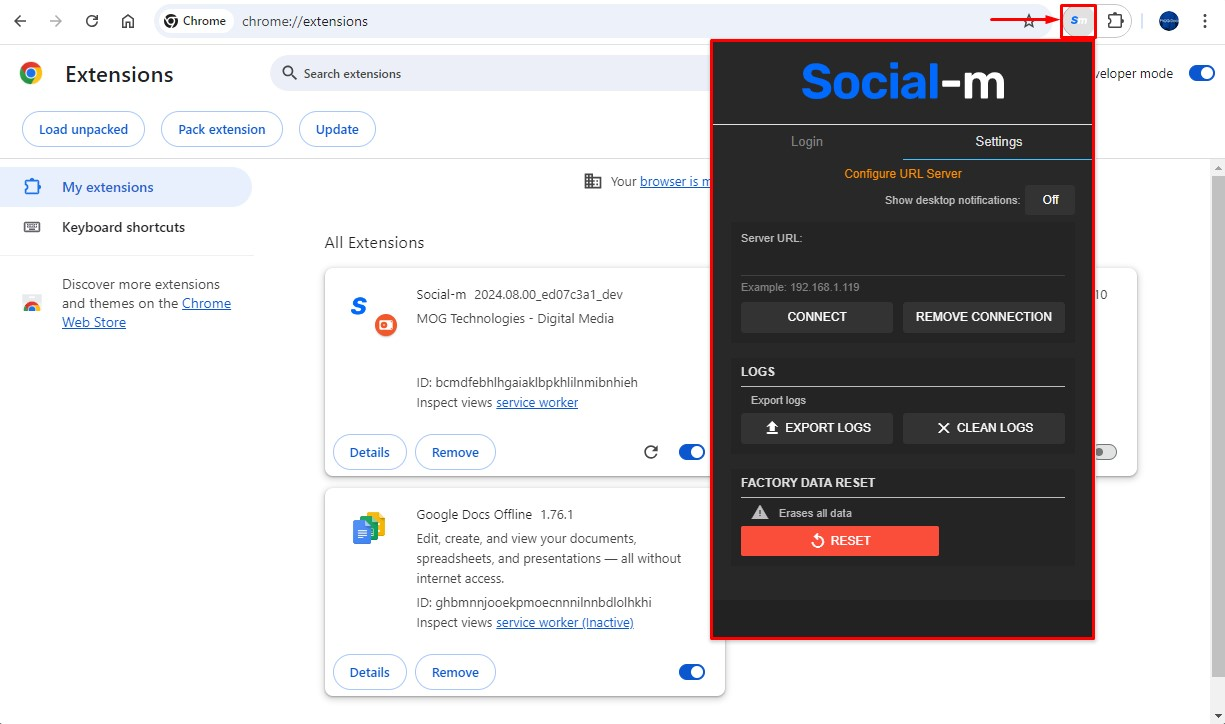
Note: the plugin only becomes useful and functional if we can connect it to an existing MAM4PRO, for that, it is necessary that the machine where the plugin is installed be able to connect, through the IP address, to the host machine where the MAM4PRO is running.
For more information on how to operate the Social-m plugin, please check chapter “Setting Up the Media Social Plugin”.
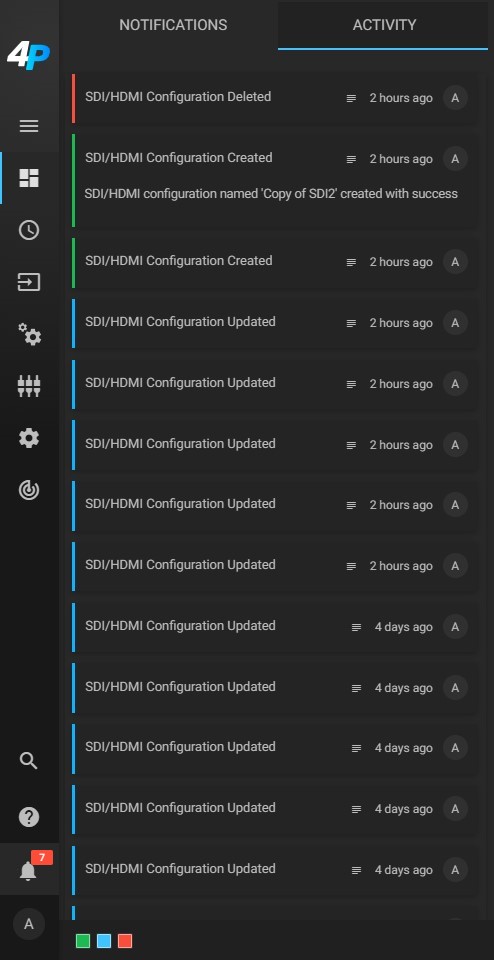
¶ Activity
The “Activity Menu” presents a quick view of all system’s notifications and actions.
-
The “Notifications” tab shows the latest info, warnings, and errors given by the system.
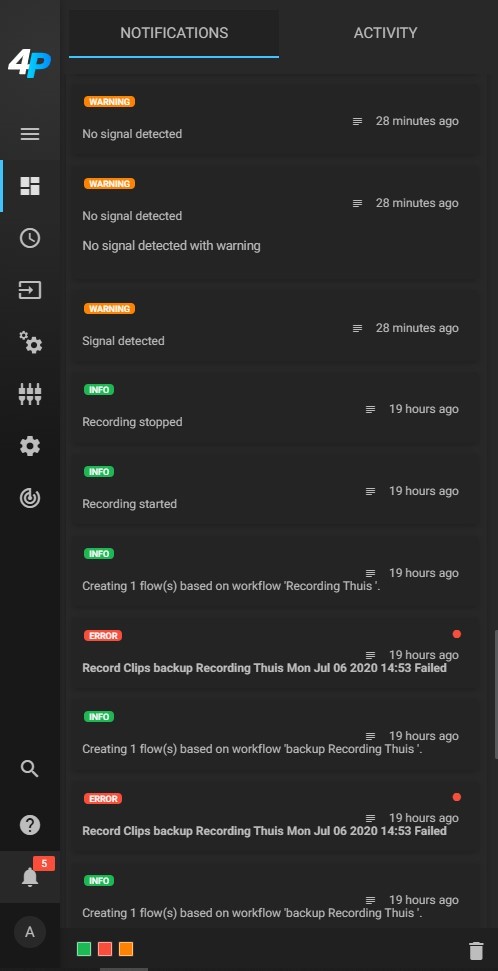
In the lower-left corner, you can select the types of notifications you want to view by selecting the colors corresponding to each type of notification. They are Green for information, Red for error, and Orange for warning.
To delete all the notifications, click the “Delete All” button, in the lower right corner of the screen.
Note: a warning message may appear during recording, signaling that the capture started or ended out of sync with frame XX:XX:XX:XX (XXXXXXXX) while the expected frame was XXXXXXXX. This warning arises when the players in the user interface fall behind the “live” stream edge. Consequently, when the capture is started or completed, the frame designated as reference is already beyond the channel’s cache.
This is most noticeable when the VU meter is visible but can also occur when other player elements from the player are displayed. This warning is an alert message to inform users of synchronization misalignment, ensuring they are aware of potential issues during the capture thus requiring appropriate adjustments or interventions.
-
The “Activity” tab shows the latest actions executed on MAM4PRO. These actions can be “Create”, “Update”, and “Delete” and are represented in green, blue, and red respectively.
In the lower-left corner, you can select the types of notifications you want to view by selecting the colors corresponding to each type of action.
In each record, you can check the action performed, how long ago it was performed and the user who performed it. For more details, just click on the desired record.
¶ User
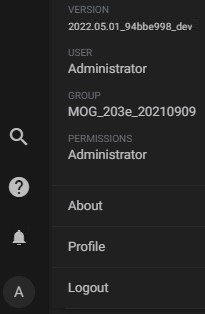
The User options open a pop-up with information / options about the current user profile and the MAM4PRO system.
-
Version: shows current MAM4PRO version;
-
User: shows current user profile name;
-
Group: shows current instance group mounted by a fixed “MOG” tag, a random four-digit alphanumeric combination, and the day the group was created;
-
Permissions: shows the current user’s permissions;
-
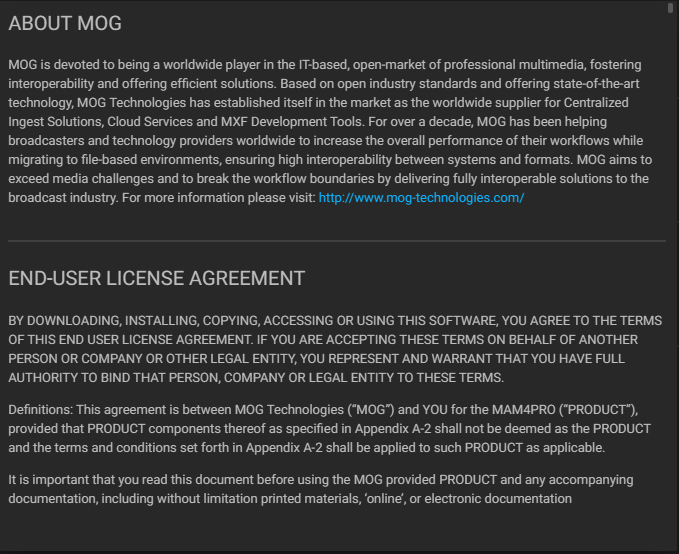
About: opens a pop-up with information about MOG, MAM4PRO, End-user license agreement, and some other external components;
-
Profile: opens the “Users” configuration window. Please refer to the “Adding Users” chapter for more information;
-
Logout: logs the current user out of MAM4PRO.
¶ Setup Menu
This section is common to most MAM4PRO modules, except for the Dashboard, Scheduler, and Environment that have their layouts and will be detailed in their chapters.
-
Title: identifies the module on which you are working;
-
Search: enter a text to search items. The fields searched will vary by modules;
-
Setup list: displays the items created in the queried module;
-
Options list: list of options to create, duplicate, delete, deselect or select all as detailed below:
 Add: click to add a new item;
 Duplicate: click to duplicate the selected item;
 Delete: click to delete the selected item;
 Deselect All: click to uncheck all items in the list (if this button is selected the "Select All" button will appear in its place);
 Select All: click to select all items in the list (if this button is selected the "Deselect All" button will appear in its place);
 Impersonation: click to view the system from the perspective of any other account. Please check the Users Navigation page to know how it works.
Tip: to select more than one random item, hold down the “CTRL” key on your keyboard and select the desired items. Or to select consecutive items, click on the first item, keep the keyboard “SHIFT” key selected and select the last item.
¶ Workspace
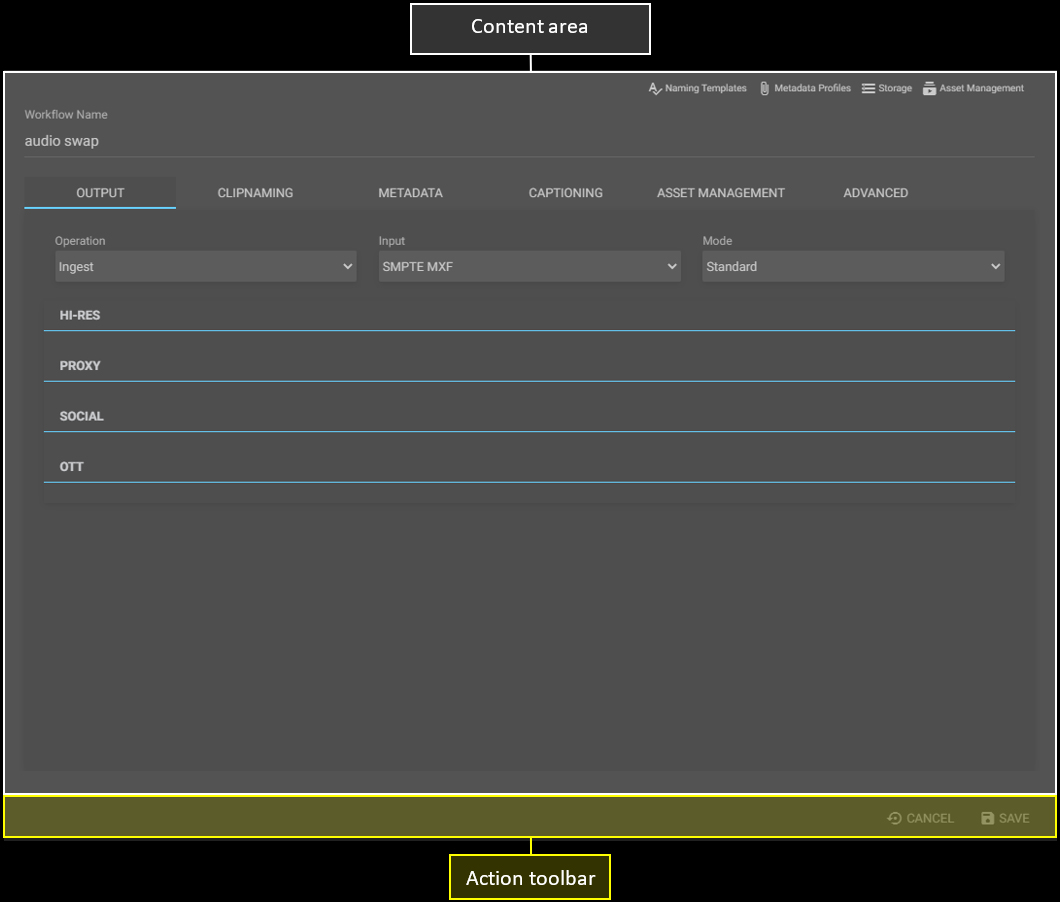
Except for the Dashboard, Scheduler, and Environment menus the Workspace session is split into two. They are “Content Area” and “Action Toolbar”.
¶ Content Area
The content area will display all the contents of the item consulted, as well as the fields for setting it.
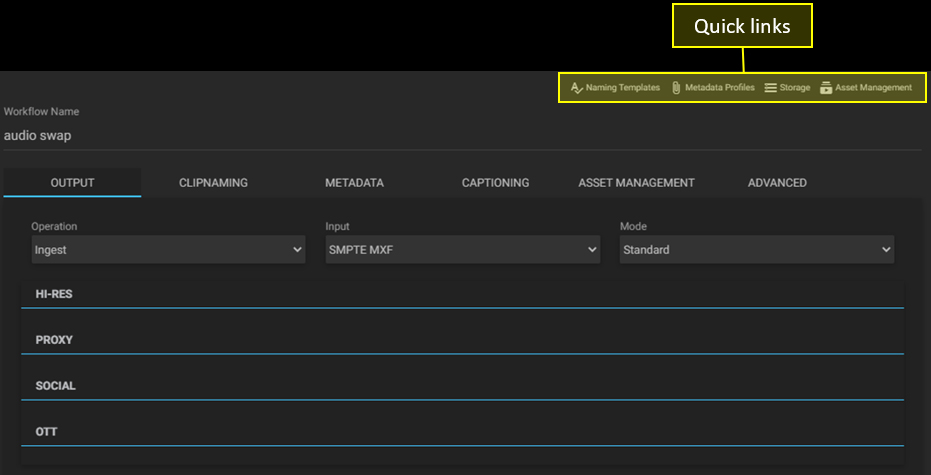
In some modules, a section with quick links is available in the upper right part of the Content area to access other modules whose information will be used to configure the current item.
Just click on a quick link to change the module.
¶ Action Toolbar
The Action toolbar contains the “Cancel”  and “Save”
  buttons which allow you to cancel the changes made to the queried item and save the changes made, respectively.
Tips:
- While there are no changes to the item consulted, the “not allowed” symbol
will appear when hovering over the “Cancel” and “Save” buttons;
- After changing any item’s configuration, two yellow bars will appear. One at the top of the Workspace and one on the Setup list, on the left side of the changed item.
